
Draping lights along a staircase railing transforms an ordinary space into something magical. Whether it’s for holiday decor, a wedding setup, or simply adding ambiance to your home, string lights can elevate the atmosphere instantly. But achieving that smooth, continuous flow of light—without unsightly gaps or uneven spacing—is more challenging than it appears. Done poorly, lights can sag, twist, or even pose safety hazards. When done right, they appear as if professionally installed: elegant, consistent, and secure.
The key isn’t just in the placement—it’s in preparation, technique, and attention to detail. This guide walks through every stage of the process, from selecting the right lights to securing them safely and evenly across multiple levels of railing. No guesswork, no frustration—just practical methods that deliver results.
Selecting the Right Type of Lights
Not all string lights are created equal when it comes to draping over railings. The length, bulb spacing, durability, and power source all influence how well they’ll perform on a staircase.
For staircases, opt for lights with shorter intervals between bulbs—typically 6 to 12 inches apart. This minimizes the risk of visible dark spots, especially on curved or multi-level railings. LED lights are preferred due to their low heat output, energy efficiency, and longer lifespan. They’re also lighter, reducing strain on mounting points.
Consider whether you want plug-in or battery-powered options. Plug-in strings offer uninterrupted runtime but require access to an outlet at the base or top of the stairs. Battery-operated sets provide flexibility but may need frequent replacements during extended use.
Essential Tools and Materials
Before beginning installation, gather the following supplies:
- String lights (measured to exceed total railing length by 25%)
- Clear plastic cable ties or twist ties
- Adhesive-backed hooks (rated for outdoor/indoor use)
- Measuring tape
- Ladder (stable and appropriate height)
- Gloves (for handling lights and hardware)
- Extension cord (if needed, UL-listed for indoor/outdoor use)
Using the correct fasteners is critical. Avoid nails, staples, or tape that could damage the railing or create tripping hazards. Instead, rely on non-damaging solutions like adhesive hooks or reusable zip ties that hold firmly without scratching surfaces.
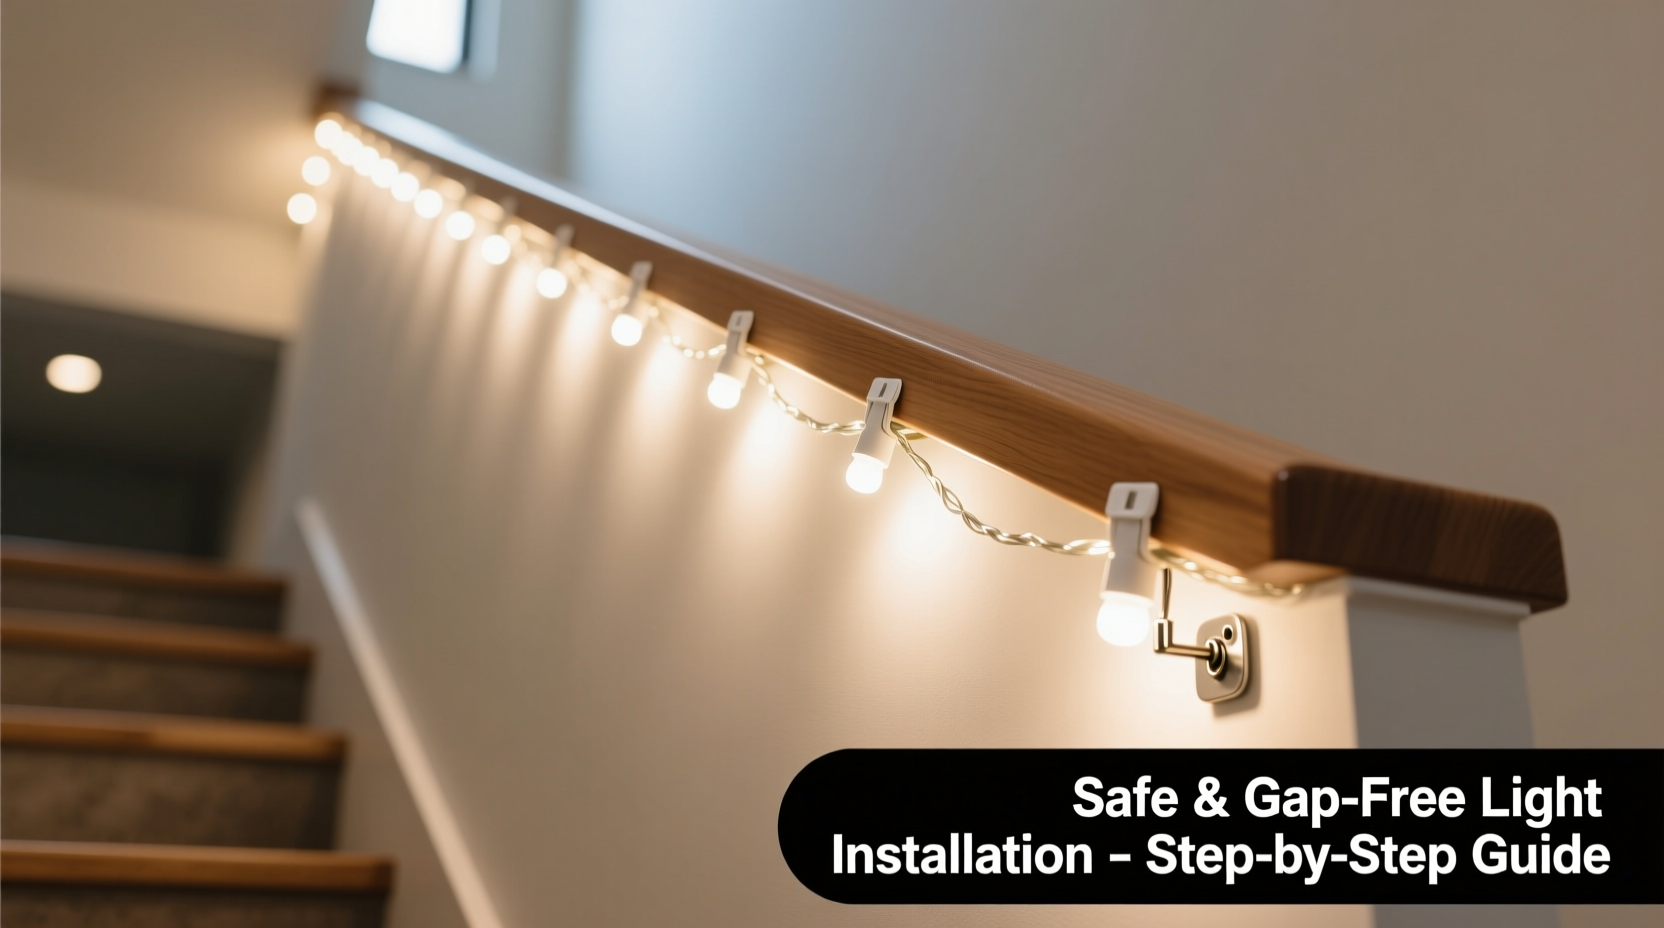
Step-by-Step Installation Guide
Follow this sequence to achieve a seamless, gap-free drape:
- Measure the railing length: Use a flexible measuring tape to trace the full path of the railing, including curves and landings. Multiply this number by 1.25 to ensure excess for looping and adjustments.
- Test the lights: Plug in the strand before installing to confirm all bulbs work and identify any dead sections.
- Plan the layout: Decide whether to run lights along the inside, outside, or both sides of the railing. For visual balance, exterior runs are typically more effective.
- Mark attachment points: Every 8–12 inches, place a small piece of removable tape to indicate where hooks or ties will go. On tight curves, reduce spacing to 6 inches for better control.
- Install support hardware: Attach adhesive hooks or clip mounts at each marked point. Press firmly and allow bonding time per manufacturer instructions (usually 24 hours for maximum strength).
- Begin draping from the power source: Start near the outlet and work upward. Feed the light strand through each hook, maintaining gentle tension—never pull taut.
- Create soft loops: At baluster posts or turns, form slight S-curves or figure-eights around supports to prevent straight-line stretching and hide minor length discrepancies.
- Secure with cable ties: Once positioned, fasten each loop with a clear zip tie. Trim excess carefully to avoid sharp edges.
- Conceal cords and connections: Route extension cords along baseboards or under rugs using cord covers. Never leave loose wires across walkways.
- Final inspection: Walk the staircase and view from multiple angles. Adjust any twisted sections or overly tight spans.
This method ensures continuity of light while minimizing stress on both the fixture and structure.
Do’s and Don’ts: A Quick Reference Table
| Do’s | Don’ts |
|---|---|
| Use lights with bulb spacing under 12 inches | Use old or frayed strands with exposed wiring |
| Install adhesive hooks 24 hours before hanging lights | Mount hardware directly onto painted wood without prep |
| Leave slack at corners for natural draping | Pull lights tightly to eliminate sagging |
| Check local electrical codes for load limits | Daisy-chain more than three strands unless rated for it |
| Inspect monthly for wear, especially outdoors | Ignore flickering bulbs or intermittent connections |
Following these guidelines protects both aesthetics and safety. Electrical failures often begin with overlooked warning signs like inconsistent lighting or loose plugs.
Avoiding Common Installation Mistakes
Even experienced decorators make errors when rushing staircase lighting projects. One of the most frequent issues is assuming uniform railing geometry. In reality, older homes often have irregular baluster spacing or slight shifts in elevation between floors, which can cause misalignment if not accounted for.
Another common mistake is failing to account for vertical drops. When transitioning from one level to another, many people simply drop the strand straight down, creating a bare spot. Instead, wrap the light around newel posts or use a secondary short strand to bridge the gap seamlessly.
Lastly, overloading circuits remains a serious concern. While individual LED strands draw minimal power, connecting multiple sets increases cumulative demand. Always verify that your circuit can handle the total wattage. As a rule, stay below 80% of the breaker’s capacity—for a standard 15-amp circuit, that means no more than 1,440 watts of connected devices.
“The difference between amateur and professional-looking lighting is in the details: consistent spacing, hidden anchors, and thoughtful routing.” — Daniel Ruiz, Residential Lighting Designer
Real-World Example: Holiday Setup in a Split-Level Home
Sarah Thompson, a homeowner in Portland, Oregon, wanted to decorate her split-level staircase for Christmas. The railing spanned two flights with a half-turn landing, totaling 38 feet. She initially bought two 20-foot strands with 12-inch bulb spacing, expecting them to meet perfectly in the middle.
After installation, she noticed a 6-inch gap near the landing where the ends didn’t quite reach. Additionally, the second flight had slightly wider balusters, causing uneven droop. To fix it, Sarah added a third 10-foot accent strand to cover the junction, weaving it in a zig-zag pattern around the newel post. She then resecured both main strands with additional adhesive clips spaced every 6 inches on the lower section.
The final result was indistinguishable from a custom installation. By accepting that real-world conditions rarely match ideal plans, Sarah adapted her approach mid-project and achieved a flawless finish.
Safety Considerations and Code Compliance
Staircases are high-traffic areas, so safety must be prioritized. All lighting installations should comply with the National Electrical Code (NEC), particularly Article 400 for flexible cords and Article 600 for electric signs and outline lighting.
Indoors, keep cords away from moisture sources like bathrooms or kitchens unless specifically rated for damp locations. Outdoors, use only weatherproof-rated lights and GFCI-protected outlets. Never staple or nail into handrails—this compromises structural integrity and creates shock risks.
If children or pets are present, position lights beyond easy reach. While low-voltage LEDs are generally safe, dangling cords can still tempt pulling or chewing. Mounting components securely and routing cords behind banisters helps mitigate these risks.
Maintenance and Long-Term Care
To preserve appearance and functionality, inspect your draped lights quarterly. Look for:
- Frayed insulation or bent prongs
- Loose hooks or weakened adhesive bonds
- Bulbs that flicker or fail to illuminate
- Accumulated dust or cobwebs affecting brightness
Clean gently with a dry microfiber cloth. For stubborn grime, lightly dampen the cloth with water—never spray directly onto lights. Remove and store seasonal displays properly: coil strands around a cardboard reel or use a dedicated storage box to prevent tangling.
Frequently Asked Questions
Can I use Command Hooks for string lights on a staircase?
Yes, 3M Command Hooks designed for lightweight décor are suitable for most LED string lights. Choose the small or medium size based on cord thickness, and follow application instructions—clean the surface with rubbing alcohol and press firmly for 30 seconds. These hooks remove cleanly, making them ideal for renters or temporary setups.
How do I hide the end of the strand or power cord?
Route the plug-down along the underside of the railing using adhesive cord clips. If the outlet is distant, use a matching-color extension cord and run it discreetly along base molding. For battery packs, conceal them inside a faux planter, decorative box, or behind wall art near the base.
What if my railing has large gaps between spindles?
In cases of wide baluster spacing, supplement with additional mounting points using self-adhesive clips attached to the underside of the handrail. Alternatively, weave a second thin strand vertically between horizontal runs to maintain visual density and eliminate dark zones.
Conclusion: Achieve a Seamless Glow with Confidence
Draping lights over a staircase railing without gaps is entirely achievable with careful planning and execution. From choosing the right materials to applying precision in placement, each step contributes to a polished, hazard-free display. The effort pays off every time someone ascends the stairs and pauses, struck by the warmth and elegance of the illuminated path.
Whether for daily enjoyment or special occasions, well-installed lighting enhances both safety and ambiance. Now that you have the knowledge and strategy, take the next step: measure your railing, gather your supplies, and bring your vision to life.


 浙公网安备
33010002000092号
浙公网安备
33010002000092号 浙B2-20120091-4
Comments
No comments yet. Why don't you start the discussion?