
For competitive gamers and performance enthusiasts, every millisecond counts. A higher refresh rate translates to smoother motion, reduced input lag, and a more responsive visual experience. While most modern monitors advertise refresh rates like 144Hz or 240Hz, many are capable of pushing beyond their rated limits through a process known as overclocking. Unlike GPU or CPU overclocking, monitor overclocking—often called \"custom resolution overclocking\"—involves adjusting timing parameters to exceed the manufacturer’s default specifications. When done correctly, it can yield noticeable improvements in fluidity and clarity. But when performed recklessly, it risks permanent damage or display instability. This guide walks you through the safe, methodical approach to unlocking your monitor’s hidden potential.
Understanding Refresh Rate and Overclocking
The refresh rate of a monitor, measured in hertz (Hz), indicates how many times per second the screen redraws the image. A 60Hz monitor updates the display 60 times per second; a 144Hz model does so 144 times. Higher refresh rates reduce motion blur and make fast-paced action appear more fluid—critical in first-person shooters, racing games, and competitive esports.
Monitor overclocking doesn’t involve hardware modifications. Instead, it uses software tools to push the panel’s maximum supported refresh rate beyond its factory-rated limit by creating a custom resolution profile with tighter timing settings. This is only possible because manufacturers often underclock panels to ensure compatibility and longevity across different systems. Many panels—especially those based on IPS, TN, or OLED technology—are built with headroom that allows for modest increases in performance.
“Panel overdrive and signal timing margins mean most displays can handle a 10–25% bump in refresh rate—if tuned properly.” — Dr. Alan Zhou, Display Systems Engineer at PanelTech Labs
However, not all monitors respond equally well to overclocking. Factors such as panel type, age, driver IC capability, and cable bandwidth play crucial roles in determining success and safety.
Prerequisites: Is Your Monitor Ready?
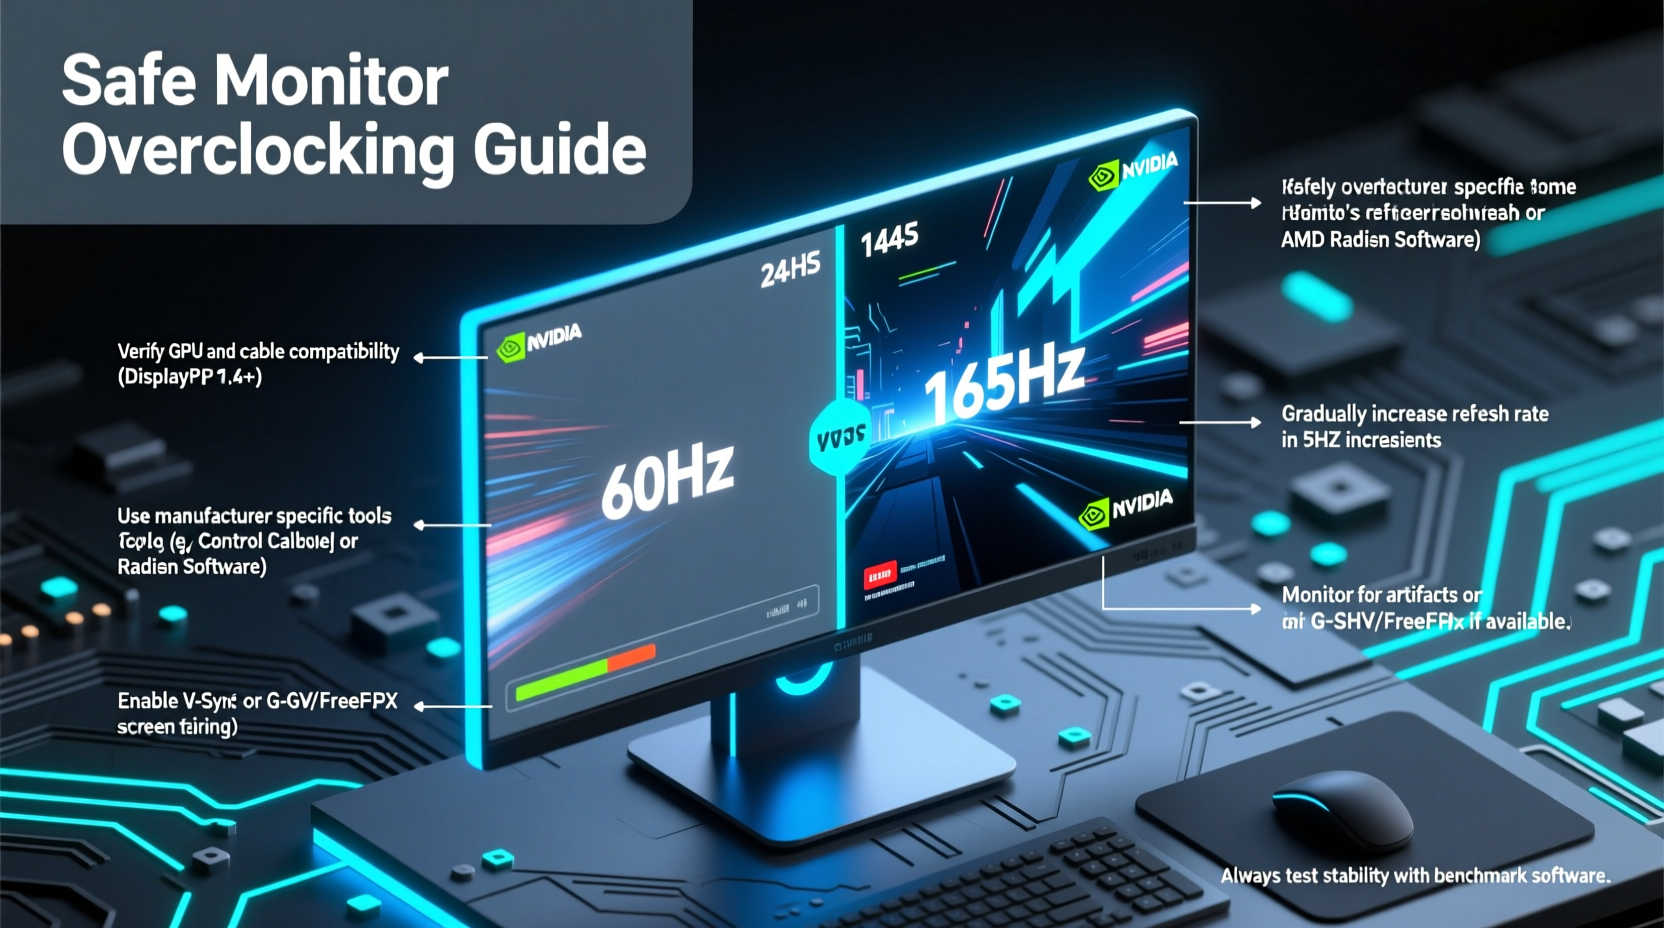
Before attempting any overclock, confirm whether your setup supports the process. Not every monitor or system configuration is suitable.
Hardware Requirements
- GPU: Must support custom resolutions via AMD Radeon Software or NVIDIA Control Panel. Modern GPUs from both brands generally do.
- Cable: Use DisplayPort 1.2 or higher. HDMI typically lacks sufficient bandwidth for high-refresh-rate overclocks beyond standard modes.
- Monitor: Must have an LCD, OLED, or QD-OLED panel with adjustable timing. Older VA panels or entry-level models may not tolerate overclocking.
- Driver Support: Updated graphics drivers are essential. Outdated drivers may fail to apply custom timings or cause crashes.
Compatibility Check
To determine if your monitor is a good candidate:
- Check the model’s datasheet or user manual for native resolution and max rated refresh rate.
- Search online forums (e.g., Reddit’s r/Monitors or Blur Busters) for others who’ve successfully overclocked the same model.
- Look for reports of “CRU” (Custom Resolution Utility) compatibility—this tool is essential for advanced tuning.
If multiple users report stable overclocks up to 175Hz on a 144Hz-rated panel, for example, your odds of success increase significantly.
Step-by-Step Guide to Safe Monitor Overclocking
This process requires patience and precision. Follow each step carefully to avoid bricking your display or causing persistent artifacts.
Step 1: Update Drivers and Reset Current Settings
Begin with clean graphics drivers. Use DDU (Display Driver Uninstaller) in safe mode to remove existing drivers completely, then reinstall the latest version from AMD or NVIDIA. Reset your monitor’s on-screen display (OSD) settings to factory defaults to eliminate interference from custom sharpness, dynamic contrast, or overdrive configurations.
Step 2: Access Custom Resolution Settings
For NVIDIA Users:
- Open NVIDIA Control Panel.
- Navigate to “Change resolution” under Display.
- Click “Customize,” then “Create Custom Resolution.”
For AMD Users:
- Open AMD Radeon Software.
- Go to Settings > Display > Create Custom Resolution.
Step 3: Incrementally Increase Refresh Rate
Do not jump straight to 200Hz. Start conservatively:
- If your monitor is rated for 144Hz, try 155Hz first.
- Input your native resolution (e.g., 1920x1080).
- Set vertical refresh rate to 155.0 Hz.
- Leave other settings (timing, polarity) at default unless advised otherwise.
- Click “Test.”
If the screen goes black and returns within 15 seconds, the test failed. If the desktop remains stable, proceed.
Step 4: Validate Stability
After applying a new rate, run a stress test:
- Use FRTC (FreeSync Test Pattern) or UFO Test (BlurBusters.com) to check for tearing or stuttering.
- Launch a fast-paced game (e.g., CS2, Valorant, or Apex Legends).
- Observe for flickering, color banding, or freezing.
If issues arise, revert to the previous stable setting.
Step 5: Push Further in Small Increments
Once 155Hz is stable, attempt 160Hz, then 165Hz. Continue increasing in 5Hz steps until the monitor fails to sync or exhibits visual anomalies. The last stable rate becomes your effective overclock ceiling.
Do’s and Don’ts of Monitor Overclocking
| Do | Don't |
|---|---|
| Start with small increments (5Hz at a time) | Jump from 144Hz to 200Hz immediately |
| Use DisplayPort 1.2 or higher | Attempt overclocking over HDMI |
| Research your specific monitor model | Assume all panels behave the same |
| Test stability with real-world usage | Rely solely on desktop detection |
| Keep a backup of original EDID settings | Ignore persistent screen artifacts |
Real Example: Overclocking a Dell S2721DGF
A user named Jordan, a competitive Apex Legends player, owned a Dell S2721DGF—a 27-inch QHD monitor officially rated at 165Hz. After reading community threads, he decided to attempt an overclock. Using NVIDIA Control Panel, he created a custom resolution at 2560x1440 @ 175Hz. The first test failed—no signal. He adjusted the horizontal and vertical sync ranges slightly and retried. At 170Hz, the desktop loaded cleanly.
Jordan spent 30 minutes testing with motion tests and gameplay. No flickering or ghosting appeared. He then pushed to 175Hz again—this time with reduced blanking enabled via CRU. The result? A rock-solid 175Hz signal that remained stable during marathon gaming sessions. His input latency dropped by approximately 3ms, giving him a perceptible edge in tracking fast-moving targets.
He emphasized caution: “I didn’t rush it. I tested every step. Now I get smoother visuals without buying a new monitor.”
Advanced Tuning with Custom Resolution Utility (CRU)
For users hitting limitations in GPU control panels, CRU offers granular control over display timings. This free tool edits the monitor’s EDID (Extended Display Identification Data), allowing precise manipulation of pixel clock, front/back porch, and sync pulse widths.
- Download CRU from the official source (monitortests.com).
- Run “CVT Calculator” to generate optimal timings for your desired resolution and refresh rate.
- Modify the active display’s timing details under “Detailed resolutions.”
- Reboot and test using standard procedures.
CRU is powerful but risky. Incorrect values can render the monitor unusable until settings are reverted via safe mode or secondary display. Always back up the current .inf file before making changes.
Frequently Asked Questions
Can overclocking damage my monitor?
Potentially, yes—but only under extreme conditions. Most failures result in temporary no-signal states rather than permanent damage. Panels are designed with electrical tolerances, and moderate overclocks (within 20%) rarely exceed these limits. However, sustained operation at unstable rates may degrade the scaler or timing controller over time.
Will overclocking void my warranty?
Technically, yes. Any modification outside factory specs may disqualify warranty claims, especially if the manufacturer detects EDID tampering. Proceed at your own risk and document original settings for restoration.
Why can’t I overclock over HDMI?
HDMI bandwidth caps limit high-refresh 1440p or 4K signals. Even HDMI 2.1 may not support the exact timing flexibility needed for overclocking. DisplayPort supports adaptive timing, higher data rates, and direct access to extended display formats, making it the only viable interface for this process.
Final Checklist Before You Begin
- ✅ Confirm monitor model supports overclocking (check forums)
- ✅ Use DisplayPort 1.2 or higher cable
- ✅ Update GPU drivers to latest version
- ✅ Reset monitor OSD to factory defaults
- ✅ Backup original resolution profiles or EDID
- ✅ Start with +10Hz increment and test thoroughly
- ✅ Avoid overclocking if using integrated graphics
Maintaining Long-Term Stability
An overclocked monitor should be monitored regularly. Signs of degradation include:
- Increased input lag despite higher refresh rate
- Occasional flickering or momentary blackouts
- Failure to wake from sleep mode
If any occur, revert to the last known good configuration. Consider reducing the overclock margin by 5Hz to restore reliability. Also, avoid running the monitor at maximum brightness continuously, as heat buildup can exacerbate instability in overclocked circuits.
Conclusion
Overclocking your monitor’s refresh rate is one of the most cost-effective ways to enhance gaming smoothness without upgrading hardware. With careful execution, the right tools, and realistic expectations, many users can gain a meaningful performance boost. The key lies in incremental testing, reliance on proven methods, and respect for hardware limits. Whether you’re squeezing an extra 15Hz from a 144Hz panel or unlocking near-200Hz fluidity on a QHD display, the payoff in responsiveness and immersion is tangible.


 浙公网安备
33010002000092号
浙公网安备
33010002000092号 浙B2-20120091-4
Comments
No comments yet. Why don't you start the discussion?