
Removing fake nails might seem simple—just peel or clip them off—but doing it incorrectly can lead to weakened, thin, or even damaged natural nails. Whether you're wearing acrylics, gel extensions, or press-ons, the removal process matters just as much as the application. Done right, you can preserve the health of your nail bed and maintain strong, resilient natural nails. This guide outlines safe, dermatologist- and manicurist-approved techniques for removing artificial nails at home or knowing when to seek professional help.
Why Safe Removal Matters
The structure of your natural nail is delicate. The nail plate, composed of keratin layers, can become compromised if subjected to harsh chemicals, excessive filing, or forceful peeling. When fake nails are removed improperly, common issues include:
- Nail thinning or splitting
- Peeling or separation of the nail layers (onychoschizia)
- Infections from micro-tears in the cuticle
- Long-term weakening leading to slow growth
“Many clients come to me with brittle nails after removing acrylics at home using pliers or aggressive soaking,” says Dr. Lena Patel, a board-certified dermatologist specializing in nail health.
“The nail matrix is sensitive. Trauma during removal can disrupt future nail growth.”
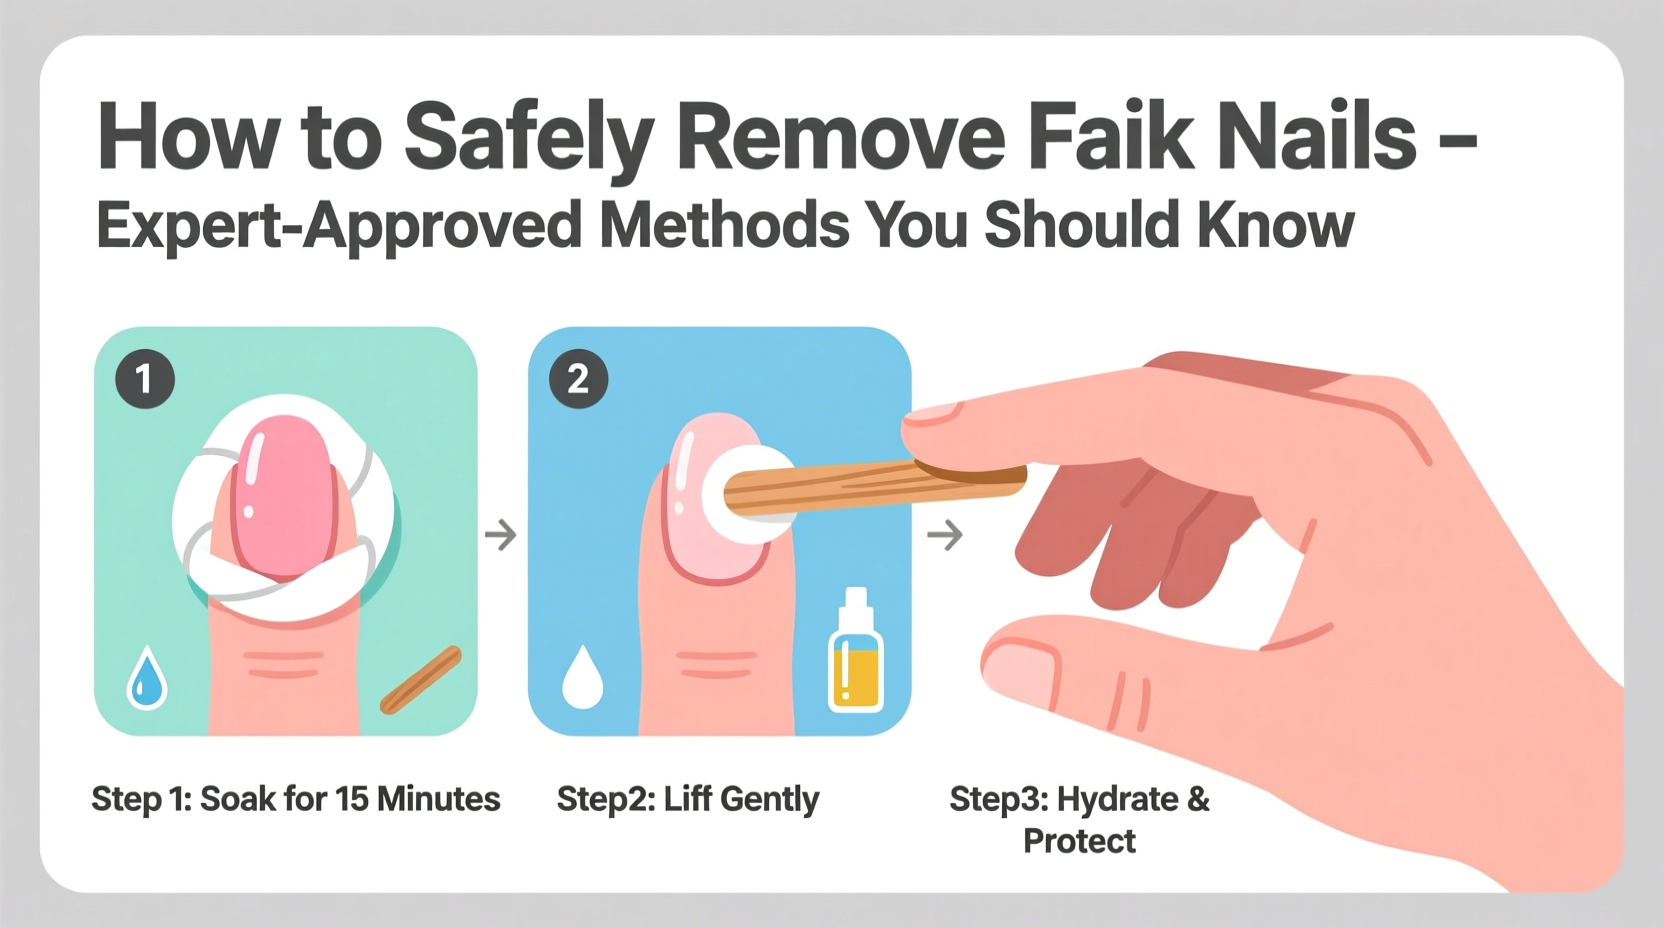
Step-by-Step Guide: Safe At-Home Removal Methods
Not all fake nails are created equal—and neither are their removal methods. Below are three expert-approved approaches tailored to different types of artificial enhancements.
Method 1: Acetone Soak for Acrylic Nails
Acrylic nails bond strongly to the natural nail and require chemical breakdown. Pure acetone is the most effective solvent.
- Trim and file down the fake nails to reduce bulk.
- Wrap cotton pads soaked in 100% acetone around each nail.
- Secure with aluminum foil to prevent evaporation.
- Wait 15–20 minutes; check progress by gently nudging the edge.
- If lifting occurs, use an orangewood stick to nudge off softened material—never pry.
- Wash hands thoroughly and apply cuticle oil immediately.
Method 2: Gentle Filing & Soaking for Gel Extensions
Gel nails are less porous than acrylics and resist acetone unless filed first.
- Fine-grit file (180+ grit) the shiny top layer off each nail to break the seal.
- Soak fingertips in a bowl of acetone for 10–15 minutes.
- Use a cuticle pusher to gently lift loosened gel—do not scrape.
- Rinse and moisturize deeply.
This method minimizes friction damage and prevents the tool from digging into the nail bed.
Method 3: Press-On Nail Removal (No Acetone Needed)
Press-on nails use adhesive stickers or glue but are generally easier to remove.
- Soak fingers in warm, soapy water for 10 minutes.
- Gently rock each nail side to side to loosen the bond.
- Use a wooden stick to slide under the edge—never pull upward.
- Clean residue with a cotton pad and non-acetone wipe if needed.
Avoid heat tools like hairdryers, which can over-dry skin and irritate cuticles.
Do’s and Don’ts of Fake Nail Removal
| Do’s | Don’ts |
|---|---|
| File down length before soaking | Peel or bite off fake nails |
| Use 100% acetone for acrylics | Use metal tools aggressively |
| Moisturize cuticles post-removal | Soak longer than 20 minutes |
| Let nails breathe for days after | Apply new enhancements immediately |
| Seek professional help if unsure | Ignore signs of infection or pain |
When to See a Professional
While many people successfully remove fake nails at home, certain situations call for salon expertise:
- You’ve had the nails on for more than six weeks.
- There’s visible lifting, greenish tint (sign of bacterial infection), or pain.
- The nails were applied with permanent bonding agents.
- You have a history of nail disorders like psoriasis or fungal infections.
Salon technicians use medical-grade tools and controlled acetone exposure, reducing risk. They can also assess nail health during removal and recommend recovery treatments.
“Even experienced users should visit a technician every few cycles. It’s like dental cleanings for your nails—preventive care prevents bigger problems.” — Maria Tran, Master Nail Technician & Educator
Mini Case Study: Recovering from Improper Removal
Sophie, a 29-year-old graphic designer, wore acrylics for two years with regular fills. After switching jobs, she decided to go natural. Eager to start fresh, she clipped and peeled her nails off in one sitting. Within days, her nails began peeling in layers, and her fingertips felt tender.
She consulted a dermatologist who diagnosed onychoschizia due to mechanical trauma. Sophie was advised to stop all polish use, apply vitamin E oil twice daily, and wear gloves during chores. After eight weeks of consistent care, her nails regained strength. Her takeaway? “I learned that patience protects your nails more than any product ever could.”
Post-Removal Nail Care Checklist
After removing fake nails, your natural nails need time to recover. Follow this checklist to support healing and regrowth:
- Hydrate cuticles daily with jojoba or almond oil
- Avoid gel or acrylic reapplication for 2–4 weeks
- Wear gloves when cleaning or washing dishes
- Use a strengthening base coat with calcium or keratin
- Keep nails trimmed short to prevent snagging
- Take biotin supplements if recommended by a doctor
- Monitor for discoloration, pain, or thickening
FAQ
Can I reuse press-on nails after removal?
Yes, if they’re intact and the adhesive is still usable. Clean them with rubbing alcohol and store in a dry case. However, reuse no more than 2–3 times to avoid hygiene risks.
How long should I wait before getting new fake nails?
Dermatologists recommend waiting at least 2–4 weeks to allow the nail plate to rehydrate and strengthen. Continuous wear without breaks increases brittleness and infection risk.
Is non-acetone remover safe for acrylics?
No. Non-acetone removers lack the solvency to break down acrylic polymers. Attempting removal with non-acetone products leads to prolonged soaking, increased moisture exposure, and higher chance of nail damage.
Conclusion
Removing fake nails safely isn’t just about convenience—it’s a crucial part of maintaining lifelong nail health. Whether you choose to do it yourself or visit a professional, the principles remain the same: be gentle, avoid shortcuts, and prioritize hydration and recovery. Your natural nails are designed to protect and grow, but they need proper care after enduring artificial enhancements.


 浙公网安备
33010002000092号
浙公网安备
33010002000092号 浙B2-20120091-4
Comments
No comments yet. Why don't you start the discussion?