
Whiteboards are essential tools in classrooms, offices, and homes—offering a clean, reusable surface for brainstorming, teaching, and planning. But when permanent marker ends up on the board by accident, panic often follows. Unlike dry-erase ink, permanent marker doesn’t wipe away with a standard eraser. The wrong removal method can leave behind stubborn stains, cause ghosting, or even permanently scar the surface.
The good news: with the right techniques and household items, you can remove permanent marker safely—without damaging your whiteboard or inviting residue buildup. This guide walks through science-backed solutions, real-world tested strategies, and expert-approved practices to restore your board to like-new condition.
Understanding the Problem: Why Permanent Marker Sticks—and How to Beat It
Permanent markers contain alcohol-based solvents and pigments designed to adhere strongly to non-porous surfaces. While this makes them ideal for labeling plastic or glass, it also means they bond aggressively to melamine, porcelain, and other common whiteboard materials. When wiped improperly, the pigment can embed into microscopic surface pores, leading to staining or “ghosting”—a faint but persistent shadow of the original mark.
Ghosting is more than cosmetic. On lower-quality boards, repeated misuse accelerates wear, reducing the surface’s ability to repel dry-erase ink over time. High-gloss porcelain boards resist this better, but no whiteboard is immune to damage from harsh scrubbing or corrosive cleaners.
“Many people reach for bleach or acetone without realizing these chemicals degrade the protective coating on whiteboards. Once that layer is compromised, the board becomes a magnet for stains.” — Dr. Alan Reyes, Materials Scientist at EduSurfaces Inc.
Safe Removal Methods That Work (and Won’t Damage Your Board)
The key to safe removal lies in dissolving the ink’s solvent base without attacking the board itself. Below are five effective, low-risk methods ranked by safety and accessibility.
1. Dry-Erase Marker “Trick” (Best for Light Stains)
This widely used method leverages the chemistry of dry-erase ink to lift permanent marker. Because both inks share similar solvents, fresh dry-erase ink can temporarily re-liquefy the permanent ink, allowing it to be wiped away.
- Trace over the permanent marker stain completely with a dry-erase marker.
- Wait 15–30 seconds for the solvents to interact.
- Wipe the area with a microfiber cloth or felt eraser using gentle circular motions.
- Repeat if necessary, then clean the entire board with a proper whiteboard cleaner.
2. Isopropyl Alcohol (70% or Higher)
Isopropyl alcohol effectively breaks down permanent marker pigments without leaving residue. It evaporates quickly and is less aggressive than acetone, making it suitable for most whiteboard types.
Procedure:
- Dampen a corner of a microfiber cloth with rubbing alcohol—never spray directly onto the board.
- Gently rub the stained area in small circles until the ink lifts.
- Wipe the area with a clean, dry cloth.
- Follow up with a commercial whiteboard cleaner to restore surface protection.
Note: Test on a small, inconspicuous corner first. Repeated use may dull high-gloss finishes over time.
3. Hand Sanitizer (Emergency Option)
In a pinch, hand sanitizer works due to its high alcohol content (typically 60–70%) and added moisturizers that reduce evaporation, giving the solution more dwell time.
Apply a pea-sized amount to a cloth, not the board. Gently rub the stain, then wipe clean. Avoid formulations with dyes or glitter, which may leave secondary marks.
4. Whiteboard Cleaner with Denatured Alcohol
Commercial whiteboard cleaners like Expo 2 or Quartet ProClean contain optimized blends of denatured alcohol and surfactants designed specifically for marker removal and surface conditioning.
These are safer than household alternatives because they’re pH-balanced and formulated to preserve the board’s finish. Spray onto a cloth and wipe the affected area. For heavy stains, let it sit for 10–15 seconds before wiping.
5. Baking Soda Paste (For Stubborn Residue)
If ink has dried for days or weeks, a mild abrasive may be needed. A paste of baking soda and water offers gentle scrubbing power without scratching.
Mix one tablespoon of baking soda with two teaspoons of water. Apply with a soft cloth and rub lightly in circular motions. Rinse the area with a damp cloth and dry immediately. Follow with a protective wipe of whiteboard cleaner.
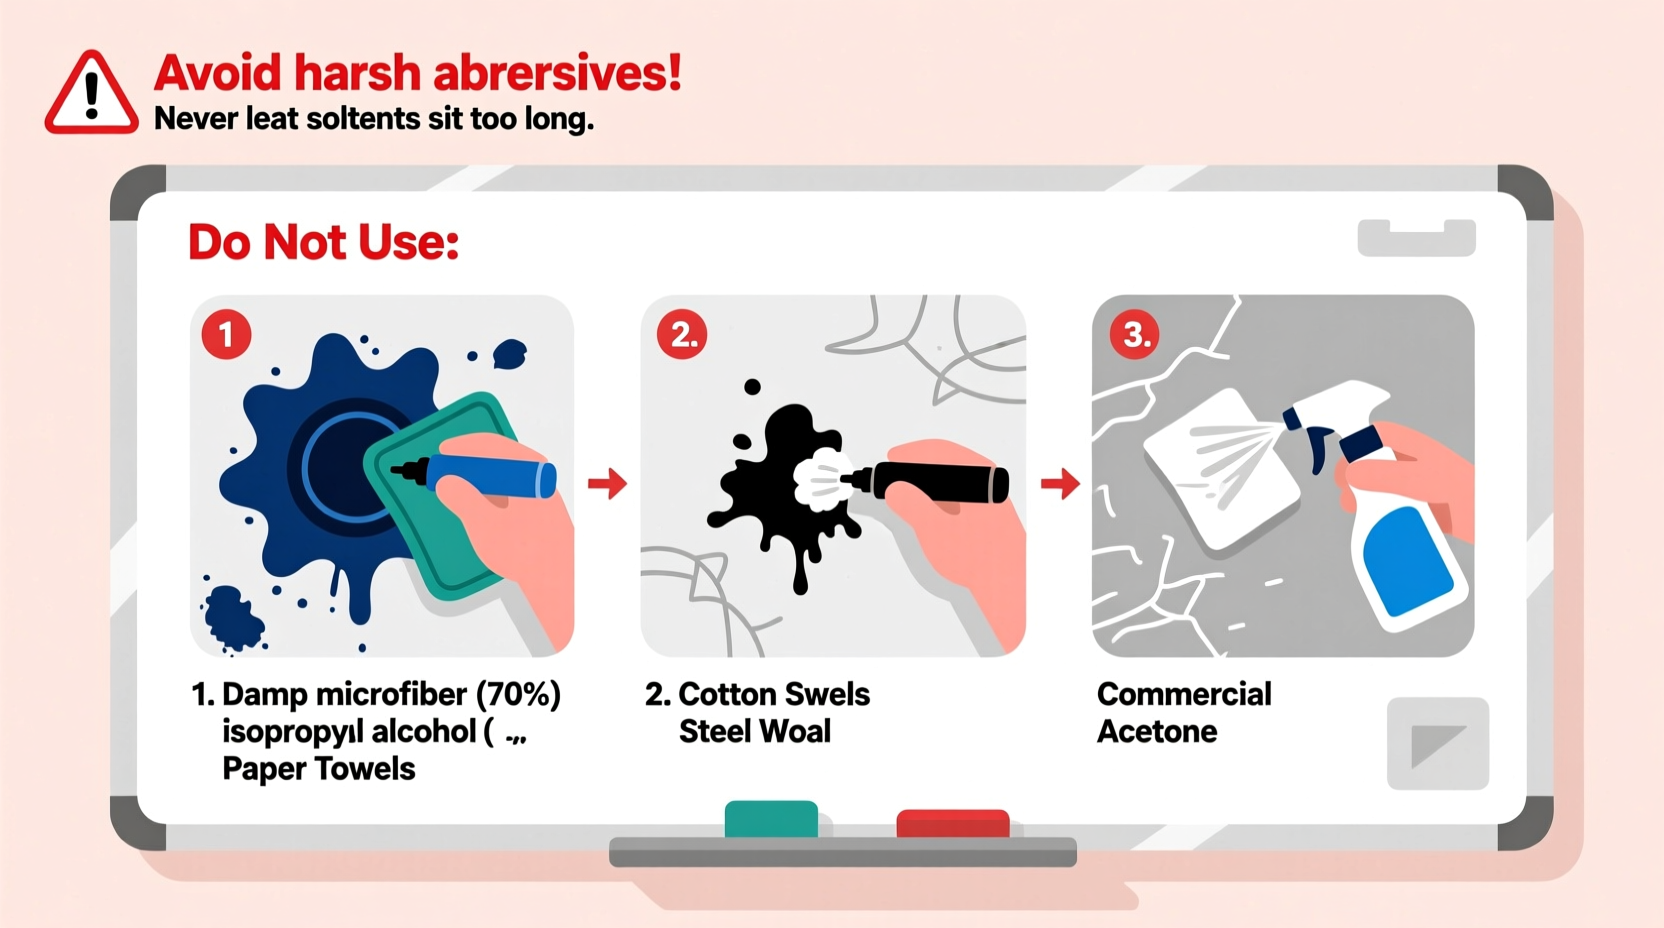
What Not to Do: Common Mistakes That Cause Permanent Damage
Many well-intentioned attempts end up harming the whiteboard more than the marker ever did. Avoid these practices at all costs:
| Don’t | Why It’s Harmful | Better Alternative |
|---|---|---|
| Use acetone or nail polish remover | Strips protective coatings; causes yellowing and pitting | Isopropyl alcohol (70%) |
| Scrub with paper towels or rough sponges | Creates micro-scratches that trap ink and promote ghosting | Microfiber cloths or felt erasers |
| Spray cleaners directly on the board | Liquid seeps into edges, warping backing or frames | Always apply to cloth first |
| Leave permanent marker unattended for weeks | Dried ink bonds deeper, increasing removal difficulty | Treat stains within 24–48 hours |
| Use bleach or ammonia-based cleaners | Corrodes surface; reacts poorly with residual alcohol | pH-neutral whiteboard cleaners |
Step-by-Step Guide: Removing Permanent Marker Safely
Follow this sequence for optimal results without risking damage:
- Assess the stain: Note size, age, and location. Fresh marks are easier to remove.
- Gather supplies: Microfiber cloth, dry-erase marker, isopropyl alcohol (70%+), whiteboard cleaner, cotton swabs (for tight spots).
- Try the dry-erase method first: Trace and wipe. This avoids introducing liquids entirely.
- If unsuccessful, apply alcohol: Dampen cloth corner, gently rub stain in small circles.
- Check progress every 10 seconds: Stop if surface appears hazy or dull.
- Wipe clean with dry cloth: Remove all residue.
- Restore surface: Apply whiteboard cleaner across the entire board to recondition.
- Prevent recurrence: Store permanent markers separately and label clearly.
Real Example: Classroom Recovery After an Accident
A middle school teacher in Portland discovered that a student had accidentally used a black Sharpie on the main classroom whiteboard during a group activity. The mark covered nearly a quarter of the board and had been left overnight.
Instead of reaching for industrial cleaner, she followed protocol: first, she retraced the lines with a dry-erase marker. After wiping, about 60% of the stain lifted. She then applied isopropyl alcohol to a microfiber cloth and gently worked the remaining areas. Within five minutes, the board was clean. She finished with a full wipe-down using Expo 2 cleaner.
“I was ready to request a replacement,” she later shared. “But taking it slow and avoiding harsh chemicals saved us hundreds of dollars and kept our learning space functional.”
Prevention Tips to Avoid Future Issues
Once your board is clean, take steps to prevent repeat incidents:
- Color-code markers: Keep permanent markers in a separate container, ideally a different color than dry-erase sets.
- Label caps: Use tape or stickers to mark permanent vs. dry-erase.
- Educate users: In shared spaces, post a quick-reference guide near the board.
- Perform weekly maintenance: Clean the entire board with a quality cleaner to prevent ink buildup.
- Inspect markers: Replace worn or leaking pens that could bleed through caps.
Frequently Asked Questions
Can I use WD-40 to remove permanent marker from a whiteboard?
No. While WD-40 can dissolve ink, it leaves behind a greasy film that attracts dust and interferes with dry-erase performance. It may also degrade plastic components and frames. Stick to alcohol-based or manufacturer-recommended solutions.
Will vinegar remove permanent marker from a whiteboard?
Vinegar is mildly acidic and may help with light stains, but it’s less effective than alcohol-based options. Additionally, prolonged exposure to acidity can dull some whiteboard surfaces. If you must use vinegar, dilute it 1:1 with water, apply briefly, and rinse immediately with a damp cloth.
My whiteboard still looks cloudy after cleaning. What should I do?
Cloudiness often results from leftover residue or minor surface abrasion. Try a final pass with a dedicated whiteboard cleaner. If the haze persists, it may indicate coating damage—consider professional refinishing or replacement for heavily used boards.
Checklist: Safe Permanent Marker Removal
Keep this checklist handy for quick reference:
- ⬜ Assess the stain (age, size, location)
- ⬜ Gather supplies (microfiber cloth, dry-erase marker, alcohol, cleaner)
- ⬜ Attempt dry-erase marker method first
- ⬜ If needed, apply isopropyl alcohol to cloth—not board
- ⬜ Rub gently in small circles; avoid pressure
- ⬜ Wipe residue with dry cloth
- ⬜ Condition entire board with whiteboard cleaner
- ⬜ Implement prevention strategies
Final Thoughts: Care Today Prevents Cost Tomorrow
A clean, functional whiteboard enhances communication, collaboration, and clarity. Treating accidental permanent marker marks with care preserves not just appearance but longevity. The methods outlined here prioritize safety, effectiveness, and sustainability—ensuring your board remains a reliable tool for years.
Damage from improper cleaning is often irreversible. But with informed habits, even severe stains can be resolved without compromise. Take a moment now to organize your markers, stock up on microfiber cloths, and keep a bottle of isopropyl alcohol nearby. Preparedness turns accidents into minor setbacks, not costly replacements.


 浙公网安备
33010002000092号
浙公网安备
33010002000092号 浙B2-20120091-4
Comments
No comments yet. Why don't you start the discussion?