
Stickers on laptops, tablets, smartphones, and other tech gadgets are common—whether they're brand labels, promotional decals, or personalized designs. When it comes time to remove them, many users face the same frustrating problem: sticky residue that clings to surfaces and threatens to mar delicate finishes. The temptation is to grab a sharp tool or harsh chemical, but doing so risks permanent scratches, coating damage, or discoloration. The good news is that with the right tools and techniques, you can eliminate adhesive residue safely and effectively, preserving both function and appearance.
This guide walks through proven, non-abrasive methods trusted by technicians and detailers alike. From identifying your device’s surface type to choosing the safest cleaning agents, every step is designed to protect your investment while restoring a clean, professional look.
Understanding Your Device’s Surface
Tech devices come with various protective coatings and materials, each reacting differently to solvents and abrasives. Before attempting any cleaning method, identify what kind of surface you’re working with:
- Anodized aluminum (common on MacBooks, premium smartphones): Resistant to corrosion but sensitive to strong solvents.
- Glossy plastic (budget laptops, older tablets): Prone to scratching and solvent clouding.
- Frosted or matte finishes (many modern phones and cases): Easily damaged by rubbing or improper cleaners.
- Glass screens: Scratch-resistant but vulnerable to ammonia-based products.
Using an inappropriate cleaner—even something as common as window spray—can strip anti-fingerprint coatings or leave swirl marks. Always test any solution on a small, inconspicuous area first.
Safe Removal Methods Step-by-Step
Removing sticker residue doesn’t require aggressive scrubbing. The key is gentle softening of the adhesive followed by careful wiping. Follow this timeline-tested process:
- Peel off the sticker slowly at a 45-degree angle. Use a plastic card edge if needed to lift stubborn corners.
- Let the surface rest for 30 seconds after removal to allow any trapped air or moisture to stabilize.
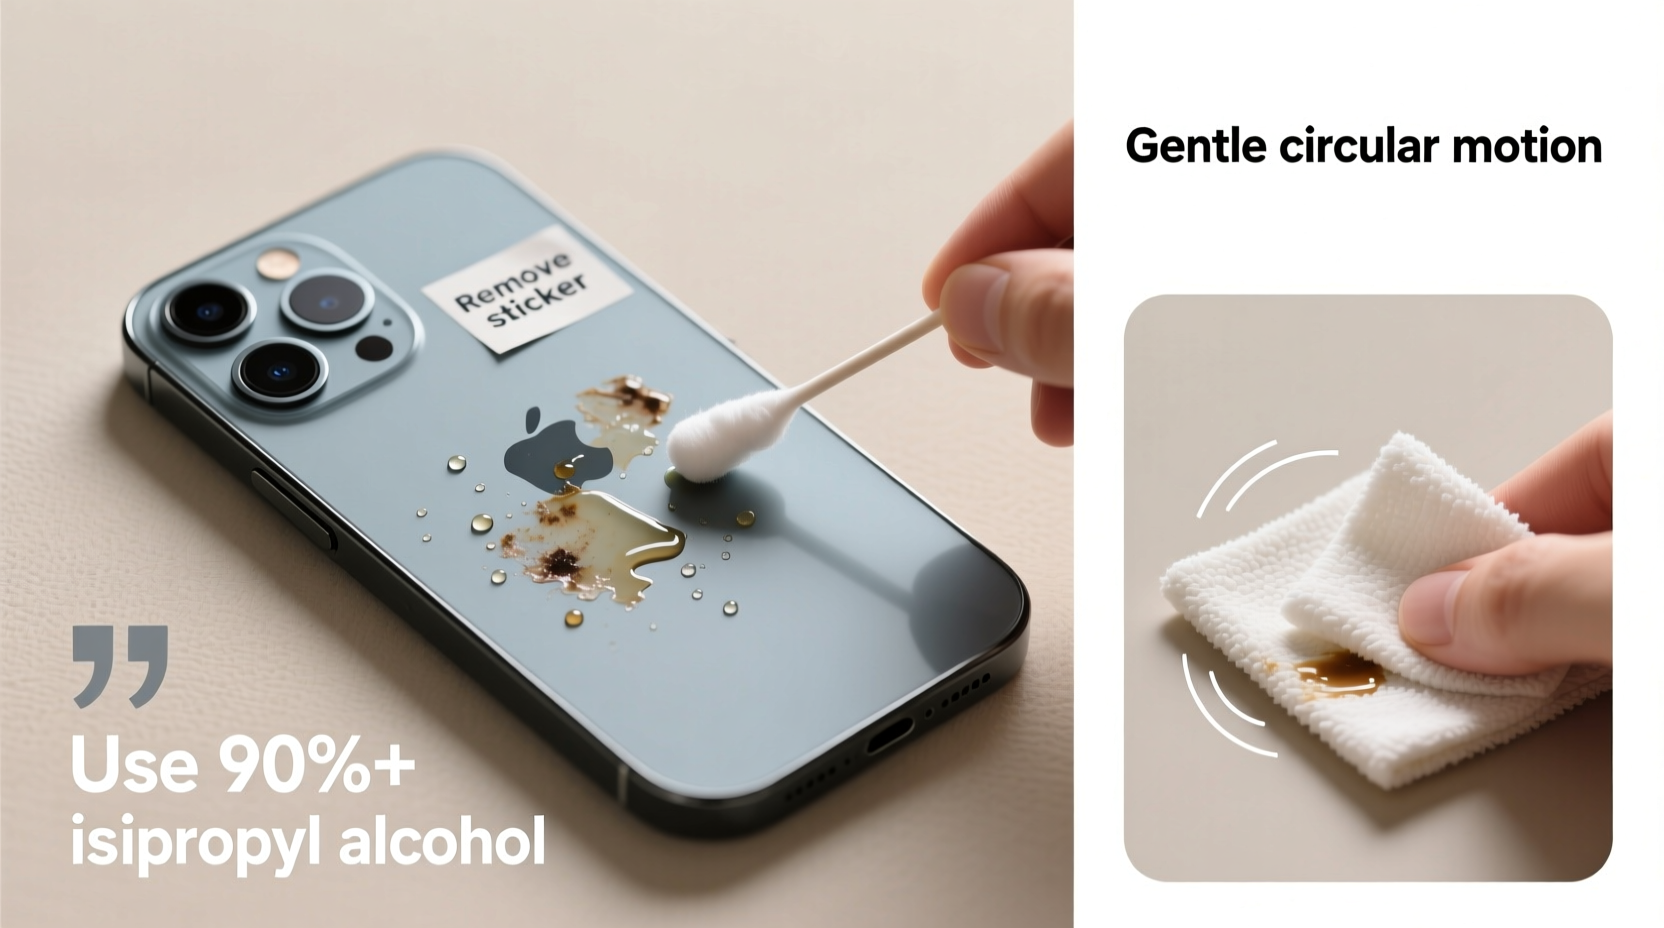
- Apply a safe solvent to a microfiber cloth—not directly onto the device—to avoid seepage into ports or seams.
- Gently rub the residue in one direction using light pressure. Circular motions may spread adhesive unevenly.
- Wipe clean with a dry section of the cloth to remove any remaining film.
- Inspect under bright light and repeat only if necessary.
Patience is critical. Rushing increases the risk of applying too much pressure or over-wetting the surface.
Best Solvents for Adhesive Removal
Not all cleaners are created equal. Some dissolve adhesives quickly but damage coatings. Below is a comparison of commonly used substances ranked by safety and effectiveness:
| Solvent | Effectiveness | Risk Level | Recommended Devices |
|---|---|---|---|
| Isopropyl alcohol (70%) | High | Low | All devices (avoid matte screens) |
| Adhesive remover (e.g., Goo Gone Original) | Very High | Moderate | Hard plastics, metal; not for screens |
| White vinegar | Moderate | Low | Non-porous surfaces only |
| Dish soap + warm water | Low | Very Low | Light residue, everyday use |
| Acetone / nail polish remover | Very High | Very High | Avoid entirely on consumer electronics |
Isopropyl alcohol remains the top choice among repair technicians due to its quick evaporation and compatibility with most surfaces. However, always dilute stronger formulas and never soak the device.
“Alcohol-based solutions are our go-to in service centers because they break down adhesives without leaving behind oily residues or damaging conductive components.” — Jordan Lin, Senior Technician at Urban Tech Repair
Common Mistakes That Cause Damage
Even well-intentioned efforts can backfire. These are the most frequent errors made during residue removal:
- Using sharp tools like knives or box cutters – These create visible gouges and compromise structural integrity.
- Applying solvent directly to the device – Liquids can penetrate speaker grills, charging ports, or buttons, leading to internal damage.
- Scrubbing aggressively with rough cloths – Terrycloth towels or kitchen sponges contain abrasive fibers.
- Using household cleaners like Windex or bleach wipes – Ammonia and chlorine degrade anti-reflective and oleophobic coatings.
- Leaving residue-soaked areas unattended – Prolonged exposure to solvents weakens surface bonds over time.
One technician reported a case where a customer used a citrus-based degreaser on their iPad back panel, resulting in irreversible hazing across the entire surface. “It looked like it had been sandblasted,” they said. “The damage wasn’t from the sticker—it was from the fix.”
Mini Case Study: Removing a Laptop Brand Sticker Without Harm
Mark, a freelance designer, purchased a new ultrabook for client meetings. While he appreciated the performance, he disliked the large silver logo sticker on the lid. Wanting a sleeker look, he decided to remove it before his next presentation.
He began by heating the sticker gently with a hairdryer on low for about 30 seconds. As the adhesive softened, he lifted one corner with a plastic spudger and slowly peeled it back. A thin layer of residue remained.
Instead of reaching for a magic eraser, Mark dampened a microfiber cloth with 70% isopropyl alcohol. Using light, linear strokes, he wiped the area for about 20 seconds. After drying with a clean part of the cloth, the surface appeared untouched—no streaks, no haze.
The entire process took less than five minutes. More importantly, the laptop retained its factory finish and warranty eligibility, since no unauthorized modifications or corrosive chemicals were used.
Checklist: Safe Residue Removal Protocol
Follow this checklist to ensure every removal job is thorough and damage-free:
- ✅ Identify the surface material (metal, plastic, glass, coated finish)
- ✅ Gather supplies: microfiber cloth, 70% isopropyl alcohol, cotton swabs, plastic card or spudger
- ✅ Work in a well-lit, static-free area
- ✅ Power off and unplug the device
- ✅ Remove sticker slowly using heat if needed
- ✅ Apply solvent to cloth—not directly to device
- ✅ Wipe residue gently in one direction
- ✅ Dry immediately with a clean microfiber section
- ✅ Inspect under angled light for missed spots
- ✅ Store cleaning materials properly for future use
FAQ: Common Questions About Residue Removal
Can I use WD-40 to remove sticker glue from my phone?
No. While WD-40 is effective on heavy-duty adhesives, it leaves behind an oily film that attracts dust and can degrade rubber seals and plastic components. It's also flammable and difficult to fully remove from small crevices. Stick to isopropyl alcohol or dedicated electronic-safe removers instead.
Will removing a sticker void my warranty?
In most cases, no—removing external stickers does not void warranties unless they cover serial number tampering or regulatory compliance labels. However, if you damage the device during removal (e.g., scratching the chassis or introducing liquid), that specific damage won’t be covered. When in doubt, consult the manufacturer’s policy.
What should I do if residue keeps coming back after cleaning?
Reappearing residue usually means incomplete removal. Try repeating the process with slightly more dwell time—let the alcohol sit on the area for 10–15 seconds before wiping. Alternatively, use a fresh piece of masking tape to dab the area repeatedly; the tape lifts leftover particles mechanically without contact.
Final Thoughts and Prevention Tips
Once you’ve successfully removed sticker residue, consider how to prevent future buildup. If you frequently apply custom decals or branding, choose removable vinyls designed for electronics. These offer strong adhesion without aggressive glues that harden over time.
For devices you plan to resell, keeping original stickers intact preserves resale value. But if aesthetics matter more than resale, clean removal is entirely possible—with care.
Remember: technology evolves rapidly, but proper maintenance ensures your devices last longer and perform better. A few minutes spent removing residue correctly today can save hundreds in replacement costs tomorrow.


 浙公网安备
33010002000092号
浙公网安备
33010002000092号 浙B2-20120091-4
Comments
No comments yet. Why don't you start the discussion?