
Stickers on laptops are a popular way to personalize devices, express identity, or promote brands. However, over time, they can fade, peel at the edges, or simply no longer align with your style. When it’s time to remove them, many users face a dilemma: how to take them off cleanly without damaging the laptop’s surface or leaving behind stubborn adhesive residue.
The wrong removal method can lead to scratches, discoloration, or even permanent marks—especially on aluminum, magnesium alloy, or matte-finish surfaces common in modern laptops. The good news is that with the right tools and techniques, you can remove stickers safely and maintain your device’s pristine condition. This guide walks you through tested strategies, real-world insights, and expert-backed practices to ensure a flawless result every time.
Why Sticker Removal Matters for Laptop Longevity
A laptop is often a long-term investment. Whether used for work, study, or creative projects, preserving its physical integrity contributes to both resale value and daily usability. Stickers may seem harmless, but their adhesive compounds bond with the laptop’s finish over time, especially when exposed to heat from the device or prolonged sunlight.
Aggressive peeling or using harsh chemicals like acetone can strip protective coatings, particularly on premium models such as MacBooks, Dell XPS, or Lenovo ThinkPads. These finishes are engineered to resist fingerprints and minor abrasions—but not industrial solvents or scraping tools. Damaging them not only affects aesthetics but can also reduce resistance to corrosion and wear.
“Adhesive residues aren’t just unsightly—they trap dust and moisture, which over time can degrade surface materials.” — Dr. Alan Reeves, Materials Scientist at TechSurface Labs
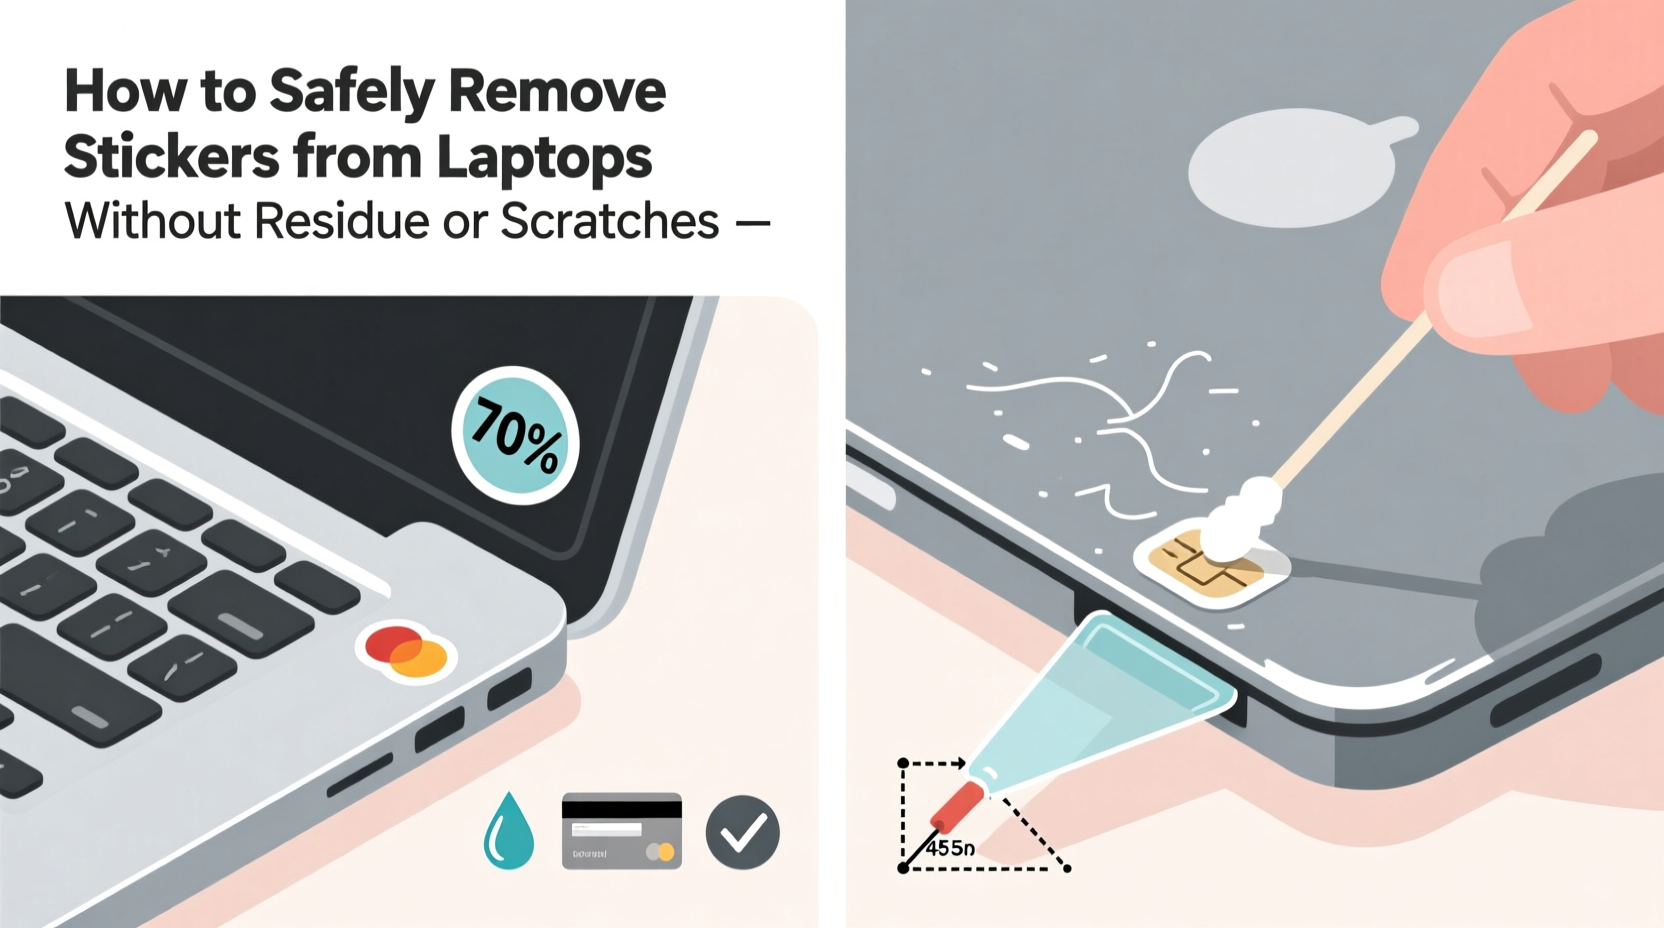
Step-by-Step Guide to Safe Sticker Removal
Follow this detailed process to remove stickers effectively while minimizing risk to your laptop’s surface:
- Power down and unplug the laptop: Always turn off your device and disconnect it from power sources. Removing stickers near ports or hinges while the system is running increases the chance of accidental contact with internal components.
- Clean the surface lightly: Use a microfiber cloth dampened with water (not dripping) to wipe away dust and oils. A clean surface allows better control during removal.
- Lift one corner gently: Using a fingernail or a soft plastic card (like an old credit card), slowly lift one edge of the sticker. Avoid metal tools like knives or box cutters, which can scratch.
- Pull at a low angle: Once lifted, pull the sticker outward at a 45-degree angle or lower. This reduces stress on the adhesive bond and helps prevent tearing.
- Apply gentle heat if needed: For stubborn stickers, use a hairdryer on low heat, held 6–8 inches away, to warm the adhesive for 30–60 seconds. Heat softens glue without damaging most laptop finishes when applied carefully.
- Peel slowly and continuously: Maintain steady pressure and speed. Rushing causes tearing and leaves more residue.
- Wipe residual adhesive immediately: As soon as the sticker comes off, treat any leftover stickiness using safe cleaning agents (covered below).
Safe Adhesive Residue Solutions
Even after successful sticker removal, some glue often remains. The key is choosing a solvent that dissolves adhesive without harming the laptop’s coating. Not all cleaners are equal—many household products contain alcohol, acetone, or ammonia, which manufacturers warn against.
Below are the safest and most effective options:
- Isopropyl alcohol (70% or less): Effective for light residue. Apply sparingly with a microfiber cloth—never spray directly onto the laptop.
- Commercial adhesive removers (e.g., Goo Gone Original): Formulated to break down glue. Use only the original formula (not gel or citrus-enhanced versions) and test on a hidden area first.
- WD-40 (with caution): Surprisingly effective, but must be wiped off completely afterward. Overuse can attract dust.
- Vegetable oil or olive oil: Natural and non-corrosive. Apply a small amount, let sit for 5 minutes, then wipe with a clean cloth. Follow with a quick pass of isopropyl alcohol to remove oily film.
Do’s and Don’ts of Residue Cleaning
| Do | Don’t |
|---|---|
| Use a soft cloth (microfiber or lint-free cotton) | Use paper towels or rough fabrics |
| Test cleaner on an inconspicuous spot | Apply full strength without testing |
| Work in small circular motions | Scrub aggressively |
| Dilute strong solvents with water when possible | Soak the surface or allow liquids to pool |
| Finish with a dry polish | Leave residue or moisture behind |
Real Example: Removing a Decade-Old Brand Sticker
Mark, a freelance graphic designer, inherited his father’s 2013 MacBook Pro. While functional, the lid was covered in outdated tech company stickers from a bygone era. One large vendor logo near the Apple emblem had started to crack and yellow, making the machine look neglected.
He tried peeling it off quickly but only succeeded in splitting it into three pieces, each leaving thick glue behind. Frustrated, he researched safer methods and adopted a systematic approach:
- Used a hairdryer on low for 45 seconds to warm the largest fragment.
- Applied a plastic spudger (a tool commonly used in electronics repair) to lift the edge gently.
- Pealed slowly at a shallow angle, repeating heat application as needed.
- Treated remaining residue with diluted isopropyl alcohol (50/50 with water) on a folded microfiber cloth.
After two hours of careful work, the laptop looked nearly new. Mark later shared photos online, where his method received praise from a senior technician at an Apple-certified repair shop: “This is exactly how we handle cosmetic restorations in-store—patience beats power every time.”
Checklist: Safe Sticker Removal in 10 Steps
Preparation
- ✅ Power off and unplug the laptop
- ✅ Gather tools: microfiber cloth, plastic card, hairdryer, cleaning solution
- ✅ Work in a well-lit, static-free environment
Removal Process
- ✅ Start lifting at a corner with a plastic tool
- ✅ Pull at a 30–45° angle slowly
- ✅ Reapply low heat if adhesion resists
- ✅ Stop if tearing occurs; reassess technique
Post-Removal Care
- ✅ Clean residue with approved solvent
- ✅ Wipe dry thoroughly
- ✅ Inspect for missed fragments or lingering stickiness
Frequently Asked Questions
Can I use nail polish remover to remove sticker residue?
No. Most nail polish removers contain acetone, which can dissolve certain plastics and damage anti-glare or anodized finishes. Even \"acetone-free\" versions may include ethyl acetate or other aggressive solvents unsuitable for electronics. Stick to milder alternatives like diluted isopropyl alcohol or plant-based oils.
Will removing stickers void my warranty?
In most cases, no. Cosmetic modifications like sticker removal do not affect hardware warranties unless damage occurs during the process. However, if you cause scratches or apply corrosive substances that lead to corrosion, the manufacturer may deny coverage for related issues. Always proceed with care.
What should I do if the paint comes off with the sticker?
This typically happens with older laptops where the adhesive has bonded too strongly with a thin finish layer. Unfortunately, once paint lifts, it cannot be restored at home. Your options include using a precision touch-up pen (available for specific laptop models) or accepting the mark as part of the device’s history. In the future, avoid placing stickers on matte-painted surfaces, which are more vulnerable than metal or glossy coatings.
Expert Tips for Preventing Damage During Future Customization
If you plan to decorate your laptop again, consider these preventive strategies:
- Use removable vinyl decals instead of permanent stickers. These are designed for easy repositioning and leave minimal residue.
- Apply stickers to laptop sleeves or cases, not directly on the device. This preserves personalization while protecting your investment.
- Limit placement near vents, hinges, and ports where heat and movement increase peeling risks.
- Document your laptop’s finish type before applying anything. Check your user manual or manufacturer website—some explicitly advise against adhesives.
“Think of your laptop’s surface like car paint—it can handle minor touches, but long-term exposure to adhesives requires maintenance.” — Lena Cho, Consumer Electronics Care Consultant
Conclusion: Preserve Your Device with Smart Practices
Removing stickers from a laptop doesn’t have to be a high-risk chore. With patience, the right tools, and a clear method, you can restore your device’s surface safely and effectively. Whether you're prepping for resale, refreshing your workspace, or simply reclaiming your style, the effort pays off in both appearance and longevity.
Remember: speed is the enemy of precision. Take your time, respect the materials, and prioritize gentle solutions over brute force. Your laptop deserves the same care you give to other valuable electronics.


 浙公网安备
33010002000092号
浙公网安备
33010002000092号 浙B2-20120091-4
Comments
No comments yet. Why don't you start the discussion?