
Removing old wallpaper can breathe new life into a room, but doing it incorrectly risks gouging, softening, or tearing the underlying drywall. Many homeowners attempt quick fixes that lead to costly repairs. The key to success lies in preparation, patience, and using the right method for your specific wallpaper type. Whether you’re dealing with vintage vinyl, stubborn paste-backed paper, or delicate textured coverings, this guide walks you through every phase of safe removal—preserving your walls and saving time on patchwork afterward.
Understanding Your Wallpaper Type
Not all wallpaper is created equal. Before applying any moisture or pressure, identify what you're working with. The structure and adhesive used determine the best removal strategy. Common types include:
- Vinyl wallpaper: Durable and moisture-resistant; requires scoring before steaming or chemical application.
- Foil or metallic finishes: Often non-porous; react poorly to water-based solutions and may need specialized removers.
- Paper-on-paper (traditional): Easier to strip if not sealed; responds well to steam or wetting.
- Textured or grasscloth: Delicate surfaces; often require gentle misting rather than soaking.
- Self-adhesive or peel-and-stick: Designed for easier removal but can leave residue if aged.
Perform a small test patch in an inconspicuous area. Use a utility knife to make a shallow “X” in the corner. Apply warm water or remover, wait 10 minutes, then try lifting an edge. Observe how easily the layers separate and whether the drywall surface remains intact.
Essential Tools and Safety Precautions
Gathering the correct tools ensures efficiency and reduces the risk of wall damage. Working with chemicals and sharp instruments also demands protective measures.
Tools You’ll Need
- Wallpaper scoring tool (manual or electric)
- Steamer or spray bottle with warm water
- Plastic scraper (wide-edged, flexible)
- Drywall putty knife (for edges and corners)
- Drop cloths or plastic sheeting
- Bucket and sponge
- Chemical wallpaper remover (optional, depending on type)
- Safety goggles, gloves, and mask
Safety First
Older homes may contain lead-based paint beneath wallpaper. If your house was built before 1978, consider testing for lead prior to sanding or aggressive scraping. Always wear nitrile gloves when handling chemical removers and ensure proper ventilation. Avoid inhaling fumes from solvents or mold spores that might be trapped behind damp paper.
“Improper removal techniques account for over 60% of drywall damage during renovations. Taking time to score and soften properly prevents unnecessary wall replacement.” — James Holloway, Residential Renovation Supervisor, NW Home Integrity Group
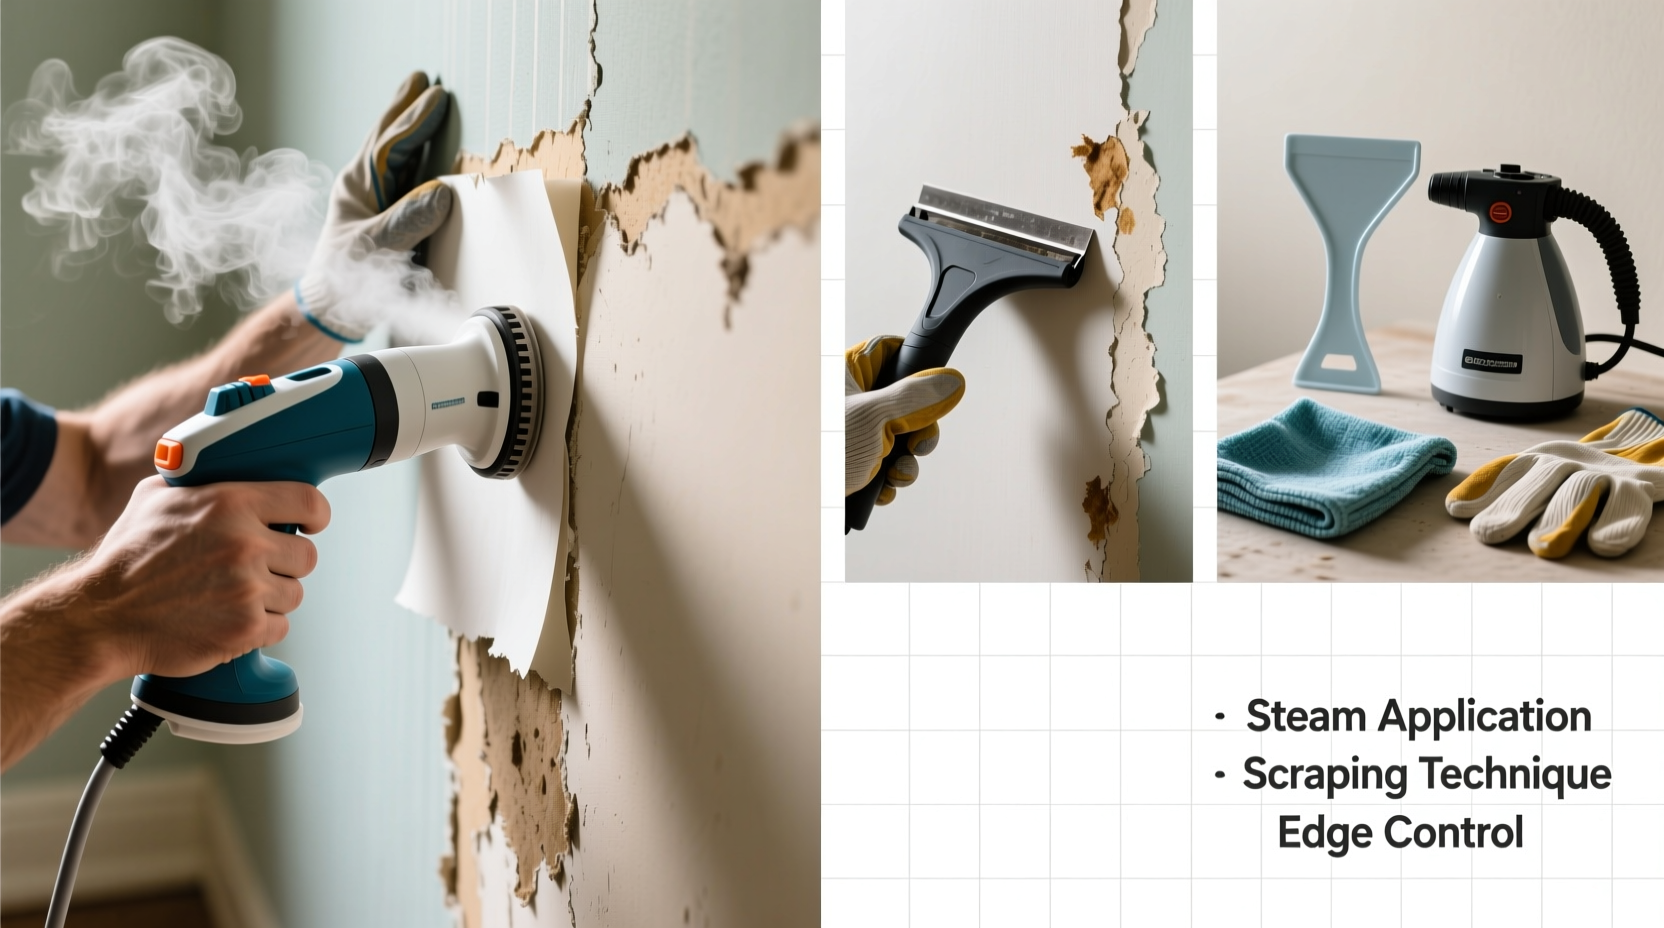
Step-by-Step Removal Process
Follow this sequence carefully to minimize stress on drywall while ensuring complete removal of both paper and adhesive residue.
- Clear the Room and Protect Surfaces
Remove furniture or cover it completely. Lay drop cloths along baseboards and floors. Turn off electrical power to outlets and switches; remove faceplates carefully. - Score the Wallpaper
Use a wallpaper scorer to create tiny perforations across the surface. This allows moisture or remover to penetrate the backing. Press firmly but avoid digging too deep—only enough to break the top layer. Work in 3x3 foot sections to maintain control. - Apply Moisture or Remover Solution
- For water-soluble wallpapers: Fill a pump sprayer with warm water and lightly mist the scored area. Let sit for 10–15 minutes.
- For vinyl or sealed types: Use a commercial remover like DIF or Safest Stripper. Mix according to label instructions and apply generously. Cover treated areas with plastic wrap to slow evaporation.
- Alternative method – Steam: Hold a wallpaper steamer against the wall for 30–60 seconds per square foot. Peel immediately after softening.
- Peel Gently with a Plastic Scraper
Start at a seam or corner. Use steady upward motion to lift the paper. If resistance occurs, reapply solution and wait longer. Never yank or use metal scrapers directly on drywall. - Remove Adhesive Residue
Once paper is gone, sticky paste often remains. Mix warm water with a tablespoon of baking soda or use diluted wallpaper remover. Sponge onto the wall, let soak for 5 minutes, then wipe with a damp cloth. For tough spots, use a fine-grit sanding sponge (120–150 grit) gently—avoid sanding through the drywall paper. - Rinse and Dry Thoroughly
Wipe down walls with clean water to remove chemical traces. Allow 24–48 hours of air drying before priming or painting. Use fans to speed up the process and prevent mold growth.
Do’s and Don’ts During Wallpaper Removal
| Do’s | Don’ts |
|---|---|
| Test a small area first to assess adhesion and material type | Assume all wallpaper will come off the same way |
| Use a plastic scraper to protect drywall surface | Use metal putty knives or aggressive wire brushes |
| Keep walls moist during removal to prevent tearing | Let treated areas dry out mid-process |
| Work in manageable sections (3x3 feet) | Try to rush large areas at once |
| Wear gloves and eye protection | Ignore ventilation when using chemical removers |
Real-World Example: Removing 1980s Vinyl in a Rental Unit
A property manager in Portland, Oregon faced peeling vinyl wallpaper in a two-bedroom rental. Previous tenants had tried ripping it off, leaving torn drywall and exposed seams. The manager followed these steps:
- Used an electric scoring tool to evenly perforate the shiny surface.
- Applied a citrus-based remover (SaferStrip) mixed with warm water.
- Covered each section with plastic for 20 minutes to retain moisture.
- Removed paper with a wide plastic scraper, keeping the blade angled low.
- Washed remaining glue with a vinegar-water solution (1:3 ratio).
The result? No drywall replacement needed. Only minor spot repairs were required, cutting renovation costs by nearly $800 compared to full board replacement. The entire process took two days with one person working six hours per day.
Post-Removal Wall Assessment and Repair
After stripping, inspect the drywall closely under bright light. Look for:
- Tears in the paper facing
- Soft or bubbled areas (signs of moisture damage)
- Nail pops or loose seams
- Residual adhesive or mold stains
Minor imperfections can be sanded and primed. Larger issues require joint compound and tape. Apply a thin layer with a 6-inch knife, feathering edges outward. Let dry completely, then sand smooth. Always prime bare drywall or repaired areas with a sealing primer like Zinsser Gardz before painting.
FAQ: Common Questions About Wallpaper Removal
Can I paint over wallpaper instead of removing it?
You can, but it’s not recommended long-term. Bubbles, seams, and future moisture exposure may cause failure. Painting seals in any mold or mildew, creating health risks. Proper removal ensures a durable, clean surface.
How long does it take to remove wallpaper from a standard bedroom?
For a 12x12 ft room with average-condition wallpaper, expect 6–10 hours over one to two days. Heavily layered or vinyl-coated paper may take longer. Factor in drying time before proceeding to painting.
Is steaming better than chemical removers?
Steaming avoids chemicals and works quickly on traditional paper, but it’s less effective on vinyl or multiple layers. It also requires electrical access and physical stamina. Chemicals work well in enclosed spaces but need ventilation. Choose based on wallpaper type and your comfort level.
Final Checklist: Did You Complete Everything?
- ✅ Identified wallpaper type with test patch
- ✅ Scored the surface evenly without gouging drywall
- ✅ Applied appropriate remover or steam effectively
- ✅ Stripped paper using plastic scraper with minimal pressure
- ✅ Cleaned adhesive residue thoroughly
- ✅ Inspected and repaired drywall as needed
- ✅ Allowed full drying time before next steps
- ✅ Disposed of debris properly (do not flush paste down drains)
Conclusion: Take Pride in a Job Done Right
Removing wallpaper isn’t glamorous, but doing it correctly protects your home’s integrity and sets the stage for beautiful results. Rushing leads to dents, holes, and frustration. By following these detailed steps, you preserve drywall, avoid expensive repairs, and gain confidence in tackling future projects. Whether refreshing a single accent wall or prepping for a full remodel, your careful effort today ensures smoother painting, cleaner finishes, and lasting satisfaction tomorrow.


 浙公网安备
33010002000092号
浙公网安备
33010002000092号 浙B2-20120091-4
Comments
No comments yet. Why don't you start the discussion?