
Holiday lights bring warmth, joy, and festive charm to homes every season. But when it's time to pack them away, many people face the same frustrating problem: tangled wires that take hours to unravel the following year. The good news is that with a little planning and the right techniques, you can store your holiday lights safely and keep them tangle-free for years to come. This guide walks through proven strategies—from winding methods to smart containers—that make setup faster, safer, and more enjoyable.
The Cost of Poor Light Storage
Tangled holiday lights aren’t just an annoyance—they can shorten the lifespan of your strings, damage bulbs, and even create electrical hazards. When wires are yanked apart or bent sharply during untangling, internal filaments break, sockets crack, and insulation wears down. Over time, this leads to flickering lights or complete strand failure.
According to the National Fire Protection Association (NFPA), damaged holiday lighting contributes to hundreds of home fires annually. Proper storage isn’t just about convenience; it’s a safety issue. By taking care now, you protect not only your investment but also your family and home.
Step-by-Step Guide to Tangle-Free Storage
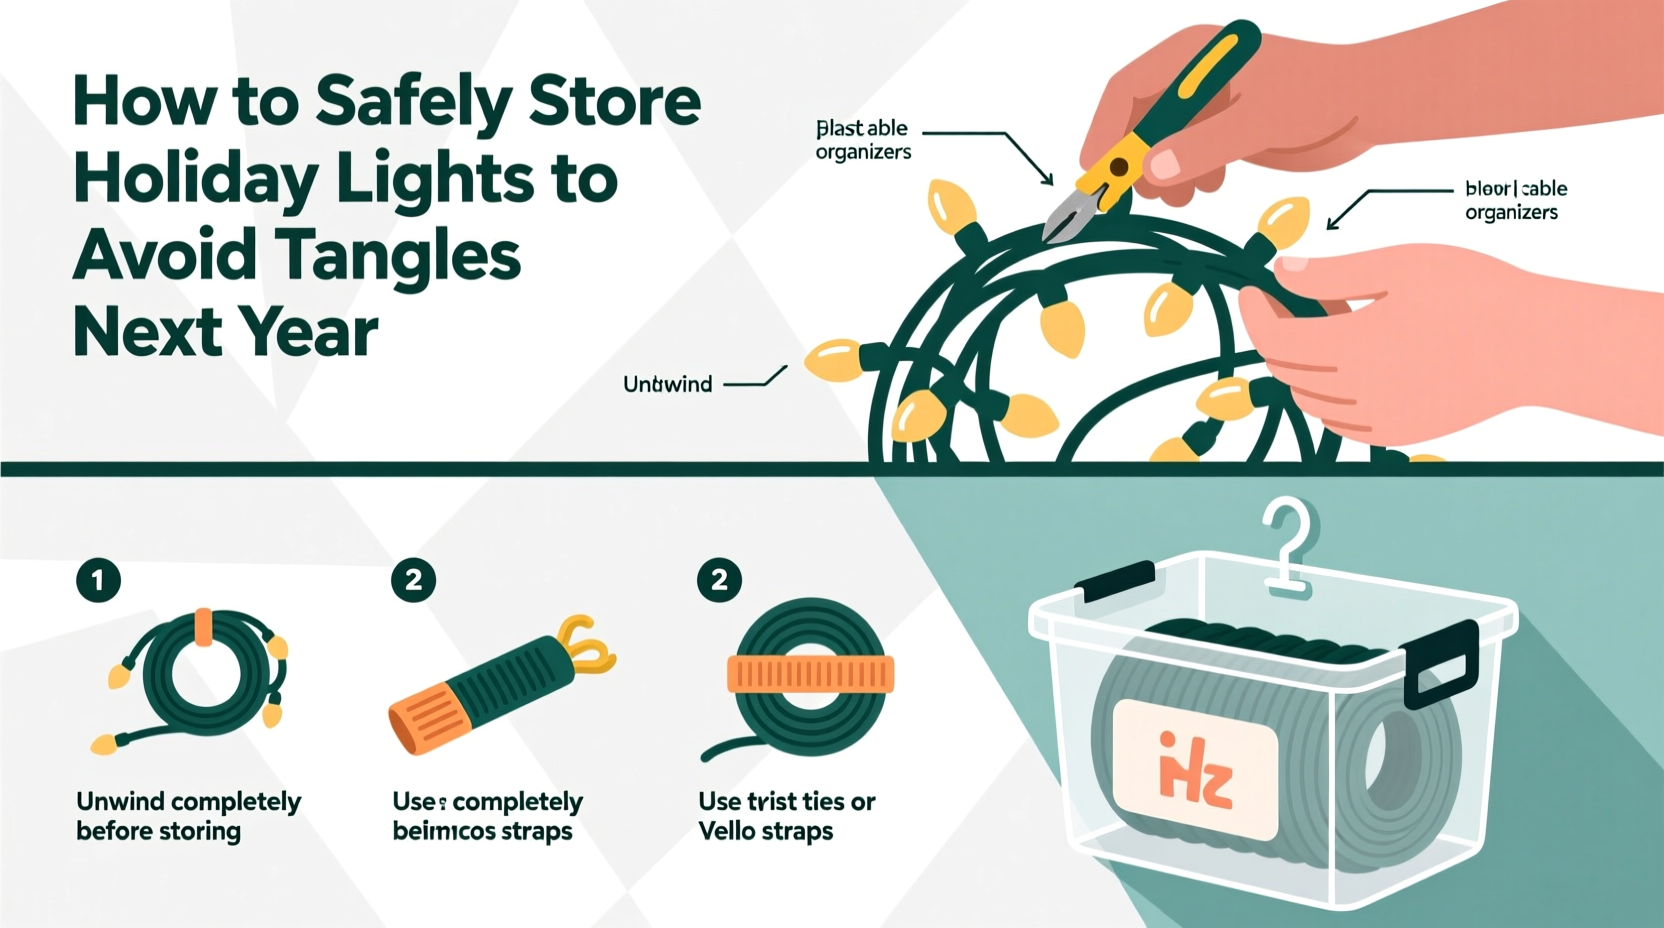
Storing holiday lights properly doesn’t require special tools or expertise. Follow these six steps to ensure your lights remain organized and functional year after year.
- Test and Repair First
Before packing anything away, plug in each string to check for dead bulbs or sections. Replace faulty bulbs and set aside broken strands for recycling or repair. - Clean Gently
Wipe down cords and bulbs with a dry microfiber cloth. If needed, use a slightly dampened cloth for outdoor lights exposed to dirt or weather. Never submerge lights in water. - Choose a Winding Method
Select one consistent method (discussed below) and apply it across all similar types of lights. Consistency reduces confusion later. - Label Each Strand
Use masking tape or waterproof labels to note length, color, bulb type, and where they were used (e.g., “Front Porch – 50 Red LEDs”). - Store in Protective Containers
Place coiled lights in bins that shield against dust, moisture, and crushing weight. - Keep in a Climate-Controlled Area
Avoid attics, garages, or basements with extreme temperatures or humidity unless properly insulated.
Why One Method Matters
Mixing winding styles leads to inconsistent tension and increases the chance of kinks forming over time. Stick with one reliable technique per light type—especially between delicate incandescent strands and sturdier LED ropes.
Top 3 Winding Techniques for Tangle Prevention
How you coil your lights determines whether they’ll pull apart easily or become a knotted mess. Here are three professional-grade methods worth mastering.
1. The Over-Under Method
This classic technique, borrowed from theater stagehands managing audio cables, prevents twist buildup by alternating the direction of each loop.
- Hold the plug end in one hand.
- Create a loop by bringing the cord over your fingers.
- For the next loop, bring the cord under your fingers.
- Alternate “over” and “under” until the entire strand is wound.
- Secure with a twist tie, Velcro strap, or reusable cable lock.
This method balances torsion and keeps the cord naturally flat when unwound.
2. The Cardboard Spool Method
Ideal for longer strands or fragile vintage lights, this approach uses a rigid base to maintain shape.
- Cut a rectangle of corrugated cardboard (about 8” x 12”).
- Poke two slits near the top and bottom edges.
- Thread the plug through the top slit and begin wrapping the cord vertically around the board.
- Wrap loosely to avoid pressure on bulbs.
- Once finished, thread the end into the bottom slit to secure.
Stack multiple boards together and store upright in a bin. This also makes identification easier if you label the front.
3. The Toilet Paper Roll Hack
A clever, low-cost solution perfect for shorter strands like garland lights or mini twinkle sets.
- Slide the plug end into the center of a toilet paper roll.
- Wrap the cord around the outside of the roll.
- When complete, tuck the male end into the core or wrap once more to hold it in place.
These rolls stack neatly in drawers or boxes and prevent tight coiling that causes memory bends in wire.
Choosing the Right Storage Container
Even perfectly wound lights can become damaged without proper protection. The container you choose affects durability, accessibility, and space efficiency.
| Container Type | Best For | Pros | Cons |
|---|---|---|---|
| Plastic Bins with Lids | All light types, especially outdoor sets | Dustproof, crush-resistant, stackable | Bulkier than soft options |
| Fabric Cable Bags | Indoor LED strings, delicate bulbs | Soft padding, labeled pockets, compact | Not waterproof |
| Shoe Organizer (Hanging) | Small strands, spare bulbs, timers | Visible access, wall-mounted, saves floor space | Limited weight capacity |
| Original Packaging | New or specialty lights | Designed for product, includes specs | Takes up irregular space |
Regardless of choice, always store containers off concrete floors and away from rodents. Consider adding silica gel packs inside bins to reduce moisture buildup.
Real Example: How a Home Decorator Solved Her Annual Mess
Sarah M., a seasonal decorator from Portland, Oregon, used to spend nearly eight hours every November untangling her extensive light collection—some 47 strands collected over 15 years. She stored everything in a single plastic tub, tossing them in after the holidays without organization.
After replacing three malfunctioning strands in one season, she decided to overhaul her system. She adopted the over-under method for her indoor lights, used cardboard spools for icicle strands, and invested in a clear plastic bin with dividers. Each strand was tested, labeled, and wound consistently.
Last year, she unpacked all her lights in under 45 minutes—with zero tangles. “It changed my whole holiday experience,” she said. “I actually look forward to decorating now instead of dreading the knot monster.”
“Proper storage adds at least three extra seasons to most holiday light sets.” — Mark Tran, Electrical Safety Consultant at Consumer Home & Lighting Institute
Common Mistakes That Cause Tangles
Avoid these frequent errors that compromise even well-intentioned storage efforts:
- Throwing lights loosely into bins: Even short drops create twists that tighten over months.
- Using tight rubber bands: These degrade and snap, plus they can cut into insulation.
- Coiling while still warm: Never wind lights immediately after use—heat weakens plastic and metal components.
- Ignoring bulb spacing: Bulky C9 or net lights need looser wraps to avoid socket stress.
- Storing near heavy items: Pressure flattens coils and misaligns wiring paths.
Storage Checklist: Prepare Your Lights for Next Year
Use this checklist as a final review before sealing your storage container:
- ✅ All lights have been tested and non-working bulbs replaced
- ✅ Damaged or frayed strands removed and disposed of safely
- ✅ Cords cleaned and completely dry
- ✅ Chosen winding method applied consistently
- ✅ Each strand secured with a soft tie (fabric, Velcro, twist)
- ✅ Labels attached indicating length, color, location, and voltage
- ✅ Stored in durable, closed container away from moisture and pests
- ✅ Container placed in climate-controlled environment (ideally 40–70°F)
Frequently Asked Questions
Can I hang holiday lights in storage to prevent tangles?
Hanging lights loosely over hooks or rods may seem convenient, but it often leads to sagging loops that shift and tangle over time. Gravity pulls on lower sections, increasing strain at bend points. A better alternative is using vertical spools or flat-wound storage in bins where shape is maintained.
Should I leave holiday lights plugged in during storage?
No. Always unplug lights before storing. Residual current is unlikely, but disconnected power eliminates any risk of short circuits due to environmental factors like condensation. Also, unplugging helps preserve switch mechanisms and timer batteries.
Are there products specifically designed for light storage?
Yes. Several companies manufacture dedicated holiday light reels, rotating storage units, and compartmentalized bins. Look for models with padded edges, labeling areas, and ventilation. While not essential, they can save time and improve longevity—especially for large displays.
Final Thoughts: Make Next Year Easier Than This One
The few extra minutes spent organizing your holiday lights after the season ends will save you hours—and frustration—next December. Tangle-free storage isn’t magic; it’s consistency, care, and a bit of smart planning. Whether you adopt the over-under method, build DIY cardboard spools, or invest in specialized bins, the key is doing it right once and repeating the process every year.
Your future self will thank you when the holidays return and your lights come out smoothly, shine brightly, and stay intact for many seasons to come.


 浙公网安备
33010002000092号
浙公网安备
33010002000092号 浙B2-20120091-4
Comments
No comments yet. Why don't you start the discussion?