
Trimming your cat’s nails doesn’t have to end in scratches, hisses, or a panicked dash under the bed. Many cat owners dread nail trims because they’ve been bitten or clawed during past attempts. But with the right approach, patience, and preparation, you can make this routine care task calm, safe, and even bonding—for both you and your feline.
Cats don’t naturally shed their claws like dogs do through walking on hard surfaces. Indoor cats, especially, need regular nail maintenance to prevent overgrowth, splitting, or accidental snagging in furniture and skin. More importantly, well-trimmed nails reduce the risk of painful ingrown claws and keep your family and furnishings safer. The key isn’t speed or force—it’s trust, technique, and timing.
Why Nail Trimming Matters (And Why Cats Resist)
Cats are predators by instinct, and their claws are essential tools for hunting, climbing, and self-defense. When you attempt to handle their paws, your cat may interpret it as a threat. This natural wariness explains why many resist nail trims so strongly. However, avoiding nail care leads to longer-term problems: overgrown nails can curl into the paw pad, causing pain and infection. Senior cats, in particular, often struggle to shed outer nail layers and benefit greatly from regular trimming.
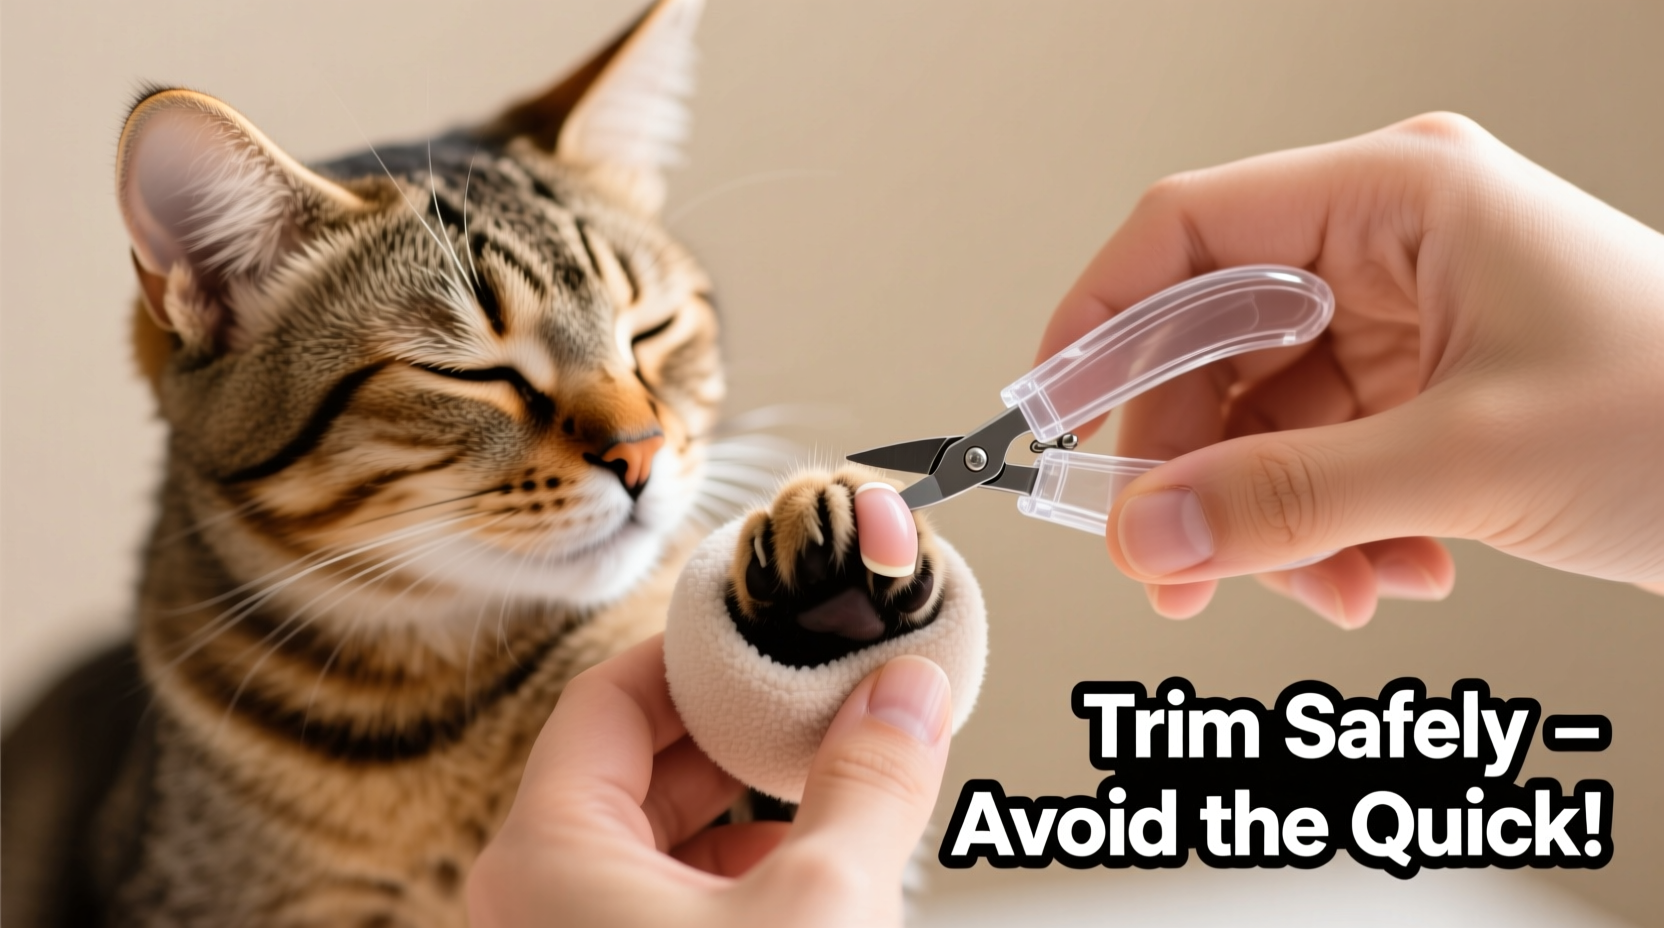
The goal isn’t to eliminate scratching behavior—cats need to scratch to stretch muscles and mark territory—but to manage nail length between natural shedding cycles. A well-executed trim removes only the sharp, translucent tip of each claw, well before the pink “quick” (the blood vessel inside). Avoiding the quick prevents pain and bleeding, which can traumatize your cat and make future trims harder.
Essential Tools and Setup for Success
Having the right tools makes all the difference. Using human nail clippers or dull pet trimmers increases the risk of crushing the nail or slipping, which can hurt your cat and scare them off future sessions.
| Tool | Recommended Type | Why It Matters |
|---|---|---|
| Nail Clippers | Guillotine-style or scissor-style pet clippers | Precise cut; less likely to crush the nail |
| Grinder | Electric pet nail grinder with low noise | Safer for dark nails; smooths sharp edges |
| Styptic Powder | Commercial clotting powder (e.g., Kwik-Stop) | Stops bleeding instantly if you nick the quick |
| Treats | Small, soft, high-value treats | Reinforces positive behavior during and after |
| Towel | Medium-sized cotton towel | For gentle restraint if needed (burrito method) |
Before starting, pick a quiet time when your cat is relaxed—after a meal or nap is ideal. Set up your tools within reach but out of sight until needed. Choose a consistent location, such as a bathroom counter or sturdy table, where you can work comfortably at eye level.
“Successful nail trimming starts days before the actual cut. Desensitization is more important than the tool you use.” — Dr. Sarah Thompson, Feline Behavior Specialist
Step-by-Step Guide: A Calm and Safe Nail Trim
Follow this gradual process to minimize stress and maximize cooperation. Rushing undermines progress—this isn’t about finishing fast, but building long-term trust.
- Start with Paw Handling Practice
For several days before trimming, spend a few minutes daily touching your cat’s paws. Gently press each toe to extend the claw, then release. Reward with a treat immediately after. Do not attempt to cut during this phase. - Introduce the Tool Without Use
Hold the clippers near your cat while giving treats. Click them softly away from the paw to desensitize your cat to the sound. Never point them at the foot during early exposure. - Choose One Paw to Begin
Pick a front paw—these claws are typically longer and used more aggressively. Gently press the top of the toe pad to extend the claw. Look closely: in light-colored nails, you’ll see the pink quick receding from the tip. Cut only the clear, hook-shaped portion, leaving at least 2 mm clearance. - Make the Cut Quickly and Confidently
Position the clippers perpendicular to the nail. A clean, swift snip works better than hesitation. If using a grinder, hold it lightly against the tip for 2–3 seconds at a time, letting your cat get used to the vibration. - Reward Immediately
After each nail (or even each paw), give a treat and verbal praise. Keep sessions under five minutes. If your cat pulls away, stop and try again later. - Repeat Over Several Days
Trim two to three nails per session. Front paws usually require attention every 2–3 weeks; back paws less frequently. Most cats tolerate 1–2 nails trimmed daily without protest.
Handling Difficult Cats: Realistic Solutions
Not all cats will sit still, no matter how patient you are. Some become aggressive, others freeze or flee. In these cases, alternative strategies can help.
Take Luna, a 7-year-old rescue tabby adopted by Maria in Portland. Luna had never had her nails trimmed and reacted to paw handling with loud growling and swatting. Maria started by simply sitting near Luna with the clippers in her pocket, offering treats. After a week, she began touching Luna’s shoulders, then legs, then briefly holding a paw—always ending with a treat and stopping before resistance began.
Over three weeks, Maria progressed to extending one claw and simulating a cut with closed clippers. On day 22, she successfully trimmed one nail. By day 30, Luna allowed two nails trimmed per day. Today, Luna hops onto the table when she sees the treat jar—proof that consistency builds comfort.
For highly resistant cats, consider the “burrito wrap” method: gently roll your cat in a towel, leaving one paw exposed. This reduces flailing and helps focus your cat. Be sure not to constrict breathing or apply pressure. Some cats respond better to being held upright against your chest, paws forward, allowing access without full restraint.
If aggression persists despite training, consult your veterinarian. Chronic fear may indicate underlying anxiety or pain. In some cases, sedation or professional grooming under veterinary supervision is the safest option.
Do’s and Don’ts of Cat Nail Trimming
| Do’s | Don’ts |
|---|---|
| Trim nails every 2–3 weeks | Wait until nails are visibly curled or snagging |
| Use sharp, cat-specific clippers | Use dull or human nail clippers |
| Cut only the translucent tip | Cut into the pink quick |
| Keep styptic powder on hand | Panic if you cause minor bleeding |
| Work when your cat is calm | Force a trim during playtime or alertness |
| Use high-value treats (e.g., chicken, tuna) | Offer dry kibble as a reward |
One common mistake is attempting to trim all nails in one session with an uncooperative cat. This often results in injury, fear, and a breakdown in trust. Instead, break the process into micro-sessions. Even touching the paw without cutting is progress if your cat stays calm.
Frequently Asked Questions
What if I accidentally cut the quick?
It happens—even experienced groomers occasionally nick the quick. Stay calm. Apply styptic powder or cornstarch with gentle pressure for 30–60 seconds. The bleeding usually stops quickly. Comfort your cat with soothing words and a treat. Avoid trimming for a few days to allow healing, then resume with extra caution.
Can I use a human nail file instead of clippers?
A manual file can work for very small adjustments but isn’t efficient for full trims. It also requires prolonged holding, which most cats won’t tolerate. For shaping or smoothing sharp tips after clipping, a fine-grit emery board or pet-safe grinder is more effective.
My cat hates all nail tools. Are there alternatives?
Yes. Nail caps (like Soft Paws) are plastic covers glued over trimmed nails. They last 4–6 weeks and prevent damage from scratching. They require trimming first, but once applied, they eliminate the need for frequent cuts. Alternatively, provide multiple scratching posts—vertical and horizontal—to encourage natural nail shedding.
Building a Lifelong Grooming Habit
The ultimate goal is to make nail trimming a neutral or even positive experience. Cats thrive on routine. Once your cat associates paw handling with treats and calm interaction, the process becomes easier over time. Kittens are ideal candidates for early training, but older cats can learn new habits too—with patience.
Integrate nail checks into your weekly routine. Simply pressing each toe to inspect the claw takes seconds and helps you spot issues early. Regular inspection also keeps you aware of growth patterns and health changes, such as redness, swelling, or discoloration, which could signal infection or disease.
“Cats aren’t stubborn—they’re cautious. Respect their pace, and they’ll reward you with cooperation.” — Dr. James Reed, Veterinary Dermatologist and Behavior Consultant
Conclusion: Turn Stress into Success
Trimming your cat’s nails safely isn’t about mastering a trick—it’s about understanding feline behavior, preparing thoroughly, and proceeding with empathy. You don’t need to be a professional groomer to do this right. What matters most is consistency, gentleness, and respect for your cat’s limits.
Start today: pick up a pair of proper clippers, gather some tasty treats, and spend five minutes practicing paw touches. Celebrate small wins. Over time, those moments add up to a healthier, happier cat—and fewer surprise scratches during cuddle sessions.


 浙公网安备
33010002000092号
浙公网安备
33010002000092号 浙B2-20120091-4
Comments
No comments yet. Why don't you start the discussion?