
Decorating a real Christmas tree with fairy lights is one of the most magical traditions of the holiday season. The soft glow enhances the natural beauty of evergreen boughs and creates a warm, inviting atmosphere in any home. However, improper handling can lead to broken branches, uneven lighting, or even dangerous fire risks—especially when dealing with live trees that dry out over time. Done correctly, light wrapping preserves the tree’s structure, maximizes visual impact, and ensures a safe environment for your family throughout the holidays.
The key lies in preparation, technique, and ongoing maintenance. From choosing the right type of lights to understanding how heat builds up in enclosed spaces, every decision impacts both aesthetics and safety. This guide walks you through best practices backed by arborists, electricians, and professional decorators who specialize in holiday installations.
Choose the Right Type of Fairy Lights
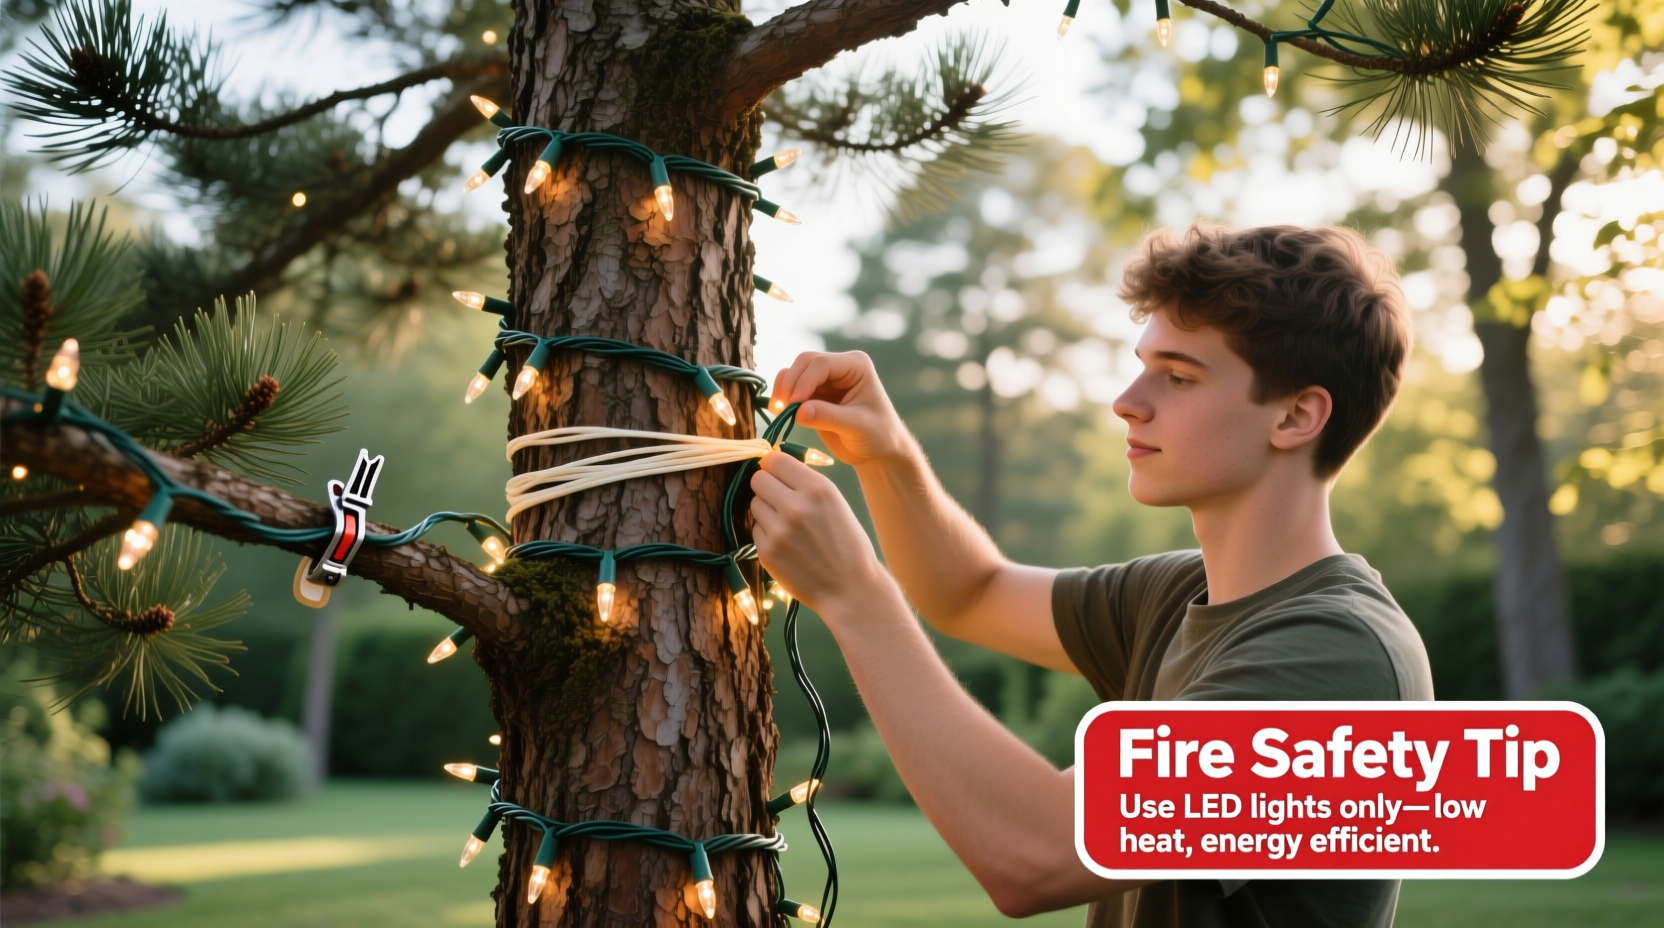
Not all string lights are created equal. When wrapping a real tree, LED fairy lights are strongly recommended over incandescent bulbs. LEDs produce significantly less heat, reducing the risk of igniting dry needles. They also consume up to 90% less energy and last longer—important considerations during extended display periods.
In addition to being cooler, LED lights are typically lighter in weight, which minimizes stress on delicate branches. Look for strings rated for indoor use with insulated wiring and shatterproof bulbs. Avoid older sets with exposed wires or cracked casings, as these increase electrical hazards.
For larger trees, consider using multiple shorter strands instead of one long chain. This prevents overloading circuits and allows for easier troubleshooting if part of the display fails. Always check manufacturer labels for maximum run limits (how many sets can be safely connected end-to-end).
Prepare Your Tree Properly Before Adding Lights
A well-prepared tree is essential for safe and effective lighting. Start by allowing your tree to acclimate indoors for at least 12 hours before decorating. Sudden temperature changes can cause sap to harden or needles to become brittle, increasing breakage risk during handling.
Before placing the tree in its stand, trim about half an inch from the base at an angle. This helps the trunk absorb water more efficiently. Place it in a sturdy stand filled with fresh water, and ensure the reservoir never runs dry. A hydrated tree remains flexible, resists drying, and is far less flammable than a dehydrated one.
“An adequately watered fir or spruce tree has a moisture content similar to a fresh cucumber—high enough to resist ignition under normal conditions.” — Dr. Alan Richter, Forest Products Safety Researcher
Give the tree time to settle and open up. Shake it gently to dislodge loose needles, then let it stand upright for several hours. This stabilizes the trunk and makes branch manipulation safer during decoration.
Step-by-Step Guide: How to Wrap Fairy Lights Safely
Wrapping lights around a real tree requires patience and a methodical approach. Follow this six-step process to achieve even coverage without harming the tree or compromising safety.
- Start at the Base of the Power Cord
Unravel the string completely and locate the plug end. Begin wrapping from the outlet side so excess cord can be neatly tucked behind the tree later. - Work from the Inside Out
Feed the first section of lights deep into the central core of the tree near the trunk. This creates depth and prevents a flat, two-dimensional look. Gently weave the wire through inner branches, securing it with minimal pressure. - Move Upward in a Spiral Pattern
Wrap the lights upward in a continuous spiral, moving outward toward the tips of the branches. Keep spacing consistent—about 4 to 6 inches between loops—for balanced illumination. Use a ladder only when necessary, and always have someone spot you. - Distribute Evenly Across All Sides
Rotate the tree stand slightly as you work to maintain symmetry. Step back frequently to assess visibility from different angles. Avoid clustering too many lights on one side, which can overload circuits and create hot spots. - Secure Without Constriction
Do not tie knots tightly around branches. Instead, use small plastic clips designed for Christmas lights or twist the wire loosely around itself. Never staple or nail lights into place—that damages bark and increases fire risk. - Test Before Finalizing
Once fully wrapped, plug in the lights to test functionality. Replace any burnt-out bulbs immediately. If using multiple strands, verify that none feel unusually warm after 15 minutes of operation.
Safety Checklist: Preventing Damage and Fire Hazards
Even minor oversights can compromise safety. Use this checklist before and after installation to minimize risks.
- ✅ Inspect all light strings for frayed wires, loose connections, or damaged sockets
- ✅ Confirm the tree stand holds water and is refilled daily
- ✅ Keep lights away from curtains, furniture, and high-traffic areas
- ✅ Install no more than three standard light sets per power strip
- ✅ Use a timer to limit operation to 8–12 hours per day
- ✅ Position the tree at least 3 feet from heaters, fireplaces, or vents
- ✅ Turn off lights when leaving home or sleeping
- ✅ Remove decorations before the tree dries out (typically after four weeks)
“The majority of Christmas tree fires occur in January—often because people leave dried-out trees lit for too long.” — National Fire Protection Association (NFPA) Safety Bulletin
Do’s and Don’ts: Common Mistakes to Avoid
| Do | Don’t |
|---|---|
| Use LED lights with low heat output | Use old incandescent mini-lights that get hot |
| Water the tree daily | Assume one watering lasts the whole season |
| Weave lights inward for depth | Only hang lights on outer edges |
| Use plastic clips to secure wires | Tie tight knots or use metal staples |
| Plug into a surge protector | Overload wall outlets or extension cords |
| Turn off lights when unattended | Leave lights on overnight or while traveling |
Real Example: A Close Call in Denver
In December 2022, a homeowner in Denver decorated her freshly cut Douglas fir with vintage incandescent lights she’d used for over a decade. She skipped checking the wiring, assuming they still worked since they lit up. After five days, the tree began shedding heavily—she didn’t refill the stand, thinking “one glass of water should be enough.”
On the seventh night, the family left the lights on while attending a holiday party. A neighbor noticed smoke coming from the living room window and called emergency services. Firefighters arrived just in time to extinguish flames spreading from the base of the tree. The incident caused $18,000 in damage but no injuries.
An investigation revealed two main causes: degraded insulation on the light wires sparked near dry needles, and the empty water basin allowed the lower trunk to ignite rapidly. The family now uses only UL-listed LED lights, checks them annually, and sets a phone reminder to refill the tree stand every morning.
Maintaining Safety Throughout the Season
Installation is just the beginning. Ongoing care determines whether your display remains beautiful—and safe—for weeks. Check the tree’s water level each morning; a typical six-foot tree can drink over a quart per day initially. Refill before the reservoir drops below the base of the trunk.
Monitor for signs of drying: brittle branches, excessive needle drop, or a faded scent. Once the tree loses its freshness, remove it promptly. Most municipal waste programs offer curbside pickup or recycling drop-offs in early January.
If using smart lights, set automated schedules to turn them off during late-night hours. Many models integrate with voice assistants or apps, allowing remote shutdown if you forget. Consider adding a smart plug with built-in overload protection—it cuts power automatically if current spikes occur.
Frequently Asked Questions
Can I reuse last year’s fairy lights on my real tree?
Yes, but inspect them thoroughly first. Look for cracked bulbs, exposed wires, or bent prongs. Plug them in for 15 minutes and touch the bulbs—if they’re warm, switch to cooler-running LEDs. Discard any set showing wear or inconsistent lighting.
Is it safe to wrap lights around pinecones or ornaments already on the tree?
Only if those items are non-flammable and securely attached. Avoid wrapping lights directly around fabric ribbons, paper decorations, or anything that could trap heat. Use clips to route wires beside, not through, decorative elements.
How many strings of fairy lights do I need for a 7-foot tree?
A general rule is 100 lights per foot of tree height. For a 7-foot tree, aim for 700–1000 bulbs. Using multiple smaller strands (e.g., 100-light sets) provides better control and reduces circuit strain compared to fewer longer strings.
Conclusion: Beauty Meets Responsibility
Wrapping fairy lights around a real tree blends tradition, artistry, and responsibility. With thoughtful preparation and attention to detail, you can create a breathtaking centerpiece that brings joy—not danger—to your home. Prioritize LED technology, maintain hydration, and follow structured wrapping techniques to protect both your tree and your household.
Safety doesn’t diminish charm; it enhances peace of mind. As the holidays unfold, take a moment each day to appreciate your work—and to ensure everything remains in good condition. When done right, your glowing evergreen becomes more than décor. It becomes a symbol of care, warmth, and lasting memories.


 浙公网安备
33010002000092号
浙公网安备
33010002000092号 浙B2-20120091-4
Comments
No comments yet. Why don't you start the discussion?