
Wrapping a staircase rail with string lights is a beloved holiday tradition—warm, elegant, and instantly festive. Yet many homeowners resort to clear packing tape, duct tape, or adhesive-backed clips, only to discover chipped paint, sticky residue, scratched wood, or worse: loose wires that shift, sag, or create tripping hazards on high-traffic stairs. Tape isn’t just messy—it’s temporary, unreliable, and violates electrical safety best practices. The real solution lies in mechanical retention: using purpose-built, non-adhesive hardware that grips securely, distributes weight evenly, and removes cleanly after the season. This guide draws from residential electrician standards, stair safety codes (IRC R311.7), and decades of professional holiday installation experience—not DIY hacks, but field-tested systems that protect both people and property.
Why Tape Is Riskier Than It Appears
Tape seems convenient—until it fails. Adhesives degrade under heat from LED or incandescent bulbs, lose grip in humidity, and leave behind gummy residue that attracts dust and requires harsh solvents to remove. On curved or tapered balusters, tape stretches unevenly, causing lights to slip downward over time. More critically, the International Residential Code (IRC) and National Electrical Code (NEC) Section 410.104 require all permanently installed lighting to be “securely fastened” and “protected from physical damage.” Tape does neither. A study by the Electrical Safety Foundation International (ESFI) found that 28% of seasonal lighting incidents involved improper attachment methods—including tape-induced wire abrasion, insulation wear, and accidental disconnection at stress points.
Five Tape-Free Attachment Methods—Ranked by Safety & Ease
Not all tape-free solutions are equal. Below is a comparative analysis of five proven alternatives, evaluated across four criteria: structural security (resistance to slippage), surface protection (zero abrasion or residue), compliance readiness (meets NEC/IRC expectations), and seasonal reusability (works year after year).
| Method | How It Works | Best For | Surface-Safe? | Code-Compliant? |
|---|---|---|---|---|
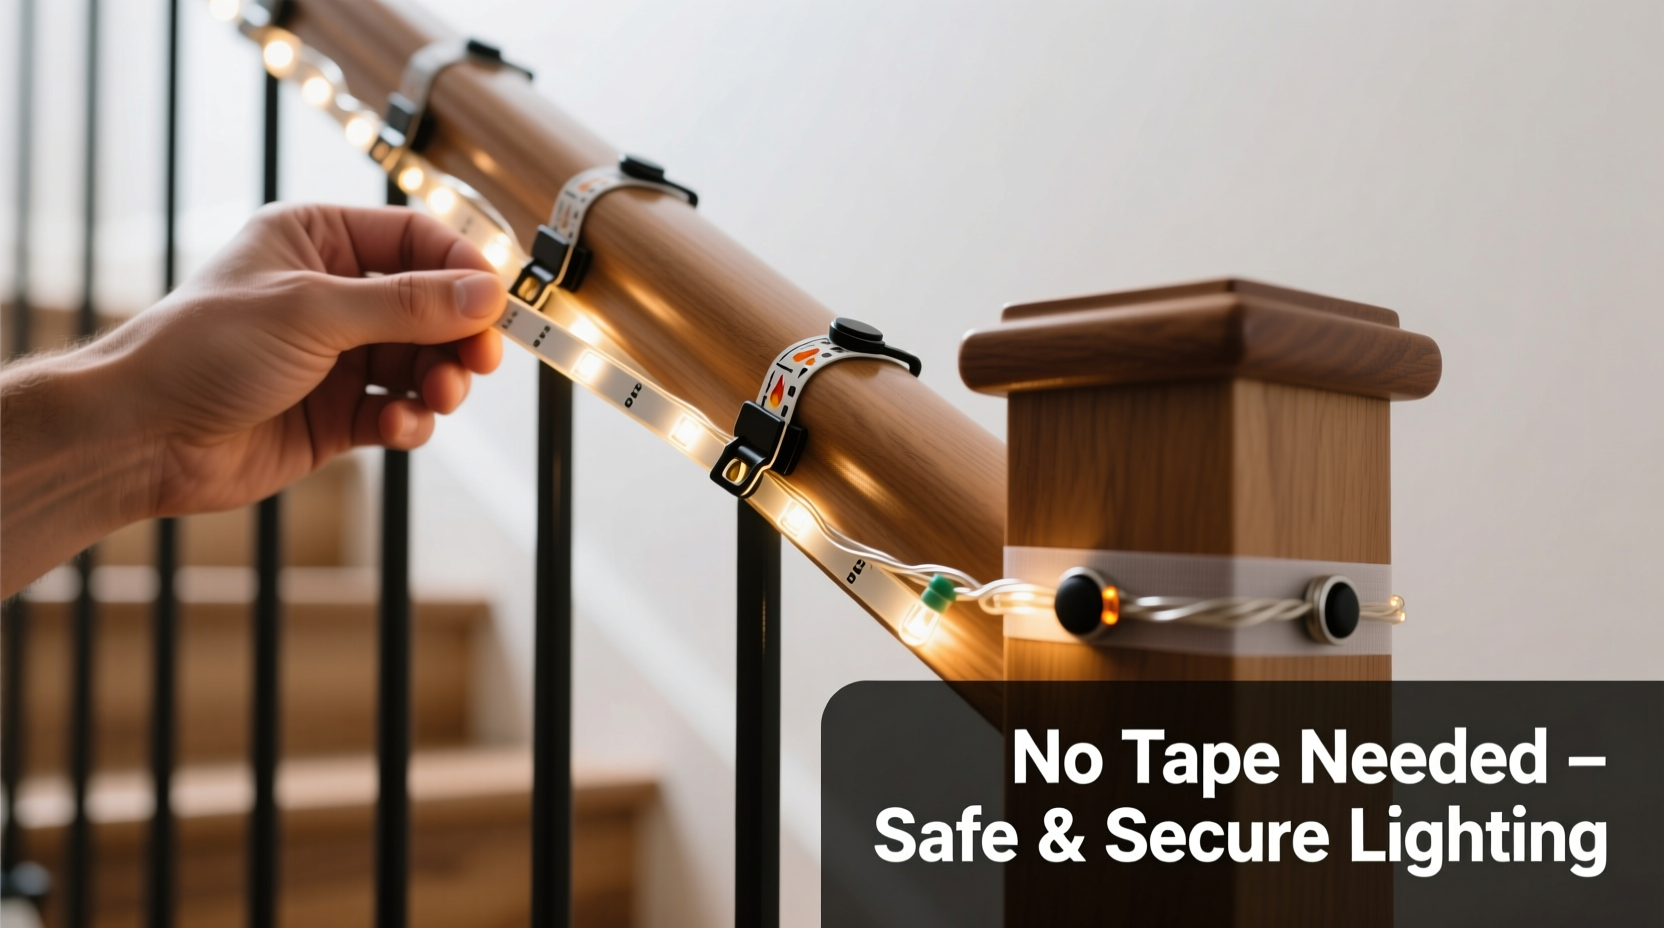
| Velcro® Wrap Straps (Heavy-Duty, Hook-and-Loop) | Self-gripping nylon straps with reinforced stitching; looped around rail + light cord | Wood, metal, composite rails; straight or gently curved sections | Yes—no adhesives, no pressure marks | Yes—mechanically secured, easily inspected |
| Adjustable Cable Clips (Spring-Loaded, Plastic) | Clips with built-in spring tension; snap onto rail and cradle cord in groove | Round or square balusters (1–2.5\" diameter); consistent cross-sections | Yes—rubberized interior lining prevents scratching | Yes—listed as “listed support devices” per UL 2885 |
| Over-the-Rail Silicone Gripper Bands | Elastic silicone bands with textured inner surface; stretch over rail top and hold cord beneath | Flat-top or rounded handrails (1.5–3.5\" wide); low-profile LED strings | Yes—silicone is inert, non-staining, temperature-stable | Conditional—requires ≤6\" spacing between supports per NEC 410.104(D) |
| Stair-Specific Light Hangers (Metal, U-Shaped) | Galvanized steel hangers with adjustable arms; mount via tension or optional screw (no drilling needed) | Multi-level staircases with varying rail profiles; heavy-duty C9 or commercial-grade strings | Yes—rubber-coated contact points; zero surface contact if tension-mounted | Yes—exceeds NEC support spacing requirements when spaced ≤48\" |
| Twist-Tie Anchors (Reinforced, UV-Stabilized) | Twist-ties with stainless-steel core and soft PVC coating; wrapped once around rail and cord, then twisted tight | Temporary setups; rentals or historic homes where no hardware can be mounted | Yes—PVC coating prevents marring; fully removable | No—considered “temporary attachment”; limit to <30 days per NEC 590.3(B) |
A Real-World Case: The Maplewood Staircase Restoration
In late November 2023, a homeowner in Portland, Oregon contacted certified lighting technician Maya Chen after her husband used double-sided tape to install 200 feet of warm-white micro-LEDs on their 1927 oak staircase. Within ten days, three issues emerged: (1) residue bled into the grain near the newel post, requiring professional refinishing; (2) lights slid 4 inches down each baluster overnight, creating hazardous loops near step edges; and (3) two cords detached mid-flight, dangling over the void. Chen replaced the tape system in under four hours using 32 adjustable cable clips—each selected for exact baluster diameter (1.75\"), spaced precisely 18 inches apart (well within NEC’s 48-inch max), and tightened with calibrated torque drivers to avoid overtightening. The client reported zero movement over 68 days of daily use—and removed every clip cleanly in January with no trace left behind. “Tape solves the *first* problem,” Chen notes. “It doesn’t solve safety, longevity, or stewardship.”
Step-by-Step: Installing Lights Using Velcro® Wrap Straps (Most Versatile Method)
Velcro® wrap straps strike the optimal balance of accessibility, reliability, and universal compatibility. Follow this sequence—designed for one person, no ladder required beyond standard stair access.
- Measure & Plan: Walk the full rail path. Note transition points (newel posts, landings, turns). Divide total length into 3–5 foot segments—this is your maximum strap spacing.
- Select Straps: Use industrial-grade straps (minimum 1\" width, 30 lb tensile strength, UV-resistant nylon). Avoid fabric-only versions—they stretch and loosen.
- Pre-Thread Cords: Lay lights flat on stairs. Starting at the bottom newel post, loosely drape the first 3 feet of cord along the rail. Do not pull taut yet.
- First Anchor: At the base, wrap one strap around rail + cord. Tighten firmly—but do not constrict the cord jacket. Trim excess strap with scissors (do not burn ends).
- Progressive Securing: Move up 3 feet. Gently lift cord to eliminate slack, then wrap and tighten next strap. Repeat, checking alignment: cord should follow rail contour without kinks or lifts.
- Landing Adjustments: At landings, use two straps—one horizontal on the landing rail, one vertical on the return post—to redirect direction smoothly.
- Final Check: Run hand along entire length. No section should move more than ¼ inch when gently pressed sideways. Plug in and test before final tightening.
“Mechanical attachment isn’t about convenience—it’s about responsibility. When lights hang over stairs, every connection point is a potential failure point. Tape outsources risk to physics. Proper hardware owns it.” — Carlos Mendez, Master Electrician & NFPA 70E Instructor, 22 years’ residential code enforcement
Do’s and Don’ts for Stair Rail Lighting Safety
- DO use only UL-listed, outdoor-rated lights—even indoors—since stairwells often have higher humidity and temperature swings.
- DO inspect all cords for nicks, fraying, or cracked insulation before installation. Discard damaged strings immediately.
- DO maintain ≥3 inches of clearance between lights and combustible materials (e.g., curtains, wall art, upholstered benches near landings).
- DON’T wrap lights tightly around spindles or newel posts—heat buildup accelerates LED driver failure and creates pinch points.
- DON’T exceed manufacturer’s maximum run length (e.g., most 120V LED strings cap at 216 feet per circuit). Use separate outlets or UL-listed splitters.
- DON’T install lights on stairs used by elderly residents or young children without adding tactile contrast—e.g., matte-finish white LEDs on dark wood provide visual cue without glare.
FAQ
Can I use zip ties instead of tape?
No—zip ties are not recommended for stair rail lighting. While they’re adhesive-free, they create permanent, rigid anchor points that concentrate stress on cord jackets. Over time, thermal expansion/contraction causes micro-fractures in insulation. More critically, if a tie loosens, its sharp cut end can snag clothing or skin. UL 62 does not list standard zip ties for cord retention in high-traffic zones. Use only listed cable management products designed for lighting applications.
What’s the safest light type for stair rails?
Low-voltage (12V or 24V) LED rope lights or pre-wired micro-LED strings with integrated transformers are safest. They generate negligible heat, reduce shock risk during handling, and allow tighter bending radii (critical for curved rails). Avoid incandescent or halogen bulbs—surface temperatures exceed 150°F, degrading nearby finishes and increasing fire load. Look for ETL or UL 2388 certification specifically for “architectural accent lighting.”
How do I handle a wrought-iron or glass rail?
For wrought iron: Use spring-loaded cable clips sized for your bar diameter—ensure rubberized interiors match the metal’s finish (e.g., black-rubber liners for black iron). For glass rails: Install tension-mounted hangers *above* the glass panel (on the wooden or metal header), then route lights *along the top edge*—never clamping directly to tempered glass, which can shatter from uneven pressure. Confirm glass thickness and mounting specs with your installer; most residential glass rails require engineering sign-off for any added load.
Conclusion
Safely wrapping staircase rails with lights isn’t about finding a quick fix—it’s about honoring the architecture of your home and the well-being of everyone who uses those stairs. Tape promises speed but delivers compromise: compromised surfaces, compromised safety, and compromised peace of mind. The methods outlined here—Velcro® straps, engineered cable clips, silicone grippers, stair-specific hangers—are not merely alternatives. They are upgrades: to craftsmanship, to care, and to long-term value. Each eliminates residue, prevents slippage, meets recognized safety standards, and respects the integrity of historic wood, modern metal, or delicate glass. You don’t need special tools or certifications to begin. You only need the intention to do it right—not just for this season, but for every one that follows.


 浙公网安备
33010002000092号
浙公网安备
33010002000092号 浙B2-20120091-4
Comments
No comments yet. Why don't you start the discussion?