
Scheduling social media content doesn’t have to mean paying for premium tools or juggling complex platforms. Most major social networks now offer free built-in scheduling features that are reliable, intuitive, and accessible directly from your account. Whether you're managing a personal brand, growing a small business, or handling community engagement, leveraging these native tools can save time, maintain consistency, and improve your posting rhythm—without spending a dime.
The key is knowing where to look, how to use each platform’s scheduler, and understanding the limitations so you can plan effectively. This guide walks through the full process across five major platforms, shares real-world applications, and provides actionable checklists to help you get started today.
Why Use Built-In Scheduling Tools?
Third-party schedulers like Buffer or Hootsuite are powerful, but they come with subscription costs and learning curves. For individuals, solopreneurs, or nonprofits on tight budgets, relying on free native options makes sense—especially when those tools are already integrated into the platforms you use daily.
Built-in schedulers eliminate the need to grant external app access to your accounts, reducing security risks. They also update in real time with platform changes, ensuring compatibility even after algorithm shifts or interface redesigns. Plus, since they’re maintained by the social networks themselves, bugs are typically fixed faster than third-party integrations can adapt.
“Native scheduling tools give users direct control without dependency on outside services. That means fewer points of failure and better alignment with platform best practices.” — Dana Reyes, Social Media Strategist at OpenWeb Labs
Step-by-Step: How to Schedule Posts on Major Platforms
Each network has its own workflow for scheduling. Below is a detailed walkthrough for Facebook, Instagram, LinkedIn, X (formerly Twitter), and Pinterest—all using only free, built-in functionality.
Facebook: Pages and Groups
If you manage a Facebook Page or administer a Group, you can schedule posts directly from desktop or mobile.
- Log in to your Facebook account and navigate to your Page or Group.
- Click “Create Post” in the composer box.
- Type your message, add photos, videos, or links as desired.
- Click the down arrow next to “Post” and select “Schedule.”
- Pick a date and time (up to six months in advance).
- Confirm the schedule. You’ll receive a notification when the post goes live.
Note: Scheduled posts appear under the “Published” tab with a clock icon. You can edit or delete them before publication.
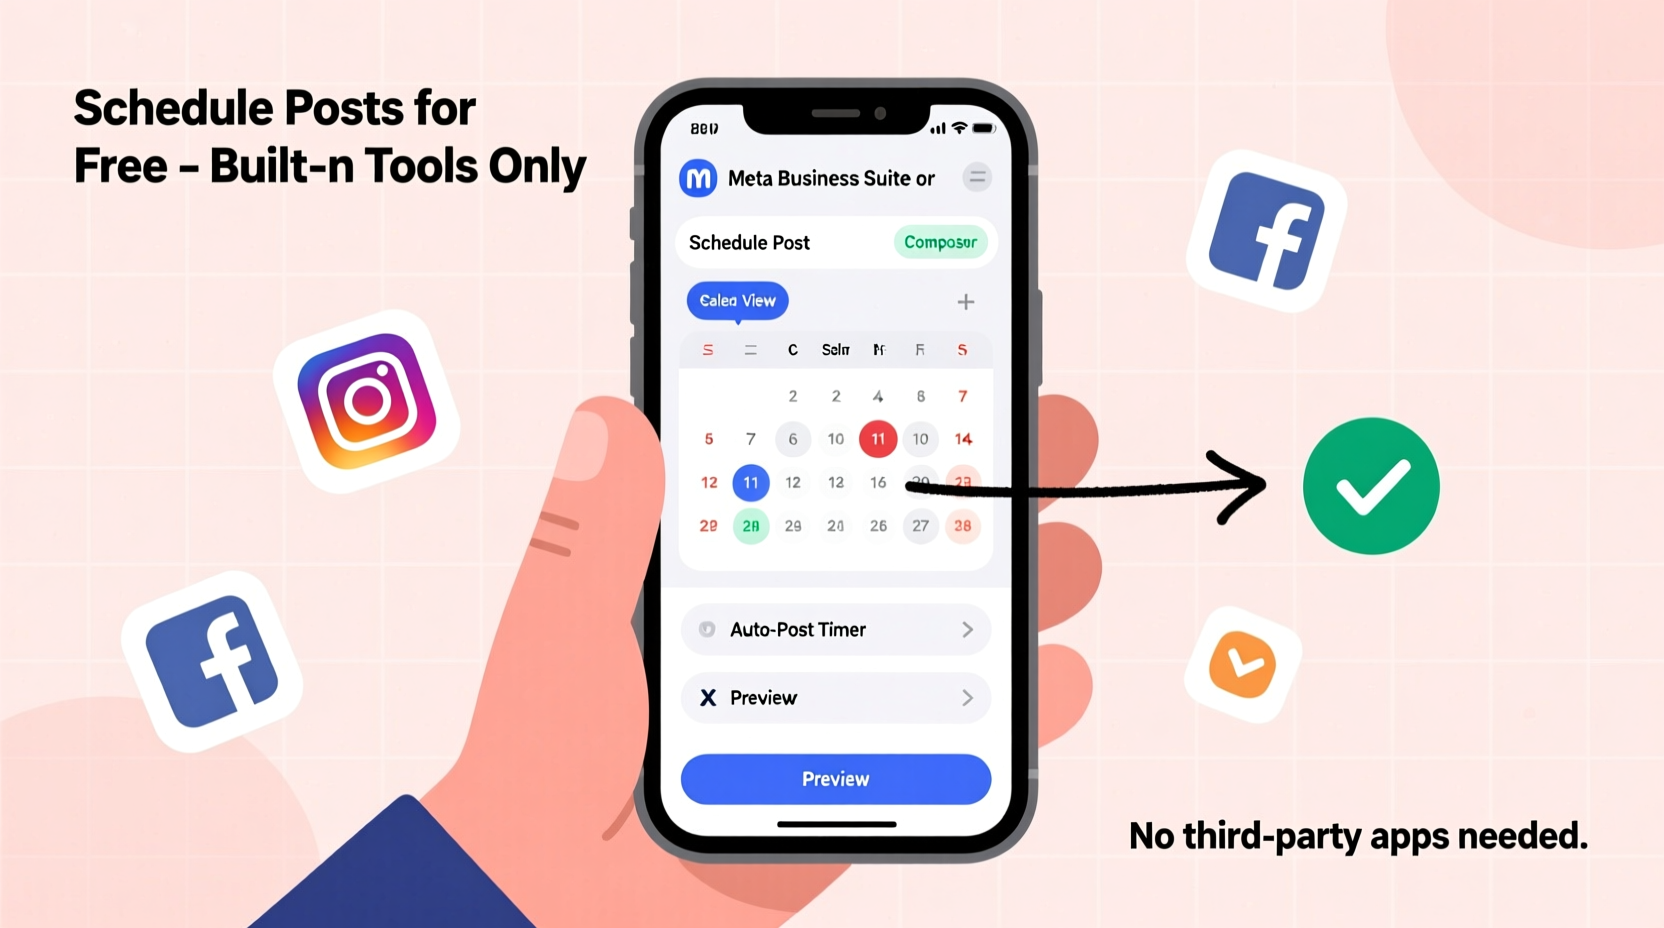
Instagram: Feed and Reels via Facebook Creator Studio (Meta Business Suite)
Instagram doesn’t allow direct scheduling within the mobile app, but it offers robust free scheduling through Meta Business Suite (formerly Facebook Creator Studio), which supports both feed posts and Reels.
- Go to business.facebook.com and log in with your Instagram-connected account.
- Select “Creator Studio” > “Create” > “Post” or “Reel.”
- Upload your image or video, write a caption, add hashtags, tag locations or accounts.
- Under “Publishing Options,” click “Schedule for Later.”
- Choose a specific date and time (within 7 days for Reels, up to 6 months for regular posts).
- Select your Instagram account and confirm scheduling.
Your scheduled content will appear in the Content Calendar view, where you can reschedule or cancel anytime.
LinkedIn: Personal Profiles and Company Pages
LinkedIn allows scheduling for both individual profiles and company pages. The interface is clean and straightforward.
- Navigate to your LinkedIn homepage or company page.
- Click “Start a post” at the top of your feed.
- Add text, images, documents, or links.
- Click the down arrow next to “Post” and choose “Schedule.”
- Select a future date and time (available up to one year ahead).
- Click “Schedule” to confirm.
Scheduled posts appear in your activity dashboard with an indicator showing their status. You can edit or cancel until the moment they publish.
X (Formerly Twitter): Direct Scheduling in Composer
X offers native scheduling for all users at no cost—a rare move among platforms. It works seamlessly across web and mobile.
- Open X.com or the X app and click “Post” (the blue feather icon).
- Write your tweet, attach media or polls if needed.
- Click the calendar icon below the composer (on desktop) or tap “More” then “Schedule” (on mobile).
- Select a date and time (up to two weeks in advance).
- Confirm scheduling. Your post will be saved to the “Scheduled” tab.
You can review, edit, or delete upcoming tweets under the “Scheduled” section in your profile menu.
Pinterest: Plan and Publish Ahead via Creator Tools
Pinterest encourages long-term planning and rewards consistent pinning. Its free scheduler is ideal for bloggers, educators, and visual marketers.
- Log in to your Pinterest business account.
- Click “Create” > “Pin Builder” or go to “Publishing Tools” > “Scheduler.”
- Upload an image, write a compelling description, add a destination link.
- Select “Schedule” instead of “Publish now.”
- Choose a specific day and time, or enable “Queue” to auto-schedule pins over time.
- Save and confirm.
Pins can be scheduled up to two years in advance, making Pinterest one of the most flexible platforms for long-range planning.
Best Practices for Effective Free Scheduling
Just because a tool is free doesn’t mean it should be used haphazardly. To maximize impact, follow these proven strategies when using built-in schedulers.
- Batch-create content weekly: Dedicate one session per week to writing captions, gathering visuals, and loading posts into the scheduler. This reduces daily friction.
- Time posts strategically: Use platform analytics to determine peak engagement times. For example, LinkedIn thrives mid-week during business hours, while Instagram often sees higher reach in evenings and weekends.
- Maintain authenticity: Avoid sounding robotic. Even pre-written posts should reflect current tone, trends, and audience sentiment.
- Monitor performance: Review insights after posts go live to refine future content. Native dashboards provide engagement data, reach, and follower growth metrics.
- Update evergreen content: Reshare high-performing posts every few months with slight tweaks to keep them relevant.
| Platform | Scheduling Access | Max Advance Time | Mobile Support | Visual Preview |
|---|---|---|---|---|
| Pages & Groups | 6 months | Yes | Yes | |
| Meta Business Suite | 6 months (posts), 7 days (Reels) | Limited (via web) | Yes | |
| Profile & Company Pages | 1 year | Yes | Yes | |
| X (Twitter) | Composer | 2 weeks | Yes | No (text-only preview) |
| Creator Dashboard | 2 years | Yes | Yes |
Mini Case Study: A Local Bakery Grows Engagement Without Spending a Dime
Jessica runs a small artisanal bakery in Portland and wanted to increase her online visibility without hiring a social media manager or paying for tools. She decided to commit to consistent posting using only free built-in schedulers.
Every Sunday evening, she spent 90 minutes photographing new pastries, writing captions, and scheduling posts across Facebook, Instagram, and Pinterest. She used Meta Business Suite to plan three Instagram posts per week and scheduled Facebook updates announcing weekend specials. On Pinterest, she created themed boards like “Brunch Ideas” and “Wedding Cakes” and queued pins to publish daily.
Within two months, her Instagram engagement rose by 45%, and website traffic from Pinterest increased by 60%. More importantly, she regained hours each week previously lost to last-minute posting stress. All of this was achieved using only native tools—no subscriptions, no downloads.
Checklist: Getting Started with Free Scheduling
Follow this step-by-step checklist to begin scheduling your social media content today—completely free.
- ✅ Confirm you have admin access to your business or creator accounts on target platforms.
- ✅ Switch personal accounts to professional profiles where applicable (e.g., Instagram to Creator, Facebook to Page).
- ✅ Set up a content calendar (use Google Sheets or Notes) to plan themes by week.
- ✅ Gather high-quality visuals and draft captions in batches.
- ✅ Log into each platform’s native scheduler (or Meta Business Suite for Instagram).
- ✅ Upload content, write engaging copy, and select optimal publish times.
- ✅ Double-check timezone settings to avoid misfires.
- ✅ Monitor scheduled posts list regularly and adjust as needed.
- ✅ After publishing, review analytics weekly to refine strategy.
- ✅ Reuse top-performing content every 6–8 weeks with updated context.
Frequently Asked Questions
Can I schedule stories or live videos using built-in tools?
No, most platforms do not support scheduling Stories, Lives, or ephemeral content natively. These must be posted in real time. However, you can prepare assets in advance and set calendar reminders to go live at optimal times.
What happens if I change my password or lose access?
If you reset your password or get locked out, scheduled posts may still publish as long as the backend system retains authentication. However, it’s wise to verify scheduled items after any account changes. Also, ensure recovery emails and phone numbers are up to date.
Are there limits to how many posts I can schedule?
Most platforms don’t enforce hard caps, but some impose soft limits. For example, X allows around 300 scheduled tweets at once, while Meta Business Suite lets you queue hundreds of Instagram and Facebook posts. Extremely large queues may slow down load times, so periodic cleanup is recommended.
Final Thoughts and Action Step
Scheduling social media posts for free isn’t just possible—it’s practical, secure, and increasingly capable. With native tools improving every year, there’s little reason to rely on paid alternatives unless you need cross-platform reporting or team collaboration features.
The real advantage lies not in the tool itself, but in the consistency it enables. When you remove the daily pressure to post, you create space for creativity, engagement, and strategic thinking. Over time, that discipline compounds into stronger audiences, deeper connections, and measurable growth.


 浙公网安备
33010002000092号
浙公网安备
33010002000092号 浙B2-20120091-4
Comments
No comments yet. Why don't you start the discussion?