
Glitter iPhone cases are a fun and eye-catching way to personalize your device. However, their biggest flaw is also what makes them appealing: the loose or suspended glitter tends to shift, clump, or even leak out over time—especially if the case is poorly sealed or subjected to daily wear. Glitter escaping not only diminishes the aesthetic but can create sticky residue, interfere with charging ports, and become a nuisance in pockets or bags. The good news is that with the right materials and techniques, you can effectively seal and protect your glitter case to extend its life and keep your surroundings mess-free.
Why Glitter Cases Leak and Degrade Over Time
Most mass-produced glitter cases use liquid-filled layers with suspended glitter particles. Over time, temperature changes, pressure from drops, or manufacturing defects can cause micro-cracks or weak seals along the edges. Once compromised, the liquid slowly evaporates or leaks, leaving behind dry, clumped glitter. Even high-quality cases aren’t immune to gradual wear, especially when exposed to heat, moisture, or frequent handling.
DIY glitter cases—popular among crafters—are particularly vulnerable. These are often made by filling clear phone cases with loose glitter and glue mixtures, then sealing them manually. Without proper sealing techniques, these homemade versions are prone to opening at the seams, leading to glitter spilling into pockets, bags, or onto surfaces.
“Many glitter cases fail not because of the materials, but due to inadequate edge sealing. A strong, flexible sealant applied correctly can make all the difference.” — Jordan Lee, Product Durability Analyst
Materials You’ll Need for Effective Sealing
Sealing a glitter case properly requires materials that are both adhesive and flexible enough to withstand daily movement without cracking. Below is a list of recommended supplies based on effectiveness and accessibility:
| Material | Best For | Notes |
|---|---|---|
| Clear Epoxy Resin | Durable, waterproof edge sealing | Makes a hard, glossy finish; ideal for DIY cases |
| Silicone Sealant (Clear) | Flexible sealing around edges | Stays pliable; resists heat and moisture |
| Mod Podge Outdoor Formula | Light protection and surface sealing | Not waterproof long-term; best for minor touch-ups |
| UV-Resin & UV Lamp | Precise, quick curing on small areas | Excellent for spot repairs and clean finishes |
| Hot Glue Gun + Clear Glue Sticks | Immediate temporary sealing | Can leave visible lines; not long-lasting |
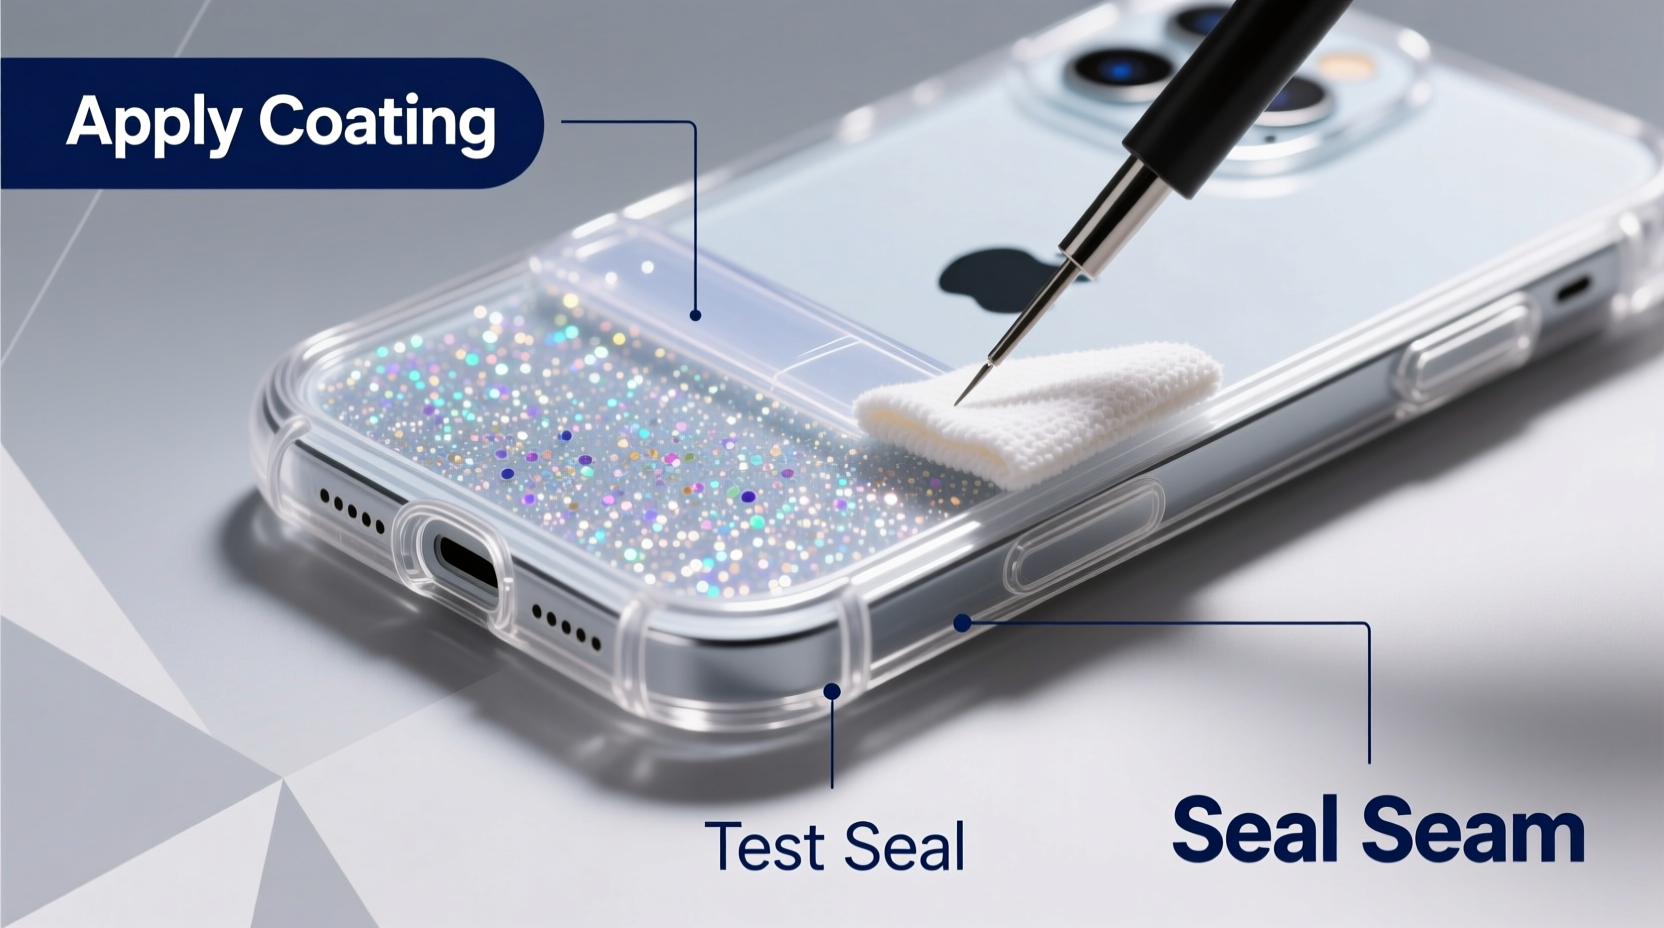
Step-by-Step Guide to Sealing Your Glitter Case
Whether you're reinforcing a store-bought case or finishing a handmade one, follow this detailed process to ensure a durable, leak-proof seal.
- Clean the Case Thoroughly: Wipe down the entire surface with rubbing alcohol on a lint-free cloth. This removes oils and dust, ensuring better adhesion.
- Inspect for Weak Points: Check along the edges, corners, and button covers for gaps or thin spots. Gently press on each seam to detect softness or movement.
- Prepare Your Workspace: Work in a well-ventilated area on a flat, protected surface. Lay down wax paper to avoid sticking.
- Apply the Sealant: Using a fine applicator or toothpick, apply a thin, continuous bead of silicone or epoxy resin along all open seams. Focus on corners and button cutouts where leaks commonly occur.
- Smooth the Bead: Dip a gloved fingertip or cotton swab in rubbing alcohol and gently smooth the sealant line for an even finish. This reduces visible ridges.
- Cure Properly: Allow silicone to cure for 24 hours. Epoxy typically requires 48 hours. UV-resin needs 2–3 minutes under a UV lamp per section.
- Test the Seal: After drying, submerge the case (without phone) in water for 5 minutes. Dry thoroughly and check inside for moisture intrusion.
Long-Term Protection Strategies
Even a perfectly sealed case can degrade with improper care. Implement these habits to maximize longevity:
- Avoid exposing the case to extreme temperatures, such as leaving it in a hot car or near radiators.
- Remove the case before charging if debris has accumulated near the port.
- Wipe it weekly with a slightly damp microfiber cloth to prevent buildup of skin oils and dirt.
- Store it in a soft pouch when not in use to prevent scratches and impacts.
Do’s and Don’ts of Glitter Case Maintenance
| Do’s | Don’ts |
|---|---|
| Use flexible sealants like silicone for moving parts | Use super glue—it becomes brittle and cracks |
| Reinforce edges every 3–6 months | Submerge in water regularly—even sealed cases weaken over time |
| Keep away from direct sunlight to prevent yellowing | Peel or pry open the case once sealed |
Real Example: How One Crafter Fixed Her Leaking DIY Case
Sophie, a DIY enthusiast from Portland, created a custom glitter case using loose iridescent flakes and a gel medium. Within two weeks, glitter began escaping through tiny gaps in the side seal. She initially tried tape and glue, which failed within days. After researching industrial sealants, she used clear silicone caulk along the perimeter, smoothing it with an alcohol-dipped tool. She let it cure for 24 hours and tested it in water. Six months later, the case remains intact, with no leakage or clouding. “I underestimated how important the seal was,” she said. “Now I treat it like a waterproof project—not just a craft.”
Expert Tips for Preventing Future Issues
Frequently Asked Questions
Can I reseal a glitter case that’s already leaking?
Yes. First, dry the case completely. Use a pin to carefully open the smallest possible gap, drain any liquid, remove loose glitter, and then inject a clear silicone sealant using a precision nozzle. Close and clamp gently until cured.
Is epoxy safe for phone cases?
Yes, once fully cured, food-safe epoxy resins are inert and non-toxic. Avoid breathing fumes during application and ensure full curing (typically 48 hours) before handling.
Will sealing affect wireless charging?
Generally, no. Most sealants add minimal thickness. However, avoid thick layers around the center-back area where charging coils align. Stick to edge-only applications for best results.
Final Checklist Before You Seal
- Case is clean and dry
- All glitter is securely contained (no loose particles outside)
- Workspace is ventilated and stable
- Correct sealant chosen based on case type
- Curing time accounted for in schedule
- Water test planned post-cure
Conclusion: Keep the Sparkle, Lose the Mess
A glitter iPhone case doesn’t have to be a ticking time bomb of sparkles. With thoughtful sealing and regular maintenance, you can enjoy the shimmer without the fallout. Whether you’re preserving a sentimental handmade gift or extending the life of your favorite accessory, taking the time to properly seal and protect pays off in durability and cleanliness. The key is choosing the right materials, applying them precisely, and treating the case like a functional object—not just a decoration.


 浙公网安备
33010002000092号
浙公网安备
33010002000092号 浙B2-20120091-4
Comments
No comments yet. Why don't you start the discussion?