
A Christmas light chase effect—the illusion of moving lights “running” along a string—is one of the most eye-catching displays for holiday decor. Unlike complex LED matrix setups requiring microcontrollers and programming, many modern chase effects can be achieved with simple, plug-and-play controllers costing under $25. This guide walks through the entire process using only widely available hardware: standard 12V or 24V DC LED light strings (not AC mini-lights), basic multi-channel controllers, and fundamental wiring principles. No soldering is mandatory, and no prior electronics experience is needed—just attention to voltage compatibility, channel sequencing, and timing logic.
Understanding the Chase Effect: What It Is—and What It Isn’t
The chase effect simulates motion by turning on and off individual segments of lights in rapid, sequential order. A true chase requires at least three independent lighting zones (often called “channels”) wired to separate controller outputs. As Channel 1 illuminates, Channel 2 turns on just after, then Channel 3—while Channel 1 simultaneously turns off. This creates the visual impression of light “flowing” from start to finish. Crucially, this is not the same as a blinking or fading effect: it relies on precise timing between discrete outputs.
Many consumers mistakenly assume any “chasing”-labeled string light will work with any controller. In reality, most pre-wired chase strings use internal ICs that lock the effect to a fixed speed and pattern—and cannot be reprogrammed or synchronized with external controllers. For true flexibility and custom timing, you need separately addressable segments controlled externally.
Essential Hardware: Controllers, Lights, and Power Supplies
Three components form the foundation of every reliable chase setup: the controller, the light strings, and the power supply. Compatibility among them determines success—or frustrating flickering, partial activation, or outright failure.
| Component | Key Specifications | Why It Matters |
|---|---|---|
| Controller | 3–8 channel DC output (12V or 24V); manual speed/direction controls; built-in chase program (e.g., “3-Wire Chase,” “Running Dot”) | Must match your light string’s voltage and have dedicated channels—not just “on/off” switches. Avoid AC controllers unless your lights are explicitly rated for AC input. |
| Light Strings | DC-rated LED strings with 3+ independently wired segments per string (e.g., 3-wire RGB or single-color segmented strips); max current ≤ controller’s per-channel rating (typically 2–5A) | Each segment must be electrically isolated. If all LEDs share one positive and one negative wire, no chase effect is possible—only full-on/full-off. |
| Power Supply | Switching DC supply; voltage matching controller (12V or 24V); total amperage ≥ sum of all channel loads × 1.25 safety margin | Underpowered supplies cause voltage sag, leading to dimming, erratic timing, or controller reset. Never daisy-chain multiple supplies without load balancing. |
Recommended starter kit: A 4-channel 12V controller (like the Ray Wu KW-4CH or similar generic models sold on major electronics retailers), four 5-meter 12V single-color LED strips cut into 1-meter segments (yielding four controllable zones), and a 12V 10A regulated power supply. Total cost: approximately $38–$45.
Real-World Setup Example: The Front-Porch Eave Runner
Mark, a high school physics teacher in Ohio, wanted a subtle but dynamic chase effect along his 24-foot front-porch eave. He’d tried two pre-programmed chase strings before—both failed within three weeks due to moisture ingress and unadjustable speed. For his third attempt, he opted for modular control.
He purchased four 5-meter 12V warm-white LED strips, cut each into six 1-meter sections (24 total), and grouped them into four zones of six meters each—spaced evenly across the eave. Using quick-connect screw terminals, he wired each zone to a separate channel on his 4-channel controller. He mounted the controller inside a weatherproof junction box with ventilation slits, connected a 12V 15A power supply housed indoors, and ran low-voltage cable through conduit.
Within 90 minutes of wiring, he had a smooth, clockwise chase running at 0.8 seconds per step—adjustable via potentiometer. When neighbors asked how he did it, he showed them the controller’s physical dial and explained that no app, no Wi-Fi, and no subscription were involved. His display ran flawlessly for 47 days straight—through rain, snow, and sub-zero wind chills—before he powered it down on January 2nd.
“The biggest misconception is that chasing requires complexity. In fact, reliability increases when you remove software layers. A well-matched DC controller with mechanical timing gives consistent performance year after year—even during brownouts.” — David Lin, Senior Applications Engineer, Luminex Lighting Systems
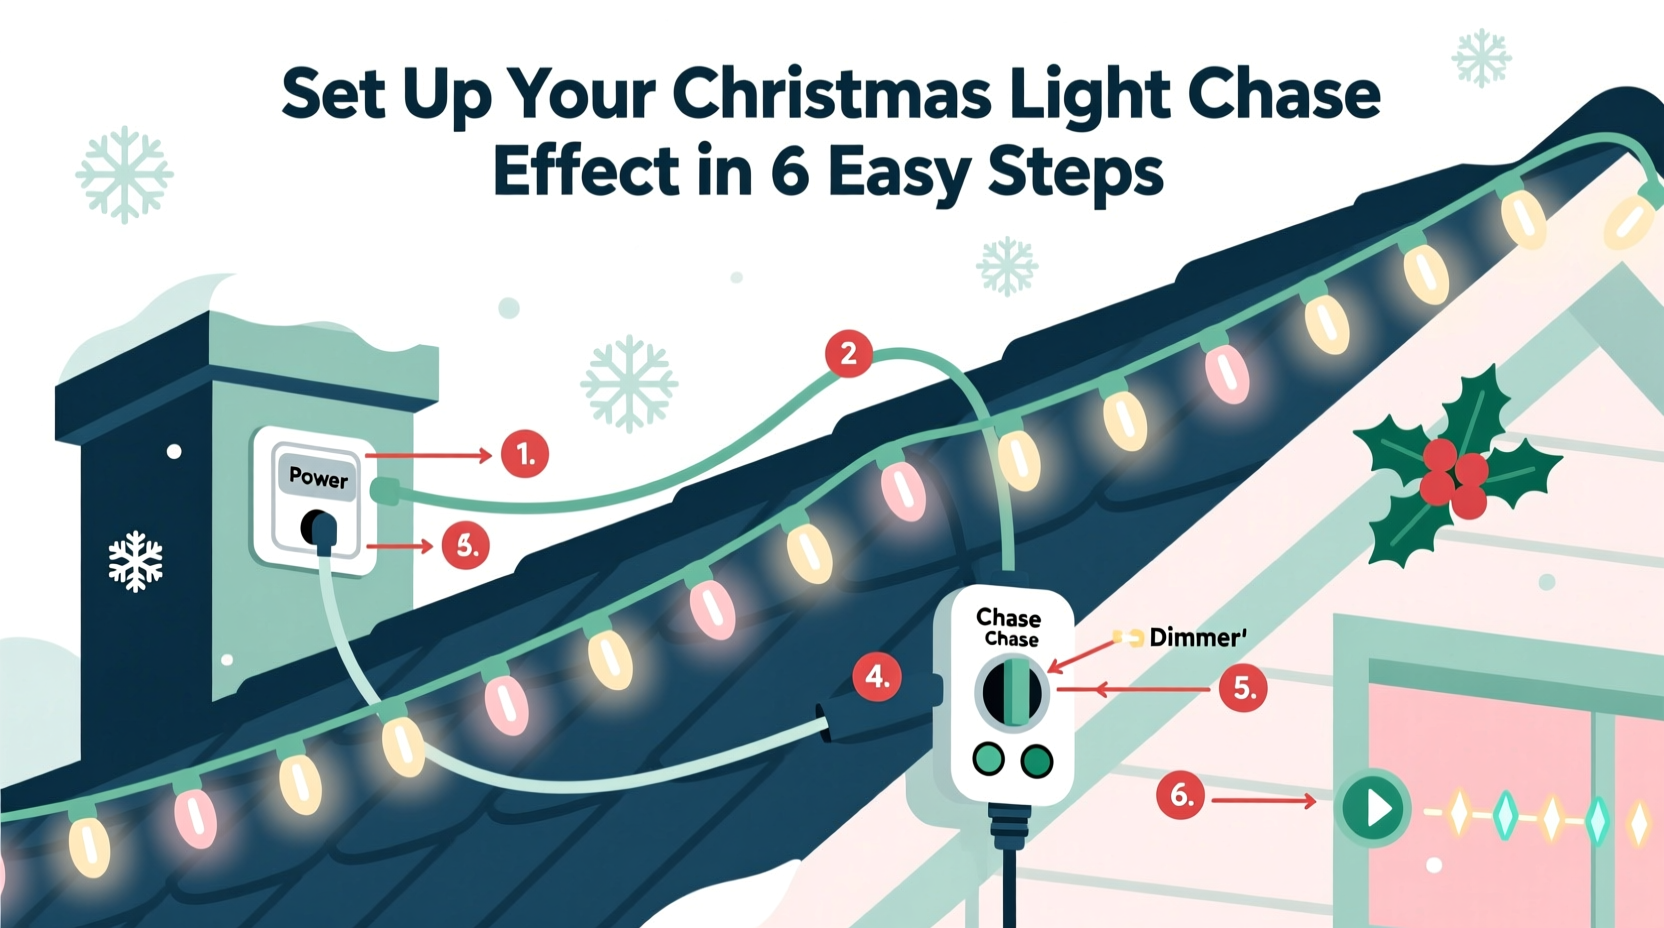
Step-by-Step Wiring & Configuration
Follow this sequence precisely. Skipping steps or reversing polarity may damage components.
- Verify voltage compatibility: Use a multimeter to confirm your light string’s actual operating voltage (not the label). Many “12V” strings actually run optimally at 11.2–12.8V. If measured voltage exceeds 13.5V under load, do not connect to a 12V controller.
- Identify channel wires: On your light string, locate the common wire (usually black or blue) and the segment wires (often red, green, yellow). Confirm continuity: there should be no resistance between any segment wire and the common wire when the segment is lit—but infinite resistance between segment wires themselves.
- Connect controller outputs: Wire Channel 1 output → Segment 1’s signal wire + common; Channel 2 → Segment 2’s signal wire + same common; repeat for all zones. Never share commons across channels unless the controller explicitly supports common-anode configuration.
- Power supply connection: Connect the power supply’s positive (+) terminal to the controller’s VIN or V+ input. Connect its negative (–) terminal to the controller’s GND and to the light string’s common wire. Use 16 AWG stranded copper wire for runs over 10 feet.
- Enable chase mode: Power on the controller. Press and hold the “Mode” button for 3 seconds until the display shows “CH3” (for 3-wire chase) or “RUN.” Adjust speed using the “+”/“–” buttons until the transition feels fluid—not jarring or sluggish.
- Test direction: Most controllers default to forward (Ch1→Ch2→Ch3→Ch4). To reverse, press “Direction” or toggle the DIP switch labeled “DIR.” Observe the flow visually before final mounting.
Common Pitfalls & How to Avoid Them
Even experienced DIYers encounter predictable issues. Here’s how to diagnose and resolve them quickly.
- Flickering or intermittent activation: Almost always caused by undersized wiring or poor connections. Replace screw terminals with crimped ring lugs and tighten to 0.5 N·m torque. Check for corrosion on exposed copper.
- Only one channel activates: Verify that the controller isn’t in “single-channel test mode.” Cycle through modes until “ALL” or “CHAS” appears. Also inspect for shorted segment wires touching metal framing.
- Chase skips or jumps erratically: Indicates voltage drop. Measure voltage at the farthest light segment while active. If below 11.0V (for 12V systems), add a local capacitor bank (two 2200µF/16V electrolytics in parallel) near the last segment’s input.
- Controller overheats after 20 minutes: Caused by exceeding per-channel current limits. Recalculate: each meter of standard 12V LED strip draws ~0.24A. Four 6-meter zones = 5.76A total—well within a 10A supply’s capacity, but if loaded across only two channels, those channels see 2.88A each. Spread load evenly.
Do’s and Don’ts Checklist
Before powering on your system, verify each item below.
- ✅ DO measure open-circuit voltage of your power supply with no load—it should read within ±5% of rated output.
- ✅ DO test each light segment individually with a 12V battery before connecting to the controller.
- ✅ DO mount the controller in free-air space—not buried in insulation or stuffed into an enclosed soffit.
- ❌ DON’T use AC wall adapters labeled “for indoor use only” outdoors—even inside an enclosure.
- ❌ DON’T twist together aluminum and copper wires without antioxidant paste and UL-listed connectors.
- ❌ DON’T assume “waterproof” LED strips are submersible—most IP65 ratings only protect against low-pressure water jets, not sustained immersion.
FAQ
Can I use my existing incandescent mini-lights for a chase effect?
No. Traditional 120V AC mini-lights lack segmented wiring and cannot be divided into independent zones without rewiring the entire string—a labor-intensive, unsafe process involving mains voltage exposure. Stick with purpose-built DC LED strips or commercial chase-rated strings like the Holiday Coro “Segmented Pro” series.
My controller has 8 channels—but I only need 4 for chase. Can I use the extra channels for something else?
Yes—if your controller supports independent channel operation (not just chase-mode locking). You can assign Channels 5–8 to static elements: porch posts, window frames, or roof lines. Just ensure total current draw remains within the power supply’s capacity. Do not enable chase mode while using mixed static/chase configurations unless the manual confirms dual-mode support.
How long do these controllers typically last?
Well-ventilated, correctly loaded DC controllers routinely exceed 50,000 hours of operation—over 5 years of continuous seasonal use. The limiting factor is usually the electrolytic capacitors on the board, which degrade faster in high-heat environments. Avoid mounting near attic vents or recessed lighting housings.
Conclusion
A Christmas light chase effect doesn’t require a degree in electrical engineering, a smart-home subscription, or a $200 controller. It demands careful component selection, methodical wiring, and respect for basic DC principles. When matched correctly—controller to lights to power supply—the result is a display that feels professionally installed yet costs less than a single premium pre-wired string. More importantly, it’s repairable, adjustable, and expandable. You can slow the chase for a stately procession, speed it for energetic energy, or reverse direction to surprise guests. That level of creative control, rooted in tangible hardware rather than opaque apps, is increasingly rare—and deeply satisfying.
This season, skip the disposable light strings and invest in a system you’ll refine and reuse for years. Cut your first segment, tighten your first terminal, and watch motion emerge—not from code, but from deliberate connection.


 浙公网安备
33010002000092号
浙公网安备
33010002000092号 浙B2-20120091-4
Comments
No comments yet. Why don't you start the discussion?