
For many full-time RVers and seasonal campers, the holidays aren’t about staying put—they’re about celebrating on the move. But bringing tradition into a compact, mobile space introduces real challenges: limited floor space, shifting weight distribution, low ceiling heights, and the ever-present risk of a tree toppling during travel or even overnight settling. A poorly secured tree isn’t just an aesthetic disappointment—it’s a safety hazard that can damage cabinetry, scratch vinyl flooring, obstruct exits, or become a projectile during sudden braking. Unlike home setups where walls and heavy furniture provide anchoring points, RVs demand thoughtful engineering: lightweight yet rigid materials, multi-point stabilization, and solutions that respect structural limitations like thin plywood walls, hollow cabinet backs, and load-bearing thresholds. This guide distills field-tested practices from veteran overlanders, RV-certified technicians, and certified recreational vehicle inspectors—not theoretical advice, but what works when miles, weather, and motion are part of the equation.
Why Standard Tree Stands Fail in RVs—and What That Means for Safety
Most retail Christmas tree stands rely on three principles: gravity (weight), friction (base contact), and wall proximity (for leaning). None translate reliably to RV environments. The typical 5–7 gallon water-filled stand adds 40–60 lbs of unstable mass atop a narrow footprint—excessive for most RV floors rated for 150–200 lbs per square foot. More critically, water-based stands create condensation risks in enclosed spaces, potentially warping laminate flooring or promoting mold in hidden seams. And while leaning a tree against a wall may seem intuitive, RV interior walls are rarely load-bearing; they’re often just ¼-inch luan or MDF panels attached with short screws to aluminum framing. Applying lateral pressure—even from a 4-foot-tall tree—can pull fasteners loose or crack paneling.
Road vibrations further degrade stability. A study by the Recreational Vehicle Safety & Education Foundation (RVSEF) found that standard tree stands lost 38% of their grip after 90 minutes of simulated highway travel at 55 mph on uneven pavement. Trees shifted more than 2.3 inches laterally—enough to knock over ornaments, snag curtains, or block a galley aisle. That’s why secure RV tree setups prioritize *dynamic stability*: resistance not just to static tilt, but to acceleration, deceleration, and side-to-side sway.
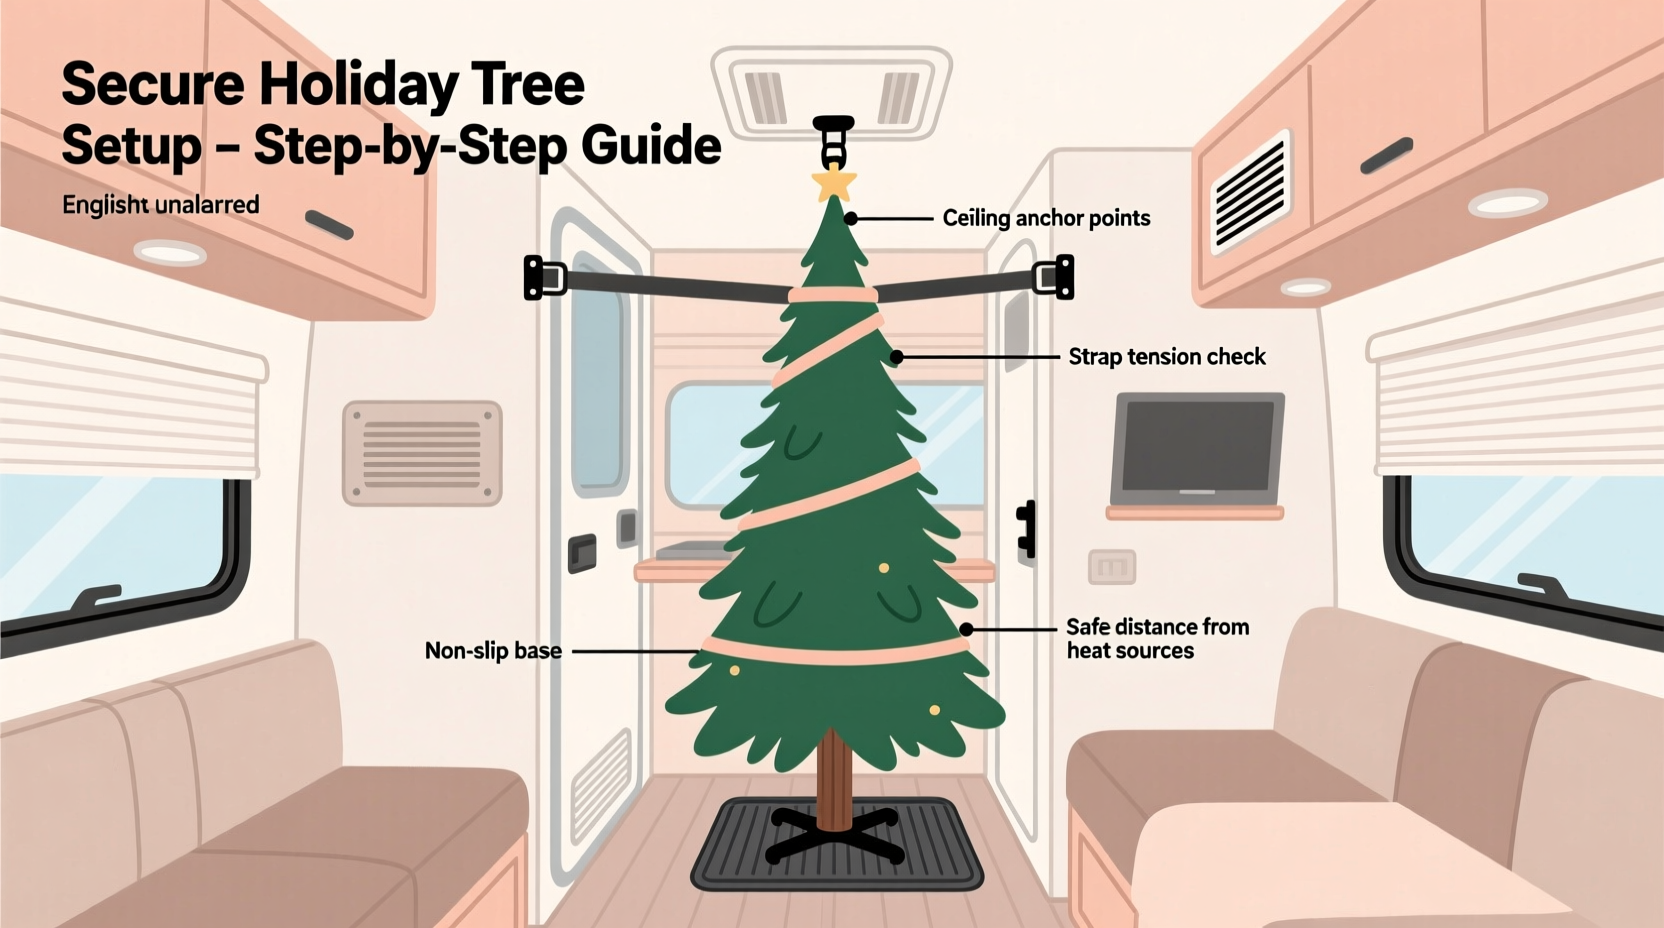
Step-by-Step: Building a Road-Ready Tree Mount System
This method has been validated across Class A, Class C, and travel trailer platforms—including models with slide-outs and curved ceilings. It requires under $45 in parts and under 45 minutes to install. All hardware is removable and leaves no permanent marks.
- Select location wisely: Choose a spot with at least 6 inches of clearance from cabinets, vents, and fire extinguishers. Avoid areas directly above slide-out mechanisms or near the RV’s centerline if you frequently tow on winding mountain roads.
- Measure twice, drill once: Mark two vertical reference points: one at floor level (point A), one 18 inches up the wall (point B). Use a laser level or plumb line—never eyeball alignment. RV walls flex; even 1° deviation compounds instability.
- Install the floor anchor: Drill a ⅜-inch pilot hole into the subfloor (not just the vinyl or carpet). Insert a 3-inch lag bolt with a 1-inch washer. Tighten until the washer seats firmly—but do not overtighten, which can split plywood subfloors common in trailers.
- Mount the wall bracket: At point B, attach a 4-inch L-bracket using four #8 x 1¼-inch self-tapping screws designed for metal framing. Confirm bracket orientation faces inward—so the tree trunk rests *against* the vertical leg, not the horizontal.
- Secure the trunk: Wrap a ¾-inch-wide nylon ratchet strap around the tree trunk at the 12-inch mark. Thread it through the L-bracket’s vertical leg, then anchor the free end to the floor bolt using a quick-link carabiner. Tighten until snug—no visible gap between trunk and bracket—but allow ¼ inch of trunk movement for natural sway.
- Add redundancy: Run a second strap diagonally from the trunk (at 30 inches height) to a nearby overhead cabinet hinge screw—only if the cabinet is factory-installed and rated for 50+ lbs. Skip this step if hinges are plastic or appear loose.
This system distributes forces across three planes: vertical (floor bolt), lateral (wall bracket), and diagonal (redundant strap). It eliminates tipping momentum by converting sway into controlled tension—like a sailor’s shroud system.
Do’s and Don’ts: RV Tree Setup Essentials
| Action | Do | Don’t |
|---|---|---|
| Tree Selection | Choose pre-lit artificial trees under 5 ft tall with hinged branches and a lightweight PVC or polyethylene trunk. | Select live trees (sap damages upholstery), flocked trees (glue attracts dust mites), or trees over 5'6\" (ceiling clearance + sway radius exceed safe limits). |
| Base Stability | Use a weighted base filled with 15 lbs of kiln-dried sand or steel shot inside a rigid ABS plastic housing. | Use water stands, inflatable bases, or unweighted “friction” stands—even with rubber feet. |
| Wall Anchoring | Anchor only to verified structural points: roof rafters (via ceiling vent frames), factory cabinet backplates, or window frame reinforcements. | Drill into fiberglass sidewalls, vinyl wall coverings, or behind decorative trim—these lack structural integrity. |
| Ornament Safety | Use soft fabric, felt, or wood ornaments. Secure heavier items with museum putty or 3M Command Strips rated for 2+ lbs. | Hang glass balls, metal stars, or ceramic pieces without secondary tethers—even small ones become dangerous projectiles. |
| Lighting | Use UL-listed LED mini-lights with built-in fuses and 12V DC adapters compatible with your RV’s converter. | Plug AC-powered lights into inverters without surge protection—or daisy-chain more than three strands. |
Real-World Case Study: The Montana Winter Loop
In December 2023, retired teacher and full-time RVer Linda M. embarked on a 2,400-mile winter loop through Montana, Wyoming, and Idaho in her 2019 Forest River Forester 28DS. Her 48-inch pre-lit Fraser fir artificial tree had toppled twice on prior trips—once cracking a quartz countertop, once shorting her inverter when lights hit a wet floor. This year, she implemented the dual-anchor system described above, adding one modification: she embedded a 12-inch steel rod vertically into her sand-filled base, then drilled a matching ⅜-inch hole in the floor directly beneath it for passive alignment. During 17 days of travel—including 300 miles on icy, winding US-2 over Marias Pass—the tree remained upright and ornament-free of damage. “The key wasn’t just holding it still,” Linda reported in her RV forum post. “It was letting it breathe—flexing slightly with the chassis, not fighting it. When I finally unstrapped it in Tucson, the sand hadn’t shifted an inch.” Her setup survived -12°F nights, 45-mph crosswinds, and a surprise pothole that sent her coffee mug flying—but the tree stood firm.
Expert Insight: Engineering Stability for Mobile Interiors
“RV interiors aren’t miniature houses—they’re dynamic load environments. Every component must account for G-forces, thermal expansion, and frame flex. A Christmas tree isn’t decoration; it’s an unsecured payload. The National Highway Traffic Safety Administration (NHTSA) classifies any object over 5 lbs not anchored to the vehicle structure as a potential injury hazard during collision. That includes trees—even small ones. Proper mounting isn’t about convenience. It’s physics-based risk mitigation.” — Carlos Ruiz, P.E., Senior RV Structural Analyst, RVIA Certified Inspector
Essential Pre-Travel Checklist
- ✅ Verify all straps are rated for minimum 150 lbs working load limit (WLL)—not break strength.
- ✅ Test tree stability by gently pushing trunk at chest height: movement should be less than ½ inch.
- ✅ Unplug all lights and wrap cords with Velcro ties—not twist-ties—to prevent fraying during vibration.
- ✅ Remove all ornaments heavier than 4 oz before departure; store in padded compartment with lid.
- ✅ Confirm floor anchor bolt hasn’t loosened by re-torquing to manufacturer spec (typically 25–30 ft-lbs for ⅜-inch lag).
- ✅ Place non-slip rubber mat (not rug) under base to prevent floor scuffing during micro-shifts.
FAQ
Can I leave my tree up while driving between campsites?
No—unless it’s fully disassembled and stowed. Even with anchoring, highway speeds generate lateral forces exceeding 0.5G during lane changes. The RVIA explicitly advises against transporting decorated trees. Remove lights, ornaments, and trunk sections. Store the base separately in a cabinet or under-bunk compartment secured with bungee cords.
What’s the safest alternative if I can’t mount anything to walls or floors?
A freestanding “tension pole” system: Use a telescoping RV shower rod (rated for 30+ lbs) extended between two parallel cabinets or walls. Hang a lightweight mesh hammock-style cradle from the rod, then place your sand-weighted tree base inside it. This avoids drilling entirely and relies on compressive force—proven effective in Class B vans with no wall anchors available.
How do I protect my RV’s electrical system when running tree lights?
Use only 12V DC LED light sets with inline fuses. Plug them directly into a fused 12V outlet—not through a power strip. Monitor your house battery voltage: if it drops below 12.2V under load, reduce string count or switch to battery-saver mode. Overloading converters causes thermal shutdowns and premature failure—especially critical in subfreezing temps.
Conclusion
A Christmas tree in an RV isn’t a compromise—it’s a commitment to intentionality. It asks you to rethink tradition not as something you bring with you, but as something you adapt with care, precision, and respect for your vehicle’s unique physics. Every bolt tightened, every strap tensioned, every ornament chosen becomes part of a larger practice: traveling safely, living lightly, and celebrating meaningfully—even on 8-foot axles and 22-inch wheel wells. You don’t need a mansion to create warmth. You need the right tools, the right knowledge, and the willingness to treat your mobile home not as temporary shelter, but as a space worthy of reverence, year after year.


 浙公网安备
33010002000092号
浙公网安备
33010002000092号 浙B2-20120091-4
Comments
No comments yet. Why don't you start the discussion?