
Adding a second monitor to your workspace can dramatically improve productivity, whether you're editing video, managing spreadsheets, or coding across multiple windows. But too often, the benefits are undermined by a jungle of cables snaking across your desk—power cords, HDMI lines, USB connections, and adapters all competing for space. A cluttered setup doesn’t just look unprofessional; it makes troubleshooting harder, reduces airflow, and increases stress during daily use.
The good news is that with thoughtful planning and a few clever techniques, you can enjoy the full advantages of a dual-monitor setup while keeping your workspace clean, functional, and visually appealing. This guide walks through proven strategies to eliminate cable chaos, organize your hardware efficiently, and maintain a sleek, tangle-free environment long after installation.
Plan Your Layout Before Connecting Anything
Before plugging in a single cable, take time to map out your ideal monitor arrangement. The physical placement of your screens affects not only ergonomics but also how easily you can route and conceal wires. Consider viewing distance, screen height, and alignment relative to your primary work surface.
Most users benefit from positioning both monitors at eye level with the top edges roughly even with seated eye height. Place them side-by-side with minimal gap between screens to reduce head movement. If possible, center the pair around your body rather than offsetting one as an afterthought.
Once layout is decided, assess what equipment you’ll need. Most modern setups involve:
- Two display outputs (HDMI, DisplayPort, USB-C, etc.) from your computer or docking station
- Matching cables for each monitor input
- Power cords for both monitors
- Potential adapters (e.g., USB-C to HDMI)
- Optional peripherals like webcams, speakers, or USB hubs
Knowing exactly which cables you’re working with allows you to plan routing paths early—avoiding last-minute improvisation that leads to messy tangles.
Cable Management: The Foundation of a Clean Setup
Even the best monitor configuration will fail if cables are left exposed or loosely bundled. Effective cable management isn't about hiding wires—it's about organizing them logically so they’re accessible when needed but invisible during normal use.
Start by measuring distances. Run a string from your PC or laptop to each monitor’s port location. This gives you a realistic idea of how long your video and power cables should be. Buying excessively long cables may seem convenient, but excess length creates loops and knots unless properly coiled.
“Cable clutter adds cognitive load. A clean desk supports focus.” — Dr. Lena Torres, Human Factors & Ergonomics Researcher
Here are three essential tools for managing cables:
- Cable sleeves or braided wraps: Bundle multiple cords together into a single streamlined line. Choose flexible spiral wrap for easy access later.
- Cable clips or adhesive ties: Mount these under desks or along monitor arms to secure runs vertically and horizontally.
- Cable trays or raceways: Wall-mounted channels keep cords off the floor and out of sight, especially useful behind standing desks.
Avoid twisting different types of cables together—especially power and data lines—as this can introduce electromagnetic interference affecting signal quality. Instead, separate them slightly within a shared sleeve or run them parallel without contact.
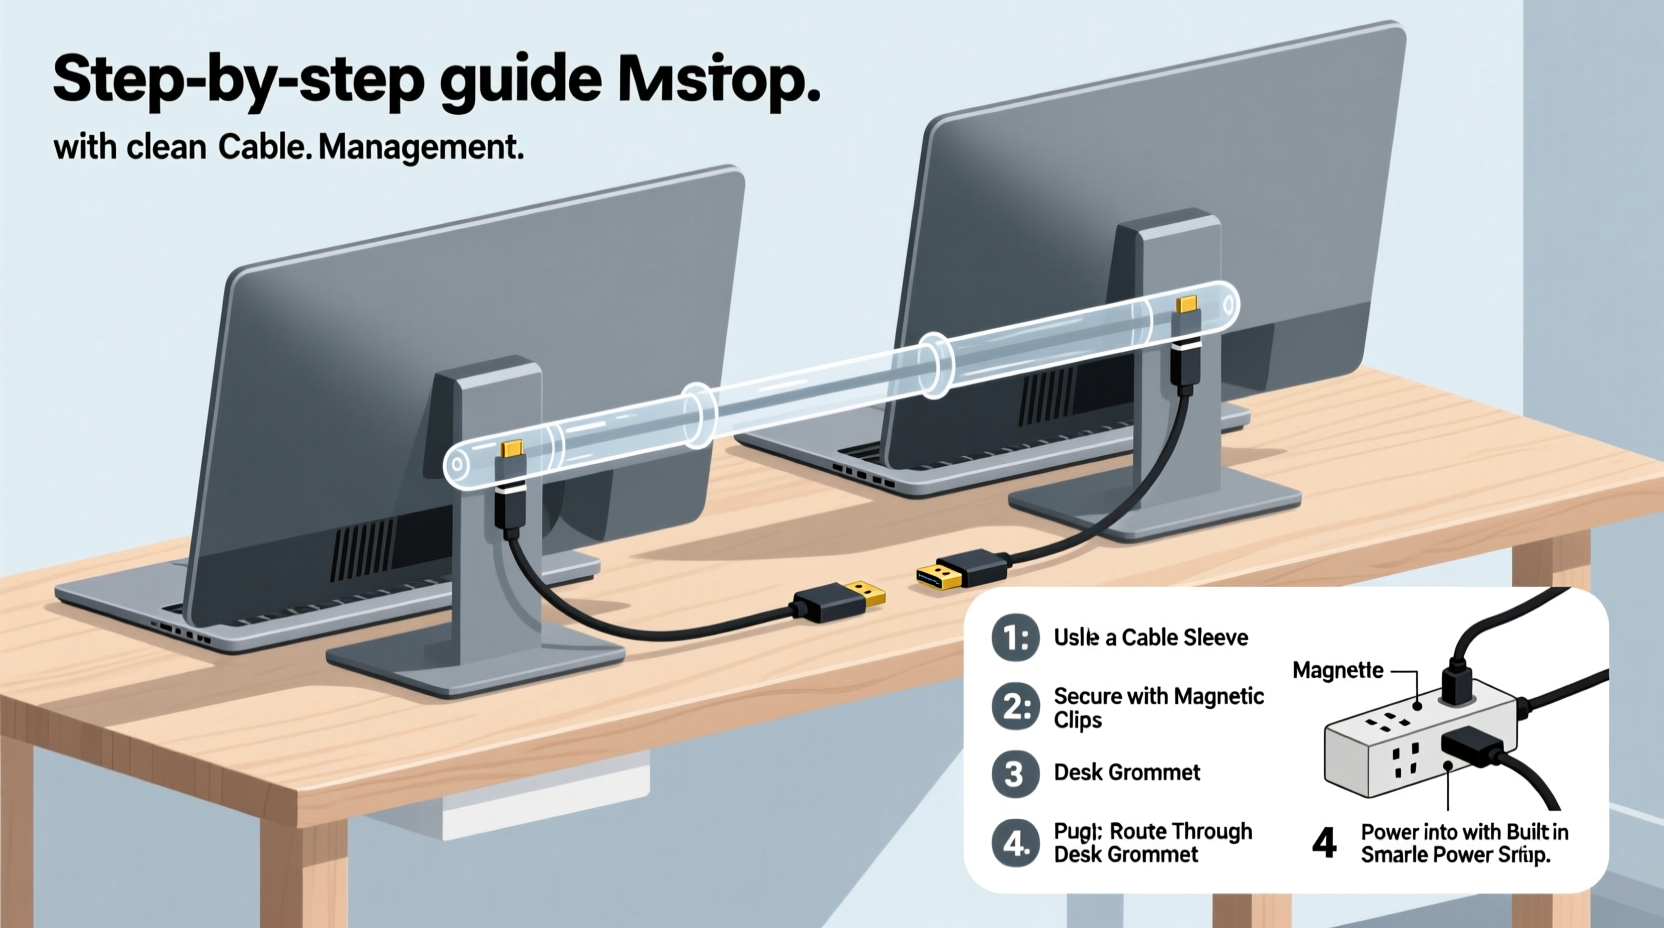
Step-by-Step Guide to Installing Dual Monitors Tangle-Free
Follow this sequence to install your dual monitors with minimal clutter:
- Disconnect and clear: Power down all devices and remove existing cables from the workspace.
- Lay out components: Position monitors, computer, and any hub/dock where they’ll live permanently.
- Test connections: Temporarily connect video cables to ensure compatibility and correct input selection.
- Route cables first: Feed video and power lines along planned paths—under desk grommets, through monitor arm channels, or via wall raceways.
- Secure in stages: Use clips every 6–8 inches to prevent sagging and maintain neat bends.
- Bundle selectively: Group similar low-voltage cables (e.g., HDMI + USB audio) using Velcro straps—not zip ties, which are hard to adjust.
- Label everything: Attach small tags or colored rings to identify cables (e.g., “Left Monitor,” “Dock Power”).
- Final check: Turn on systems, confirm displays are detected, then fine-tune positioning and cable slack.
Smart Hardware Choices That Reduce Clutter
Some monitors and accessories are designed specifically to minimize cable complexity. Investing in the right gear pays off in long-term tidiness.
Consider monitors with built-in USB hubs or KVM switches. These allow you to plug keyboards, mice, and webcams directly into the monitor, reducing the number of cables running back to your computer. Similarly, models with USB-C connectivity offer single-cable solutions that transmit video, data, and power simultaneously.
| Feature | Benefit | Best For |
|---|---|---|
| USB-C with Power Delivery | One cable handles video, data, and charging | Laptops, minimalist setups|
| Monitor-mounted docking stations | Centralizes peripheral connections | Hybrid workers, multi-device users|
| Integrated cable management arms | Hides wires inside adjustable mounts | Standing desks, ergonomic stations|
| Wireless display options (Miracast, AirPlay) | Eliminates video cables entirely | Presentations, secondary viewing
If your current monitors lack integrated features, upgrade strategically. A powered USB hub placed near your keyboard tray can consolidate mouse, headset, phone charger, and webcam cables into one short run back to your machine.
Mini Case Study: From Cable Chaos to Clean Desk
Sarah, a freelance graphic designer, upgraded to dual 27-inch monitors to handle large Photoshop files more efficiently. Initially excited, she quickly became frustrated by the mess: HDMI and VGA cables tangled under her desk, power strips dangling, and no clear way to manage audio and peripheral connections.
After researching cable solutions, she made several changes:
- Replaced old VGA with two DisplayPort cables of appropriate length
- Installed a desktop grommet with a rubber pass-through sleeve
- Mounted a vertical cable tray behind her desk leg
- Used a monitor arm with internal wire channels
- Bundled remaining cords with Velcro and labeled each
The result? A completely transformed workspace. Her monitors adjusted smoothly, troubleshooting became easier, and clients complimented her professional-looking studio. More importantly, Sarah reported feeling less mentally fatigued at the end of the day—proof that visual order impacts mental clarity.
Dos and Don’ts of Dual Monitor Cabling
To reinforce best practices, here’s a quick-reference table summarizing key dos and don’ts:
| Do | Don’t |
|---|---|
| Use cable sleeves to group similar wires | Twist power and signal cables tightly together |
| Install adhesive clips to guide cable paths | Let cables drape over sharp desk edges |
| Choose monitors with USB-C or built-in docks | Use excessively long cables without bundling |
| Label each cable near connectors | Hide critical connections behind immovable furniture |
| Leave service loops for adjustments | Cut zip ties too tight—they can damage insulation |
Following these guidelines ensures your setup remains functional and adaptable. As technology evolves, you may add new devices or switch computers. A well-documented, organized system makes transitions smoother.
Frequently Asked Questions
Can I use wireless monitors to avoid cables altogether?
Yes, but with caveats. Wireless display technologies like Miracast or proprietary systems (e.g., Dell Wireless HD, ASUS WiGig) exist, but they often introduce latency and compression artifacts unsuitable for detailed work like photo editing or gaming. They’re best used for presentations or secondary viewing. For primary productivity monitors, wired connections remain more reliable and higher quality.
What’s the best way to hide cables behind my desk?
The most effective method combines physical concealment with structured routing. Use adhesive-backed cable raceways along the back edge of your desk or down a wall stud. Pair this with a power strip mounted underneath the desk surface. Route all cords through the raceway into the strip, keeping them flush and invisible from seated view. For drywall, consider installing a recessed in-wall cable channel for a built-in look.
How do I manage cables if my desk has no grommets or passthroughs?
No passthrough? No problem. You can retrofit your desk using several methods:
- Apply adhesive cable clips along the rear lip to direct cords downward.
- Use a desktop cord cover—a flat plastic track that sits on the surface and snaps closed over wires.
- Drill a small hole (1–2 inches) in a discreet corner of the desktop (check warranty first!) and feed cables through to a mounted power strip below.
Checklist: Achieve a Tangle-Free Dual Monitor Setup
Use this checklist before, during, and after installation:
- ☐ Measure distances between devices to determine optimal cable lengths
- ☐ Choose monitors with integrated ports or docking capabilities if possible
- ☐ Acquire necessary cables, adapters, and management tools (sleeves, clips, labels)
- ☐ Plan cable routes: under desk, through grommets, or along walls
- ☐ Test all connections before securing cables permanently
- ☐ Bundle and label cables using non-damaging fasteners
- ☐ Secure runs with clips or raceways every 6–8 inches
- ☐ Leave service loops near connectors for future adjustments
- ☐ Evaluate aesthetics and functionality once powered on
- ☐ Document setup with photos for future reference or troubleshooting
Conclusion: Build a Workspace That Works for You
A dual monitor setup shouldn’t come at the cost of visual chaos. With deliberate planning, the right tools, and attention to detail, you can create a high-performance workstation that’s as tidy as it is powerful. Clean cable management isn’t just cosmetic—it enhances usability, improves safety, and supports long-term satisfaction with your tech environment.
Start small: re-route one cable today, label two connections tomorrow. Over time, these habits compound into a workspace that feels intentional and calm. Whether you're working from home, in a corporate office, or running a creative studio, a tangle-free desk sets the tone for focused, productive days.


 浙公网安备
33010002000092号
浙公网安备
33010002000092号 浙B2-20120091-4
Comments
No comments yet. Why don't you start the discussion?