
Well-groomed eyebrows frame the face, enhance your features, and require surprisingly little effort—when done right. For many beginners, shaping eyebrows at home quickly turns into a lesson in regret: one too many tweezers pulls, and you're left with thin, uneven arches that take months to grow back. The key isn’t avoiding grooming altogether—it’s learning how to do it with precision, patience, and an understanding of your natural brow structure.
This guide walks you through a safe, effective method for shaping your eyebrows at home without over-plucking. You’ll learn how to identify your ideal brow shape based on your face type, use simple tools correctly, and avoid the most common beginner mistakes. Whether you’re starting from scratch or correcting past over-plucking, this process will help you achieve polished, natural-looking brows with confidence.
Understanding Your Natural Brow Shape
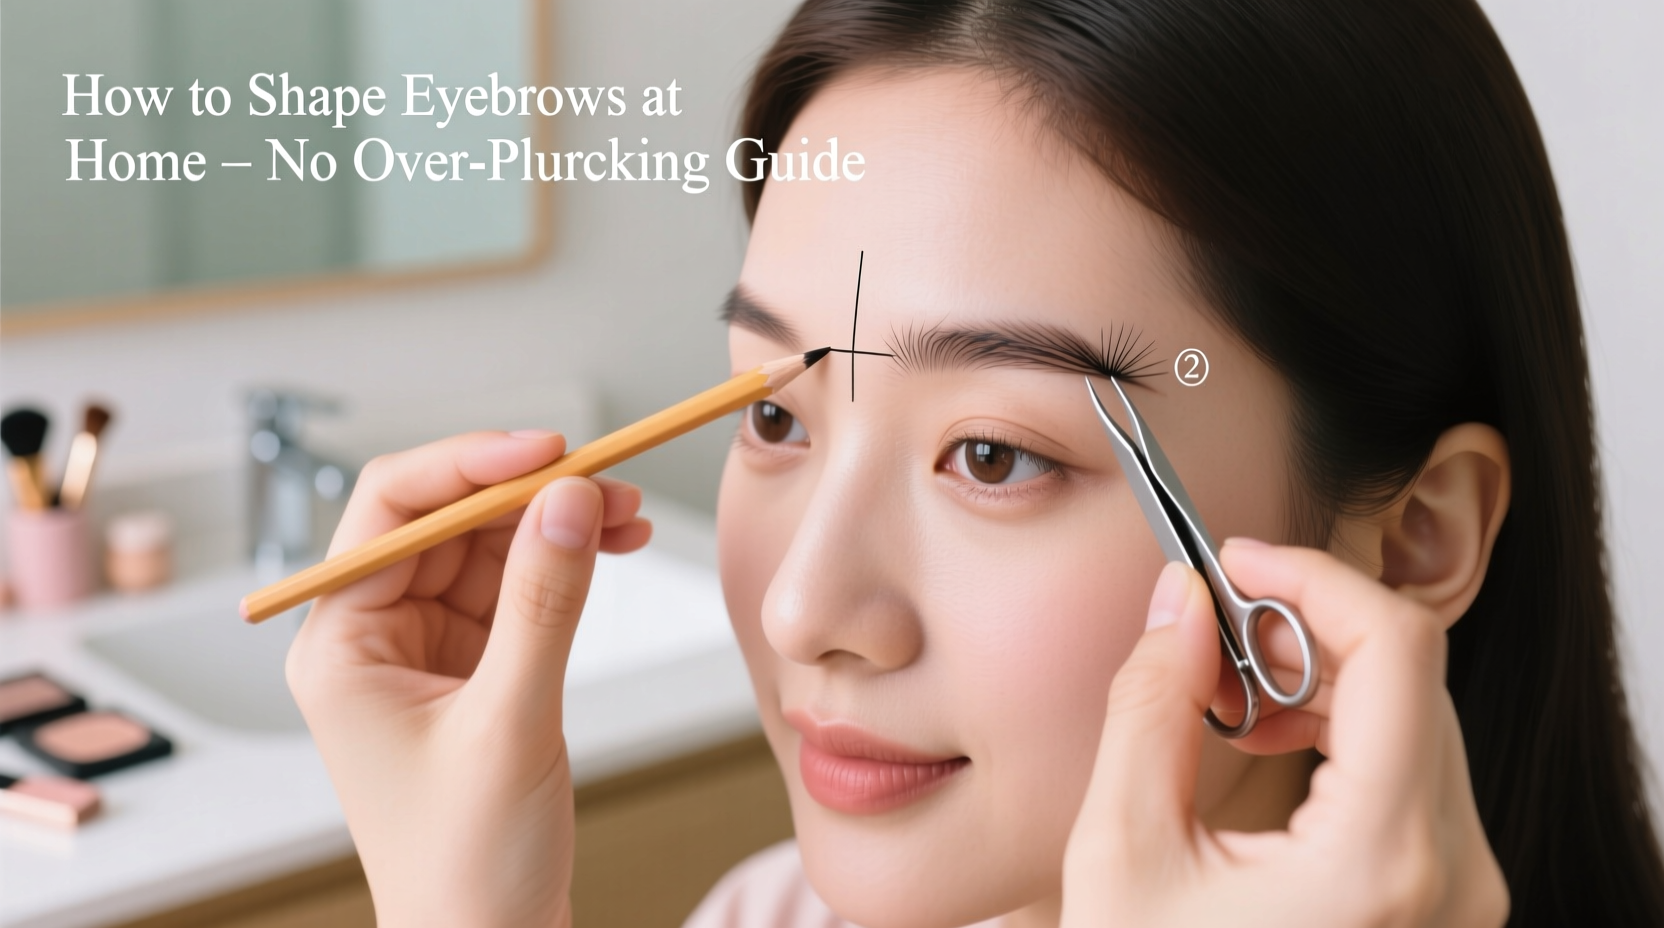
Every face is unique, and so are its eyebrows. Before removing a single hair, it’s essential to assess your natural brow line. This helps preserve volume while enhancing symmetry and definition. Start by identifying three anchor points that define your ideal brow shape: the start (head), the arch (peak), and the tail (end).
- Start of the brow: Hold a straight edge (like a makeup brush or spoolie) vertically against the side of your nose. Where it aligns with your eyebrow is where your brow should begin.
- Arch position: Angle the same tool from the outer edge of your nostril through the center of your iris. The point where it intersects your brow marks the ideal peak.
- Tail of the brow: Extend the tool from the side of your nose through the outer corner of your eye. That’s where your brow should naturally end.
Marking these points lightly with an eyebrow pencil can help guide your shaping—but avoid drawing a hard outline. The goal is subtle refinement, not reconstruction.
Essential Tools and How to Use Them Safely
You don’t need a professional kit to groom your brows at home, but using the right tools properly makes all the difference. Here’s what you should have on hand:
- Slant-tipped tweezers: Offers precision and a firm grip on individual hairs.
- Spoolie brush: To comb brows into place and check symmetry.
- Small scissors: For trimming long hairs—not for shaping.
- Good lighting: Natural daylight is best; avoid dim or yellow-toned bulbs.
- Mirror with magnification: Helps spot fine hairs without leaning in too close.
Before you begin, clean your tweezers with rubbing alcohol to prevent infection. Always pluck in the direction of hair growth to reduce breakage and ingrown hairs. Work slowly—one hair at a time—and step back every few minutes to assess balance between both brows.
| Tool | Purpose | Common Mistake |
|---|---|---|
| Slant tweezers | Remove stray hairs precisely | Using dull or misaligned tips causing skin pinching |
| Spoolie | Distribute hairs evenly and reveal hidden strays | Skipping brushing before plucking, leading to uneven results |
| Brow scissors | Trim excessively long hairs | Cutting too much at once, creating blunt or choppy ends |
| Highlighter or concealer | Define shape temporarily for guidance | Overlining and creating an unnatural stencil |
Step-by-Step Guide to Shaping Eyebrows at Home
Follow this methodical approach to shape your brows safely and effectively, minimizing the risk of over-plucking.
- Wash and dry your face. Clean skin reduces bacteria and allows better visibility.
- Brush your brows upward with a spoolie to see their full length and identify any overly long hairs.
- Trim if necessary. Only trim hairs that extend beyond the top line of your natural brow. Hold scissors parallel to your brow line and snip in small increments.
- Identify stray hairs outside your natural shape. These include thick patches above the brow, wisps below the tail, or hairs growing toward your temple.
- Pluck one hair at a time. Focus only on the identified strays. Avoid going “brow hunting”—don’t pull every minor hair just because it exists.
- Check symmetry frequently. Look straight ahead in the mirror and compare both brows. Small differences are normal; perfect symmetry is not the goal.
- Stop after 5–10 minutes. Eyebrows can appear more dramatic when viewed up close. Let them settle for a day before considering additional tweaks.
Remember: It’s easier to remove more later than to regrow lost hairs. If in doubt, leave it out.
“Beginners often mistake fullness for messiness. Natural brows have variation in thickness and texture—that’s part of their beauty.” — Lena Torres, Licensed Esthetician & Brow Specialist
Avoiding Common Beginner Mistakes
Over-plucking is the number one error in at-home brow shaping. But it’s not the only pitfall. Here are several habits that undermine your results—and how to correct them.
- Shaping too often: Plucking more than once a week prevents hairs from growing back uniformly. Wait at least 10–14 days between sessions.
- Following trends blindly: Thin, angular brows may look striking on some, but they can age poorly and don’t suit round or heart-shaped faces. Prioritize harmony with your features over fashion.
- Using wax or threading at home: These methods remove larger sections of hair and are harder to control. Stick to tweezing until you’re confident in your technique.
- Ignoring facial expressions: Raise your eyebrows as you shape. Some hairs only become visible when the skin lifts.
- Plucking after showering: Hot water opens follicles and softens skin, making plucking less painful—but also increases the risk of removing too much. Wait at least 30 minutes post-shower.
Real Example: Recovering from Over-Plucking
Sarah, a 28-year-old teacher, began shaping her own brows in college. Without guidance, she gradually removed more and more hair, aiming for a sleek, defined look. By her mid-twenties, her brows were narrow, disconnected, and slow to grow back. After reading about brow health, she committed to a six-month no-pluck recovery plan.
She started by mapping her natural shape and only removing obvious strays. She applied castor oil nightly and avoided harsh products near her brows. Within three months, fine hairs began filling in the sparse areas. By month six, she had restored a balanced, fuller brow that required only minimal maintenance.
Her biggest realization? “I thought I was fixing my brows, but I was actually stripping away their character. Now I work with them, not against them.”
Checklist: Safe At-Home Brow Shaping Routine
Use this checklist each time you shape your brows to stay consistent and avoid overdoing it:
- ☐ Wash hands and sanitize tweezers
- ☐ Sit in natural light with a well-lit mirror
- ☐ Brush brows into place with a spoolie
- ☐ Identify only the hairs clearly outside your natural shape
- ☐ Pluck sparingly—focus on obvious strays
- ☐ Step back every few minutes to check symmetry
- ☐ Stop after 10 minutes or after removing fewer than 15 hairs
- ✓ Apply a soothing balm or aloe vera afterward to calm the skin
Frequently Asked Questions
How long does it take for over-plucked eyebrows to grow back?
Eyebrow hair grows slower than scalp hair—typically 0.1 to 0.2 millimeters per day. Full regrowth can take anywhere from 2 to 4 months, depending on genetics, age, and overall health. Consistent care, proper nutrition (especially biotin and protein), and avoiding further trauma speed up recovery.
Can I use an eyebrow pencil to fill in gaps while growing them back?
Absolutely. A soft, angled brush and powder or pencil can create the illusion of fullness without harming regrowth. Choose a shade slightly lighter than your hair color for a natural effect. Avoid heavy gel or pomade if you’re still actively growing brows, as buildup can clog follicles.
Is it okay to pluck gray eyebrow hairs?
Yes, but be cautious. Gray hairs are often coarser and more deeply rooted, so pluck gently to avoid skin trauma. If a gray hair bothers you, it’s fine to remove it—but consider trimming instead if it’s isolated, to minimize disturbance.
Final Thoughts: Patience Builds Perfect Brows
Shaping your eyebrows at home doesn’t have to mean sacrificing fullness or symmetry. With the right tools, a clear understanding of your natural shape, and a disciplined approach, you can maintain polished brows without falling into the trap of over-plucking. Remember that brows are not meant to be perfectly uniform—they’re expressive, dynamic features that change with your emotions and age gracefully when treated with care.
The most beautiful brows aren’t the thinnest or the most dramatic—they’re the ones that look like they belong to you. Trust your natural shape, work slowly, and let time refine your results.


 浙公网安备
33010002000092号
浙公网安备
33010002000092号 浙B2-20120091-4
Comments
No comments yet. Why don't you start the discussion?