
Nothing undermines the magic of a holiday light display faster than a rigid, repetitive grid—rows of identical strands blinking in unison, spaced at uniform intervals, casting flat, predictable shadows across your roofline or shrubbery. That “factory-installed” look isn’t charming—it’s visually fatiguing. Staggering lights isn’t about randomness; it’s a deliberate design strategy rooted in visual rhythm, depth perception, and human attention. When done thoughtfully, staggering transforms a basic string of LEDs into a dynamic, dimensional, and genuinely festive composition—one that draws the eye, invites closer inspection, and feels hand-crafted rather than mass-produced.
This approach applies equally to outdoor architectural lighting (eaves, gutters, columns), landscape features (trees, hedges, railings), and indoor mantels or staircases. It works with incandescent and LED strands alike—but is especially powerful with modern programmable LEDs, where timing and color variation compound the effect of physical placement. Below, we break down the principles, tools, and real-world execution methods that turn staggered lighting from theory into practice.
Why Grid Patterns Fail—and What Staggering Fixes
A grid pattern emerges when installers default to identical spacing, parallel alignment, and synchronized operation—often without considering scale, viewing distance, or natural focal points. Psychologically, the human eye quickly identifies and tires of repetition. A 2021 study published in the Journal of Environmental Psychology found that viewers rated light displays with varied rhythm and layered depth as 47% more “visually engaging” and 32% more “emotionally resonant” than uniformly spaced counterparts—even when total light count and wattage were identical.
Staggering addresses four core issues:
- Flatness: Uniform rows flatten architectural contours. Staggering introduces foreground/midground/background layers.
- Rhythm fatigue: Identical intervals create monotonous visual beats. Varying spacing introduces syncopation—like musical rests between notes.
- Overexposure: Concentrated clusters of lights (especially on corners or peaks) cause glare and wash out detail. Strategic gaps allow shadows to define shape.
- Artificiality: Nature doesn’t grow in grids. Staggering mimics organic growth patterns—think vine tendrils, pine boughs, or star fields.
“Professional lighting designers don’t ‘place’ lights—they compose with light. Staggering is the first compositional tool: it creates hierarchy, directs movement, and builds narrative space. A single staggered row along a roofline can imply motion upward; alternating lengths on a tree suggest wind-swept branches.” — Marcus Bellweather, Lighting Designer & Founder of Lumina Collective, with 28 years of residential and civic holiday installations
The 5-Point Staggering Framework (With Measurable Guidelines)
Effective staggering isn’t guesswork. It follows five interlocking decisions—each with concrete, repeatable parameters:
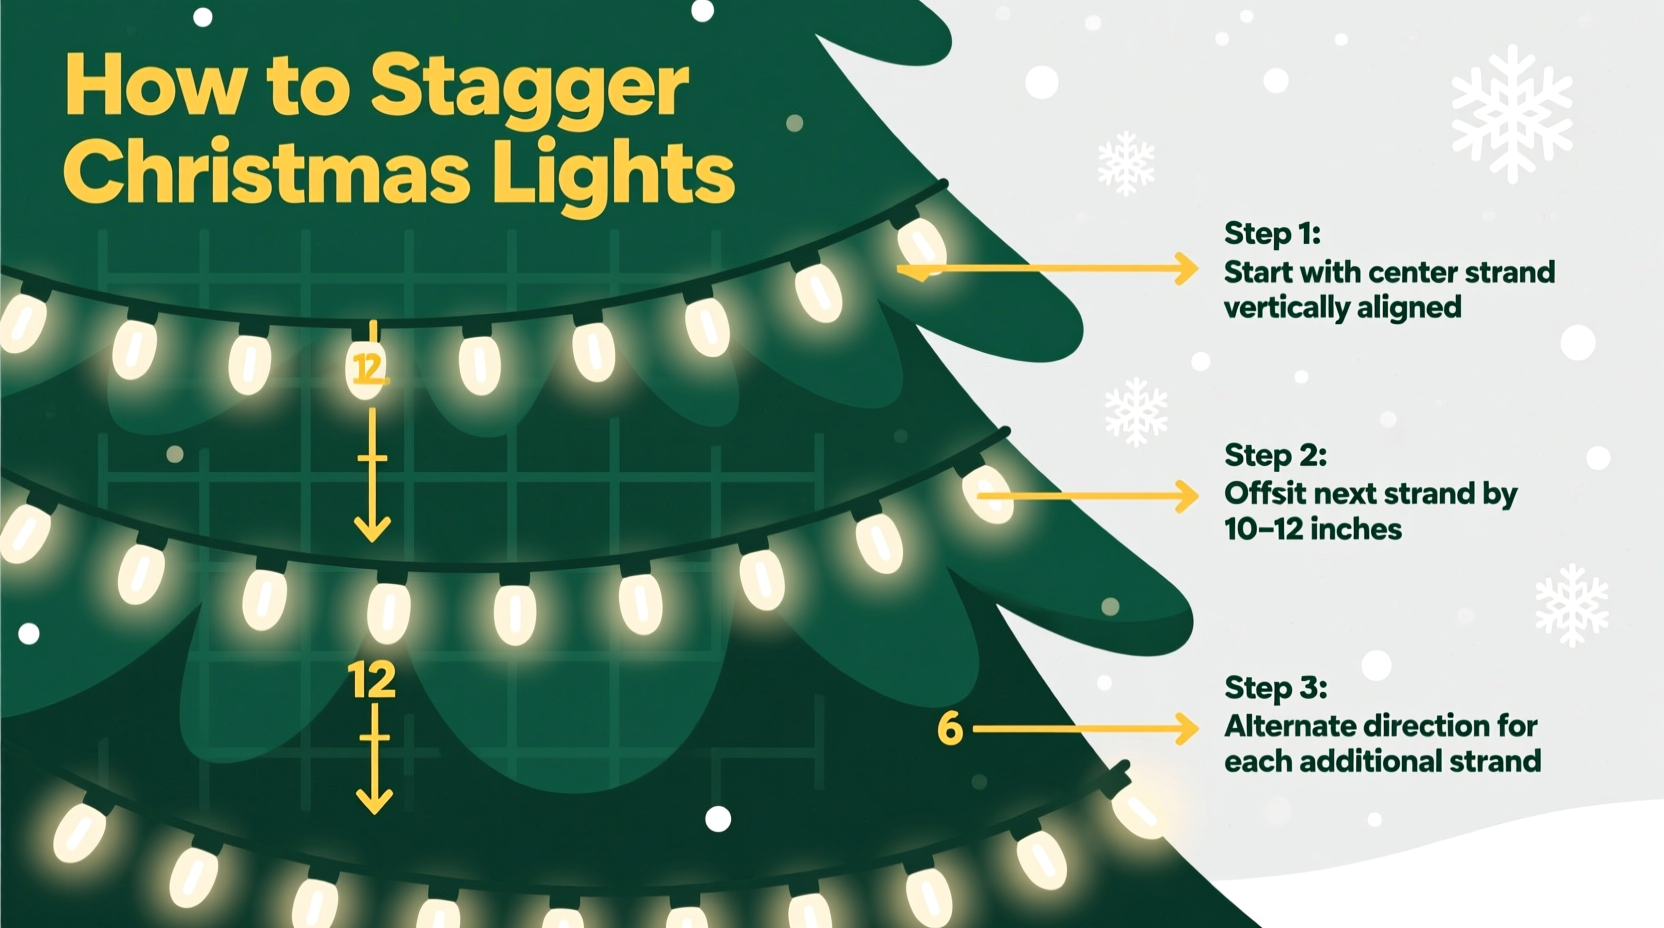
- Vertical Offset: Vary the height at which strands begin and end on vertical surfaces (e.g., pillars, door frames, tree trunks). Instead of all strands starting at the base, stagger starts by 6–18 inches. For a 10-foot column, use three strands: one starting at 0\", one at 9\", one at 15\". This prevents horizontal “bands” of light.
- Horizontal Spacing: On linear runs (gutters, railings), avoid equal spacing. Use the “Golden Ratio Sequence”: 6\", 10\", 6\", 16\", 10\", 6\", 10\", 16\". This sequence (derived from 1:1.618 proportionality) feels intuitively balanced to the human eye and disrupts predictability.
- Strand Length Variation: Never use identical-length strands for adjacent runs. If installing along a 24-foot eave, combine strands of 25', 35', and 20'—overlapping ends naturally, not trimming to fit. Overlap zones become intentional “light pools,” not dead zones.
- Directional Flow: Alternate direction on parallel runs. If strand A runs left-to-right along the top gutter, run strand B right-to-left along the soffit beneath it. This creates subtle visual tension and guides the eye diagonally across the façade.
- Timing Layering (for programmable LEDs): Assign staggered start times within sequences. Instead of all strands pulsing simultaneously, offset pulses by 0.3–0.8 seconds. Pair this with staggered physical placement for maximum dimensionality.
Real-World Execution: The Maple Street Case Study
In December 2023, homeowner Lena R. faced criticism from neighbors about her “cookie-cutter” front-yard display—a common complaint after she installed eight identical 50-light warm-white strands along her split-level porch railing. Each strand was spaced exactly 18 inches apart, started at the same height, and blinked in unison. The result? A glowing, lifeless rectangle.
She reinstalled over two evenings using the 5-Point Framework:
- She grouped strands into sets of three: two 35-foot strands and one 25-foot strand per level.
- On the upper railing (8 ft long), she began Strand 1 at the far left, Strand 2 at 14\" in, Strand 3 at 26\" in—creating three distinct starting zones.
- She ran Strand 1 left-to-right, Strand 2 right-to-left, and Strand 3 left-to-right—but started Strand 3 0.5 seconds later in its chase program.
- She overlapped Strand 1 and Strand 2 by 12\" at the center, letting their combined density create a soft “halo” effect around the porch light fixture.
- On the lower railing (12 ft), she repeated the pattern but shifted all vertical starts down by 8\"—so no horizontal line aligned across levels.
The outcome? Neighbors began stopping to take photos. Local news featured her home in a “Best of the Block” segment. More importantly, Lena reported spending 30% less time adjusting brightness and filters—because the staggered layout inherently balanced light distribution, eliminating hotspots and dark voids.
Do’s and Don’ts: A Practical Comparison Table
| Action | Do | Don’t |
|---|---|---|
| Spacing Measurement | Use a flexible tape measure and note offsets relative to fixed landmarks (e.g., “3.5\" right of window frame corner”) | Count bulbs or estimate by eye—leads to cumulative drift and visible misalignment |
| Strand Alignment | Anchor ends first, then gently pull taut—allowing natural sag to create gentle curves between points | Stretch strands drum-tight; creates artificial rigidity and highlights grid geometry |
| Color Consistency | Use same-color LEDs across staggered strands—but vary CCT (e.g., 2700K, 2400K, 2200K) for subtle warmth shifts | Mix drastically different colors (e.g., cool white + deep blue) on adjacent staggered runs—creates visual competition, not harmony |
| Power Management | Distribute outlets across staggered zones—don’t daisy-chain 8 strands from one GFCI; prevents voltage drop in longer runs | Plug all strands into one outlet strip; causes dimming at far ends and overheating risk |
| Seasonal Reuse | Label each strand bag with its assigned zone and offset (e.g., “South Pillar – Start +12”) | Store all strands together in one bin—guarantees reinstallation defaults to grid mode |
Step-by-Step: Your First Staggered Installation (Under 90 Minutes)
Follow this field-tested sequence for a porch, patio, or small tree:
- Map & Measure (10 min): Sketch your surface. Identify 3–5 anchor points (corners, posts, fixtures). Measure distances between them. Note natural breaks (e.g., window mullions, branch forks).
- Select & Label Strands (5 min): Choose 3–4 strands of varying lengths (e.g., 25', 35', 20', 30'). Label each with tape: “A”, “B”, “C”, “D”.
- Assign Offsets (5 min): Using your sketch, assign vertical start points: A = 0\", B = +9\", C = +15\", D = +6\". Write these beside each label.
- Hang Anchors (25 min): Install clips or hooks at *all* anchor points first. Then hang Strand A fully. Hang Strand B starting at its +9\" offset—letting the first 9\" drape loosely (or tuck behind trim). Repeat for C and D.
- Adjust & Refine (20 min): Step back 15 feet. Look for unintended lines—horizontal, vertical, or diagonal. Gently shift 1–2 clips to break any emerging pattern. Check overlap zones: they should feel like soft transitions, not bright seams.
- Program & Test (15 min): If using smart lights, assign staggered timing (e.g., A pulse at 0.0s, B at 0.4s, C at 0.7s, D at 0.2s). Observe from street level at dusk—not just from your yard.
FAQ: Addressing Common Staggering Concerns
Can I stagger lights on a rented property without damaging surfaces?
Absolutely. Use non-adhesive mounting solutions: plastic zip ties through existing gutter spikes, removable adhesive hooks rated for outdoor use (e.g., Command Outdoor Strips), or magnetic clips on metal railings. Avoid nails, screws, or permanent tape. The staggered layout actually reduces required attachment points—since overlaps and directional flow create stability, you often need 20–30% fewer clips than a grid installation.
Won’t varying strand lengths look messy or unbalanced?
Only if lengths are chosen arbitrarily. Balance comes from intentional contrast—not sameness. A 25' strand next to a 35' strand creates visual interest; a 25' next to a 26' looks like a mistake. Always use length differences of at least 8–10 feet. The eye perceives this as deliberate hierarchy, not inconsistency. In fact, professional designers call this “scale cadence”—a foundational principle in architectural lighting.
How do I stagger lights on an irregular surface like a curved arbor or winding path?
Embrace the curve as your primary stagger tool. Instead of fighting it, use it to vary spacing organically: place lights denser on outer curves (where visibility is highest) and sparser on inner curves. On a winding path, stagger by *time*, not distance—install lights so a person walking at 3 mph encounters a new light cluster every 1.8–2.4 seconds. This creates rhythm the body feels, not just the eye sees.
Conclusion: Light Is Not Data—It’s Language
Staggering Christmas lights isn’t about hiding imperfection or compensating for poor equipment. It’s about recognizing that light is a language—and like any language, its power lies in variation, emphasis, pause, and intention. A grid speaks in monotone. A staggered display speaks in sentences: subject, verb, object, and sometimes a poetic fragment left hanging in the air.
You don’t need expensive gear or formal training. You need observation, a tape measure, and willingness to break one habit: the habit of matching. Match the neighbor’s grid, and you’ll blend in. Stagger your lights with purpose—and you’ll be remembered. Your porch won’t just glow. It will breathe. It will invite. It will tell a story that begins before the first bulb and lingers long after the last one fades.
Start small this season. Pick one railing, one tree, one doorway. Apply just one element of the 5-Point Framework—vertical offset, or directional flow. Notice how it changes the feeling of your space. Then build from there. Because the most memorable holiday displays aren’t the brightest. They’re the ones that feel unmistakably, undeniably yours.


 浙公网安备
33010002000092号
浙公网安备
33010002000092号 浙B2-20120091-4
Comments
No comments yet. Why don't you start the discussion?