
For many, the frustration is all too familiar: a perfectly applied eyeliner at 7 a.m. turns into a smudged, shadowy mess by lunchtime. You love your current eyeliner—its pigment, texture, and precision—but it just won’t stay put. Before you assume the product is the problem, consider this: longevity often depends less on the formula and more on how you prepare, apply, and set it. With strategic tweaks to your routine, you can dramatically extend wear time—without ever switching brands.
The key lies in understanding what causes smudging in the first place. Oily eyelids, natural moisture, friction from blinking, and environmental humidity all contribute to breakdown. But these factors are manageable. By focusing on eyelid prep, layering techniques, and smart finishing steps, you can lock your liner in place for hours longer.
Understanding Why Eyeliner Smudges
Smudging isn’t always a flaw in the eyeliner itself. More often, it’s a mismatch between product behavior and skin conditions. The eyelid is one of the oiliest areas on the face due to sebaceous glands concentrated near the lash line. This oil gradually breaks down makeup, especially formulas not designed for high-moisture zones.
Additionally, constant eye movement creates friction. Every blink slightly tugs at the delicate skin, disrupting the liner over time. Sweat and humidity accelerate this process, particularly in warmer climates or during physical activity. Even touching your eyes—adjusting glasses, rubbing fatigue away—can smear product unintentionally.
But here’s the good news: you don’t need waterproof or “long-wear” labeled liners to achieve staying power. What matters most is creating a stable base that resists oil and moisture while reinforcing the liner’s integrity through technique.
Prep Your Eyelids for Maximum Hold
Foundation for lasting eyeliner starts before the liner touches your skin. A clean, primed lid creates a smooth, dry surface that resists oil migration. Skipping this step is like painting on damp drywall—the result may look good initially but won’t endure.
Begin with a gentle cleanser to remove any residual oils or moisturizers. Avoid heavy eye creams before makeup; if you must hydrate, use a lightweight gel formula and allow it to fully absorb—at least 10 minutes—before proceeding.
Next, apply an eyeshadow primer or a targeted eyelid primer. These products create a barrier between your skin’s natural oils and your makeup. Look for silicone-based formulas, which form a breathable seal. Even a small amount—dabbed with a fingertip and blended outward—makes a significant difference.
If you don’t own a dedicated primer, use a neutral matte concealer or foundation as a substitute. Set it lightly with translucent powder using a flat brush or fingertip. The goal is a velvety, non-greasy finish that doesn’t crease.
“Priming isn’t optional for long-wear eye makeup. It’s the single most effective step for preventing smudging.” — Lena Torres, Celebrity Makeup Artist
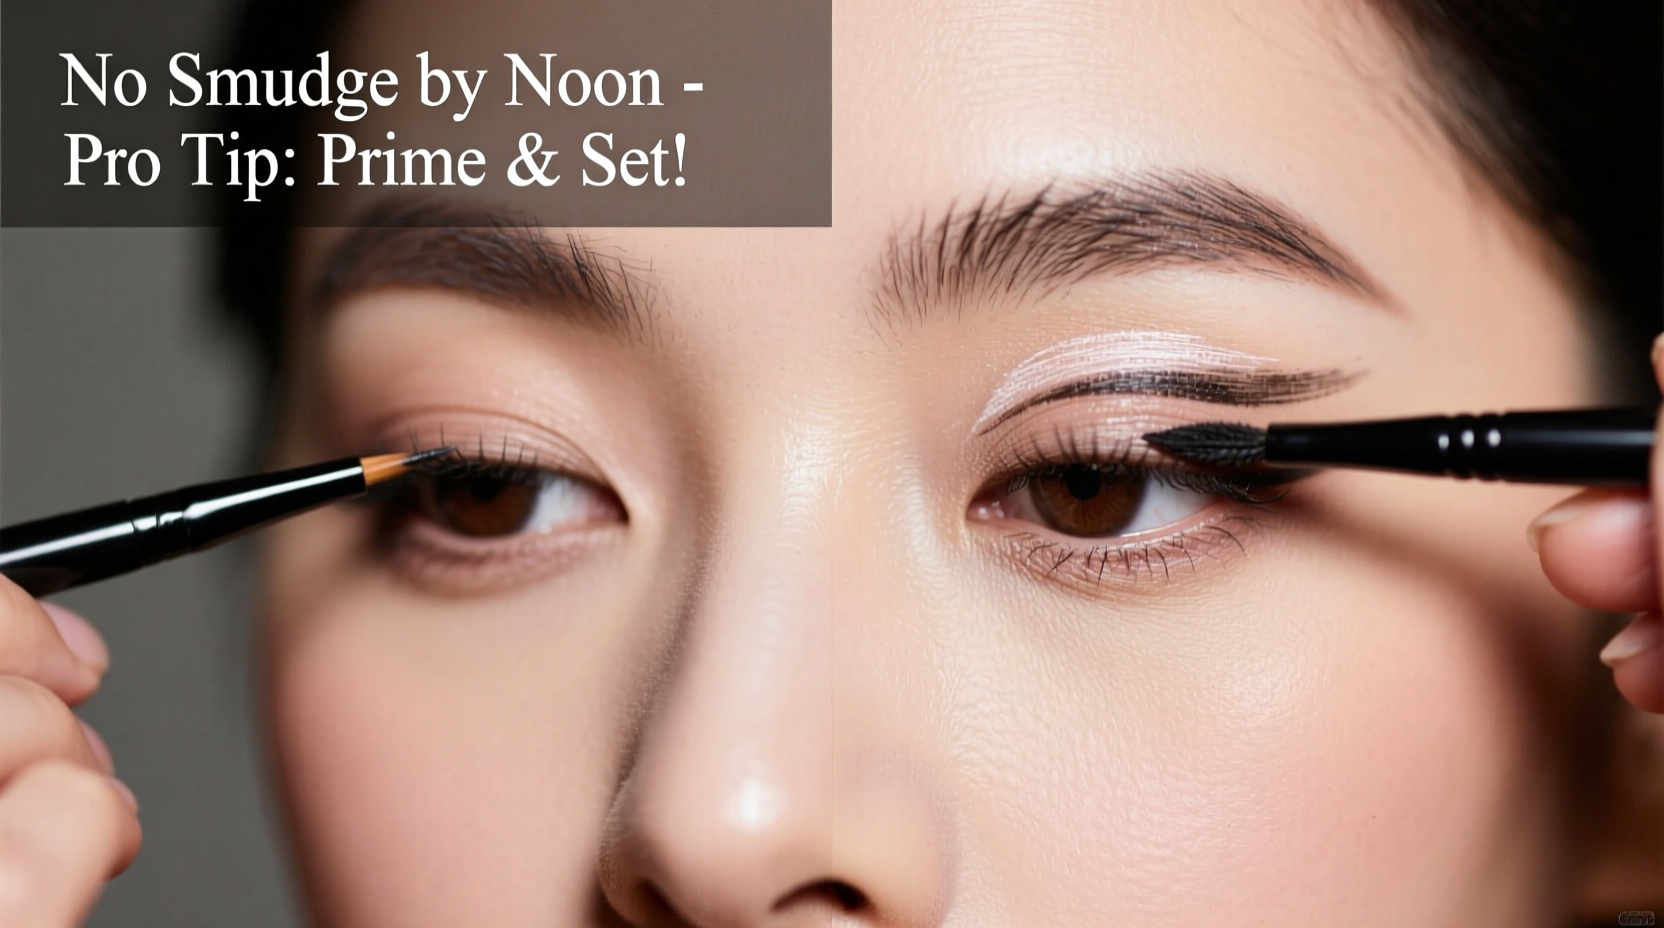
Layering Techniques That Lock Liner in Place
Once your lids are prepped, the way you apply eyeliner becomes critical. The trick is to build layers that reinforce each other, rather than relying on a single pass of product.
Start by using your preferred eyeliner to draw the initial line as close to the lash roots as possible. Whether it’s pencil, gel, or liquid, precision at the base ensures minimal gaps where oil can seep through. For pencils, sharpen them frequently to maintain a fine point and reduce drag.
After applying the first layer, immediately go over it with a matching eyeshadow using a thin angled brush. This technique, known as “tightlining with shadow,” deposits pigment into the lash line, filling any micro-gaps and adding a second layer of color that adheres to the skin differently than liner alone. Choose a matte shadow in a similar shade—it will act as a fixative.
This dual-layer method works because powders bind well to primed skin and resist oil better than creamy formulas. The shadow essentially “locks” the liner underneath, reducing direct contact with moisture and minimizing transfer.
| Application Method | Wear Time (Average) | Smudge Resistance |
|---|---|---|
| Liner only, no prep | 2–3 hours | Poor |
| Liner + primer | 5–6 hours | Fair |
| Liner + shadow layer | 7–8 hours | Good |
| All three: prep, liner, shadow | 10+ hours | Excellent |
Setting Strategies to Prevent Transfer
Even with perfect prep and layering, eyeliner can still shift if not properly sealed. Setting isn’t just for foundation—it’s essential for eyes too. After completing your eye look, take one final step to lock everything in place.
Spray a light mist of setting spray and close your eyes tightly for five seconds. This allows the fine droplets to coat the eyelid without irritating the eye. Alternatively, use the “press-and-seal” method: dampen a clean angled brush with setting spray and gently press it along the length of the liner. This reactivates the pigments slightly, fusing them with the shadow layer and creating a more cohesive, durable line.
Another powerful option is translucent powder applied with precision. Using a small, stiff brush, dust a tiny amount directly over the liner. Don’t swipe—press and lift. Too much powder can cause cracking, but a whisper-thin layer absorbs excess oil and prevents migration.
Avoid using cotton swabs or fingers after application unless absolutely necessary. Both introduce oils and friction that undo your work. If cleanup is needed, use a pointed Q-tip dipped in micellar water and work carefully from the outer edge inward.
Mini Case Study: Office Worker with Oily Lids
Sophie, a 32-year-old project manager, struggled daily with her favorite creamy pencil eyeliner smudging into soft gray rings under her eyes by midday. She worked in a climate-controlled office but spent hours in back-to-back Zoom meetings, often touching her face unconsciously. Despite trying multiple removers and wipes, she assumed the liner was flawed.
After consulting a makeup artist, she changed only her prep routine: she began cleansing her lids with a wipe, applying a silicone-based primer, and setting the liner with a matching espresso shadow. She also switched from sweeping powder across her entire lid to pressing it only along the lash line.
Result: Her eyeliner stayed intact until 6 p.m., even after a lunchtime walk in humid weather. She didn’t change her product—only her method—and finally achieved the sharp, clean look she wanted all day.
Common Mistakes That Sabotage Longevity
Even with the right products, small missteps can undermine your efforts. Awareness of these pitfalls can prevent wasted time and frustration.
- Applying liner over moisturizer: Eye creams and serums create a slippery base. Wait at least 10 minutes after skincare for full absorption.
- Using old or degraded liner: Pencil and gel liners can dry out or grow bacteria. Replace every 6–12 months.
- Over-blending immediately after application: Softening the line with a brush right after drawing it introduces friction and lifts product.
- Touching the eyes throughout the day: Adjusting glasses, rubbing fatigue, or resting your chin in your hand transfers oil and disrupts makeup.
- Skipping the inner rim (waterline): Leaving the waterline bare creates a visible gap where sweat and oil accumulate, pushing liner outward.
Step-by-Step Routine for All-Day Wear
Follow this sequence every time for consistent results:
- Cleanse eyelids with a gentle wipe or toner-soaked pad to remove oils.
- Apply a thin layer of eyeshadow primer or matte concealer. Blend evenly and set with translucent powder.
- Draw your eyeliner as usual, starting from the inner corner and working outward.
- Dip a thin angled brush into a matte eyeshadow matching your liner shade. Press it along the top of the liner to reinforce and diffuse edges.
- Optional: Tightline the upper waterline with a waterproof pencil to seal the lash base.
- Lightly press translucent powder over the liner using a small brush.
- Finish with mascara, then seal the entire eye area with a fine mist of setting spray.
This routine takes less than five extra minutes but extends wear time significantly. Once mastered, it becomes second nature.
FAQ
Can I use setting spray before applying eyeliner?
Not ideally. Setting spray is best used as a final step to lock everything in place. Applying it before liner can make the surface too wet, causing patchiness or sliding. If you must hydrate your face post-primer, let the spray dry completely before lining.
Does this work for lower lash line liner?
Yes, but with adjustments. The lower lid is even more prone to smudging due to proximity to tear ducts and cheek movement. Use a lighter hand, opt for waterproof formulas below, and avoid heavy powder there to prevent flaking. Reinforce with shadow sparingly.
What if I have sensitive eyes or wear contacts?
Stick to hypoallergenic, ophthalmologist-tested products. Avoid lining the inner waterline if it irritates you. Focus instead on tightlining just above the lashes and using a long-wearing gel or pencil that doesn’t migrate. Always wash brushes regularly to prevent bacterial buildup.
Final Thoughts: Mastery Over Product
Lasting eyeliner isn’t about chasing the next “miracle” formula. It’s about mastering the fundamentals: preparation, layering, and sealing. The product you already own likely has the potential to last all day—if you give it the right environment to thrive.
Small changes compound into dramatic results. Priming, reinforcing with shadow, and setting with precision cost nothing but a few extra minutes. And unlike buying new liners repeatedly, these techniques work across brands, formulas, and budgets.


 浙公网安备
33010002000092号
浙公网安备
33010002000092号 浙B2-20120091-4
Comments
No comments yet. Why don't you start the discussion?