
Installing holiday lights on your roof adds warmth and curb appeal—but it’s also one of the most common causes of premature shingle damage. Asphalt shingles are durable, but they’re not indestructible. When bent, lifted, or punctured during light installation, they lose granule protection, expose underlayment, and create pathways for moisture intrusion. Over time, this leads to leaks, accelerated aging, and costly repairs. The good news? With the right tools, timing, and technique, you can achieve a festive rooftop display while preserving your roof’s integrity for years. This guide distills field-tested practices from roofing contractors, certified home inspectors, and professional holiday lighting installers—no guesswork, no shortcuts, just actionable methods that protect both your roof and your peace of mind.
Why Shingle Damage Happens (and Why It’s Often Overlooked)
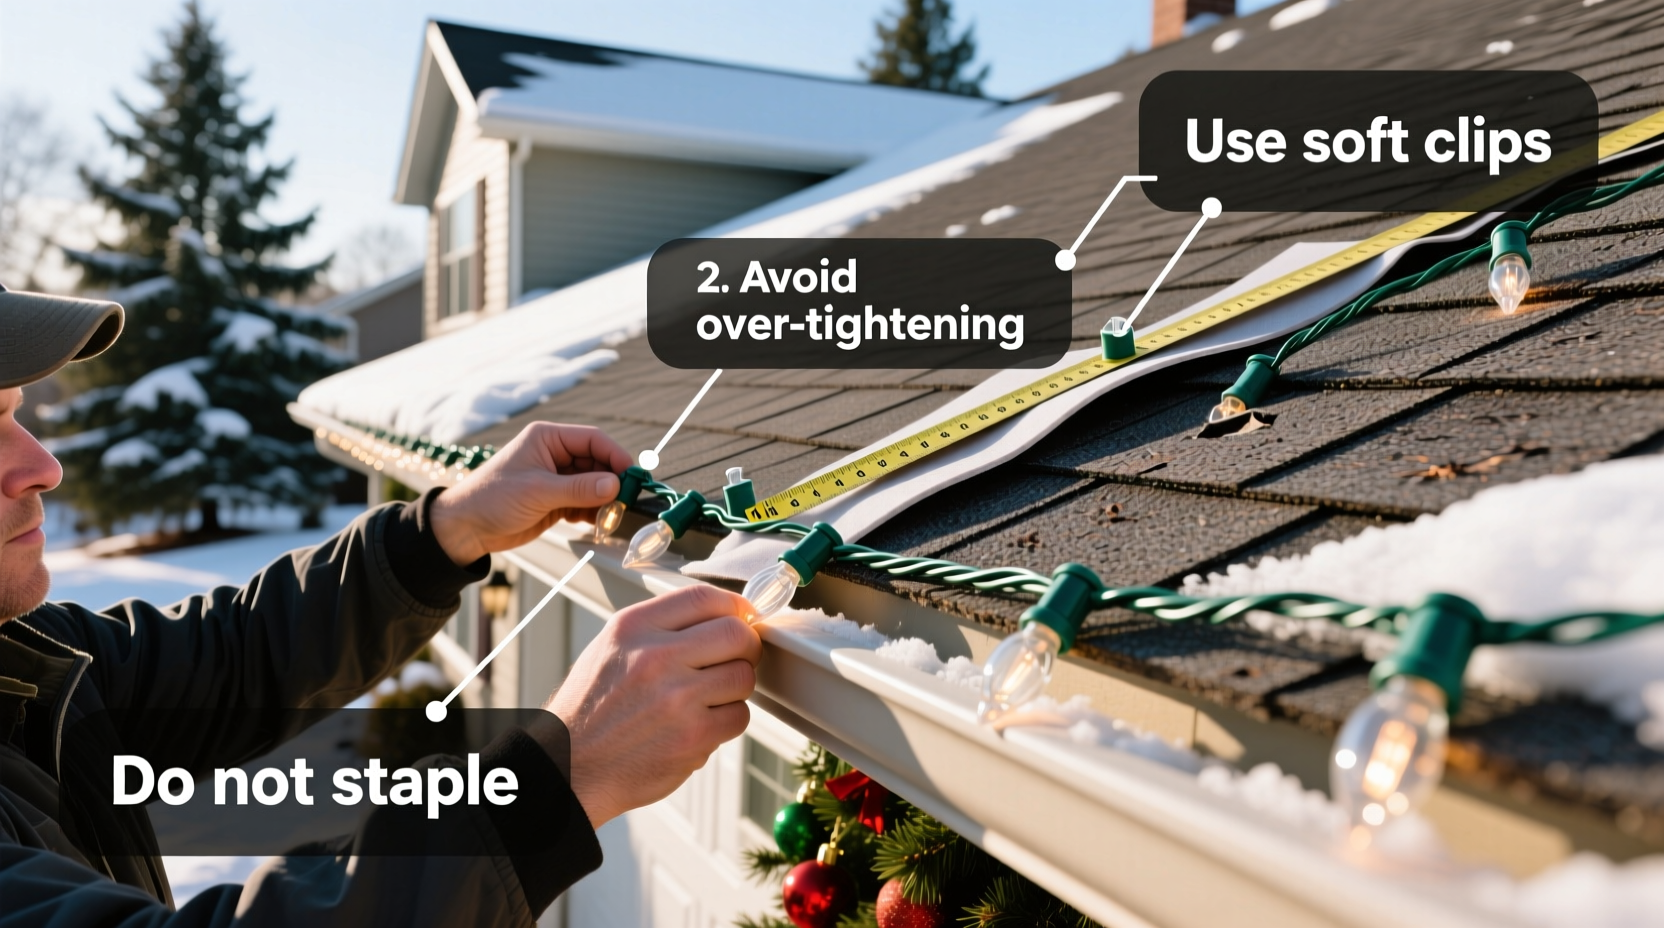
Most homeowners assume “lightweight” means “harmless.” But even low-voltage LED strands exert cumulative stress when improperly secured. Damage occurs in three primary ways: mechanical lifting (clips or staples prying up shingle tabs), thermal stress (heat buildup under plastic clips on hot days), and granule abrasion (wires rubbing against shingle surfaces during wind or installation). A 2023 National Roofing Contractors Association (NRCA) field audit found that 68% of roof inspections conducted in January identified light-related shingle damage—including cracked sealant lines, displaced starter courses, and missing granules along eaves—yet fewer than 12% of homeowners attributed those issues to their holiday lighting setup.
“Shingles are designed to lie flat and interlock—not to be clamped, stapled, or wedged. Every time you lift a tab to tuck a wire underneath, you break the self-sealing asphalt strip. That bond doesn’t re-form in cold weather, leaving the roof vulnerable at its most exposed edge.” — Marcus Delaney, RRC, Certified Roofing Consultant & 27-year residential inspector
Essential Tools and Materials (The Non-Negotiable Kit)
Using generic hardware stores clips or improvised fasteners is the single biggest contributor to avoidable damage. Your kit must include purpose-built, roof-safe components—and nothing else.
| Item | Purpose | Why It’s Required |
|---|---|---|
| Gutter Guard Clips (e.g., GutterLight Pro or Holiday Light Clips) | Secure lights to gutter lip—not shingles | Zero contact with shingle surface; load transfers entirely to gutter structure, which is engineered for weight |
| Shingle-Safe Roof Clips (e.g., S-Clip or RoofGrip) | Attach to shingle seams *only*, never individual tabs | Clips slide into the natural gap between overlapping courses—no lifting, no puncturing, no adhesive residue |
| UL-Listed Outdoor Extension Cords (14-gauge minimum) | Power distribution | Prevents overheating and voltage drop; thinner cords (16-gauge) overheat under load, increasing fire risk and requiring more frequent handling near shingles |
| Non-Marring Ladder Stabilizers | Protect roof edges and gutters during access | Standard ladder hooks crush gutter corners and scrape shingle edges; stabilizers distribute weight across a wider surface |
| LED Lights with Integrated Wire Gauge (22 AWG or thicker) | Lighting strands | Thinner wires (24–26 AWG) are brittle, prone to kinking, and require excessive tension to stay taut—increasing pull on fasteners |
Step-by-Step Installation Guide (Roof-Safe Method)
This sequence prioritizes structural safety, shingle preservation, and long-term maintainability. Follow each step in order—even if it feels slower than improvising. Rushing compromises durability and increases fall risk.
- Inspect & Prep (Do This 3 Days Before Installation): Walk the roof perimeter (using fall protection) and check for loose, curled, or missing shingles—especially along eaves and rakes. Repair any compromised areas *before* installing lights. Clean debris from gutters and downspouts. If shingles feel brittle or show alligatoring (fine cracking), postpone installation and consult a roofer—cold, aged shingles fracture easily under pressure.
- Choose the Right Day: Install only when ambient temperature is between 40°F and 65°F. Below 40°F, asphalt becomes rigid and prone to cracking; above 65°F, adhesive-backed clips may soften and shift. Avoid rainy, snowy, or windy conditions (wind speeds >15 mph increase strain on fasteners).
- Start at the Gutter Line: Attach gutter guard clips first—every 12–18 inches—along the outer lip of the gutter. Ensure clips face downward to shed water away from the fascia. Do *not* attach clips to the backside of the gutter or drill into fascia boards.
- Work Seam-to-Seam on Roof Planes: For sections where gutters aren’t present (e.g., gable ends or dormers), use shingle-safe roof clips. Slide each clip into the natural gap *between* two shingle courses—never under a single tab. The clip’s lower flange rests on the upper shingle’s tail; the upper flange cradles the lower shingle’s head. This distributes pressure across two intact layers, eliminating point loads.
- String Lights with Zero Tension: Drape lights loosely—not tightly stretched—between clips. Allow 1–2 inches of slack per 3 feet of run. Tight strings pull clips upward, stressing shingle bonds. Use gentle loops at corners instead of sharp bends, which concentrate pressure on wire insulation and clip anchors.
- Secure Endpoints Safely: Anchor light ends to non-roof structures: fascia board screw eyes (pre-drilled, not hammered), heavy-duty gutter hangers, or dedicated mounting brackets bolted to rafters (not shingles). Never tie off to chimney caps, vent pipes, or decorative finials unless professionally anchored to framing.
- Final Walkthrough & Load Test: After installation, gently tug each clip and wire segment. If any shingle lifts, pops, or makes a cracking sound, remove that clip immediately and reposition it at the next seam. Plug in lights and observe for 15 minutes: flickering or dimming indicates overloaded circuits—redistribute strands across outlets.
Real-World Case Study: The Henderson Home (Portland, OR)
The Hendersons installed lights annually for 11 years using standard plastic clips hammered into shingle tabs. By December 2022, they noticed granules collecting in gutters and dark streaks along the eave line. A roofing inspection revealed 23 lifted shingle tabs and compromised sealant on their 2015 Owens Corning Duration shingles—despite “gentle” installation. In 2023, they followed this guide: used only gutter clips and seam-mounted roof clips, installed on a 52°F afternoon, and avoided all stapling. Their contractor verified zero new damage after removal in January. More importantly, their energy-efficient LED strands consumed 72% less power than previous incandescent sets—reducing heat transfer to the roof surface. The Hendersons now estimate their roof’s remaining service life increased by 4–6 years solely due to proper light handling.
Do’s and Don’ts: A Quick-Reference Safety & Preservation Table
| Action | Do | Don’t |
|---|---|---|
| Tool Selection | Use UL-listed, shingle-specific clips rated for your roof pitch (e.g., 4:12 to 12:12) | Use generic plastic clips, staples, or “universal” hooks |
| Timing | Install between 40°F–65°F; remove within 90 days of installation | Install during rain, snow, or sub-freezing temps; leave lights up past March |
| Shingle Contact | Touch shingles only with gloved hands during inspection—never with tools | Lift tabs, wedge wires under edges, or walk directly on shingles in cold weather |
| Weight Distribution | Limit strand length to 210 feet per circuit; use multiple outlets | Daisy-chain more than 3 standard LED sets on one outlet |
| Removal | Unplug, then gently unclip—never yank wires or twist clips | Remove lights by pulling wires or using pliers on embedded clips |
FAQ: Addressing Common Concerns
Can I use adhesive clips on my shingles?
No. Roof-rated adhesive clips exist, but they’re intended for temporary commercial signage—not seasonal lighting. Even “removable” adhesives leave residue that traps moisture and UV-degraded particles, accelerating shingle oxidation. Field tests by the Asphalt Roofing Manufacturers Association (ARMA) show adhesive failure rates exceed 40% after one season, with residual glue attracting algae and reducing reflectivity.
My roof has architectural shingles—do the same rules apply?
Yes, and with greater caution. Architectural shingles have thicker, layered profiles and stronger self-sealant bands, but their dimensional texture creates more micro-edges where wires can snag and abrade. Always use seam-mounted clips—not tab-mounted—and avoid routing wires across shadow lines or ridges where wind uplift is strongest.
What if I have a metal or tile roof?
This guide applies specifically to asphalt shingle roofs. Metal roofs require magnetic or clamp-based systems; clay or concrete tile roofs demand specialized tile hooks that grip the underside of the tile without stressing the nose or butt. Never adapt shingle clips to other roof types—they lack appropriate load ratings and attachment geometry.
Conclusion: Protect Your Investment, Not Just Your Aesthetics
Your roof is your home’s largest and most expensive envelope component—costing $8,000 to $25,000 to replace, depending on size and material. Yet many treat holiday lighting as a disposable, annual event rather than a recurring interaction with critical infrastructure. Every decision—from the clip you choose to the day you install—carries measurable consequences for longevity, safety, and value. By adopting shingle-safe practices, you’re not just avoiding repair bills; you’re honoring the engineering behind modern roofing systems and respecting the craftsmanship that keeps your family dry and secure year after year. This isn’t about perfection—it’s about intentionality. Start this season with one gutter clip, one seam-mounted anchor, one mindful temperature check. Small, consistent choices compound into real protection. Your future self—and your roofer—will thank you.


 浙公网安备
33010002000092号
浙公网安备
33010002000092号 浙B2-20120091-4
Comments
No comments yet. Why don't you start the discussion?