
Urban living rarely affords the luxury of a wide, traditional Christmas tree. Hallways, studio apartments, entryway nooks, and rental balconies demand thoughtful alternatives—not compromises. The slim Christmas tree has emerged not as a second-choice option but as a deliberate, elegant design solution: tall, narrow (typically 24–36 inches in diameter), and often 6–7.5 feet high. When paired with vertical light strands—lights strung *from top to bottom* along the trunk and primary branches rather than wrapped horizontally—the result is a striking, architectural focal point that draws the eye upward, enhances perceived height, and minimizes visual bulk. This approach isn’t just about fitting into tight quarters; it’s about reimagining holiday lighting as intentional interior design. Done well, it delivers drama without density, warmth without clutter, and festive presence without spatial intrusion.
Why Vertical Light Strands Work Best on Slim Trees
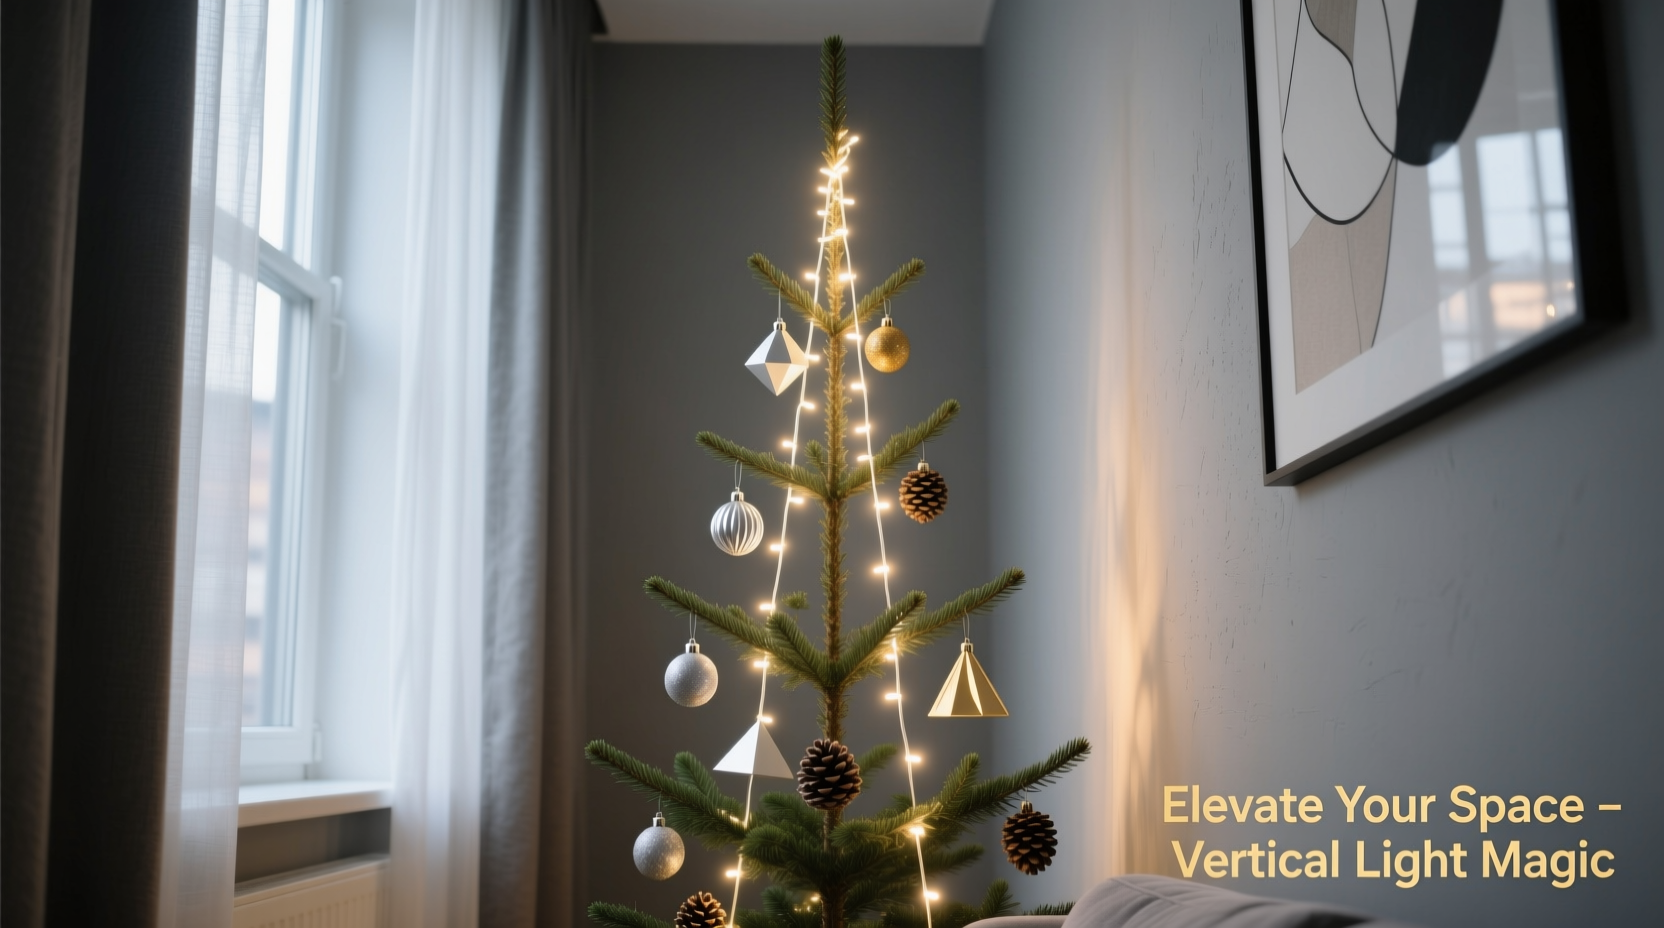
Horizontal wrapping—a technique suited to full-bodied trees—creates visual weight and horizontal rhythm. On a slim profile, that same method can exaggerate narrowness, making the tree appear spindly or top-heavy. Vertical strands counteract this by reinforcing the tree’s natural linearity and emphasizing its height. They mimic the verticality of real evergreen growth patterns—think the clean ascent of a Norway spruce or the slender silhouette of a blue atlas cedar. Psychologically, vertical lines convey elegance, stability, and aspiration. In interior design terms, they “lift” a room, especially valuable in low-ceilinged studios or long, narrow corridors where horizontal elements dominate.
Lighting engineer and residential designer Lena Torres explains:
“Vertical strand placement transforms illumination from ambient filler into structural accent. It turns the tree into a luminous column—not just a decorated object. For narrow spaces, that distinction is critical: you’re not adding decoration; you’re defining vertical volume.” — Lena Torres, Principal Designer at Lumina Interiors & Lighting Consultant for NYC Housing Authority Adaptive Reuse Projects
This principle extends beyond aesthetics. Vertical strands reduce tangling during setup and takedown—a frequent pain point with slim trees whose dense, upright branch tips easily snag standard light cords. They also distribute heat more evenly, lowering fire risk near walls or furniture—particularly important when trees sit within 6 inches of drywall or built-in shelving.
Choosing the Right Slim Tree & Vertical Light Setup
Not all slim trees support vertical lighting equally. Prioritize structural integrity and branch orientation:
- Branch angle matters: Select trees with branches angled upward at 30–45 degrees—not flat or downward-sweeping. Upward angles provide secure anchor points for clips and prevent lights from sliding down.
- Trunk reinforcement: Look for models with a solid central pole (steel or reinforced PVC) and internal cable tension systems. Avoid flimsy “hinged branch” designs without mid-height bracing—they’ll sag under even lightweight cord weight.
- Pre-lit vs. unlit: Most pre-lit slim trees use horizontal wiring. For true vertical control, choose an unlit tree—or verify the pre-lit version uses a *separate vertical circuit* with dedicated clip-on sockets (rare, but available from brands like National Tree Company’s “Slim Profile Plus” line).
For custom vertical strands, LED mini lights are non-negotiable. Choose warm white (2200K–2700K) for cozy ambiance or soft amber for vintage warmth. Avoid cool white—it reads clinical in tight spaces. Opt for UL-listed, insulated wire with memory wire cores (so strands hold their straight drop). Each strand should be 24–36 feet long—enough to run from tip to base with gentle tension, plus 3 feet for plug access.
A Step-by-Step Styling Process
Styling vertically isn’t intuitive. Follow this precise sequence to avoid last-minute frustration:
- Assemble & stabilize: Fully assemble the tree indoors, away from drafts. Tighten all hinge bolts and ensure the stand holds at least 1 gallon of water (even for artificial trees—this adds crucial ballast against tipping).
- Map your lines: Stand back and identify 5–7 primary “light lines”: one centered on the trunk, then 2–3 on each side, spaced evenly around the circumference. Mark starting points at the very top tip and ending points at the base of the lowest branch tier.
- String top-down: Starting at the apex, attach the first strand using a micro-clip. Gently pull taut (no sag, no strain) and clip at each major branch intersection. Work downward, keeping consistent spacing. Repeat for all lines.
- Add texture with ornaments: Hang ornaments only on branch *ends*, never along the lit strands. Use lightweight, elongated shapes: teardrop glass, slender wood slices, or matte-finish metal cones. Keep ornament size under 3 inches in diameter to preserve negative space.
- Final calibration: Turn on lights in a darkened room. Adjust any sags or twists. If a strand flickers, check connections—not the bulb—vertical setups stress wiring junctions more than horizontal ones.
Real-World Application: The Brooklyn Studio Case Study
Maria R., a graphic designer in a 420-square-foot Williamsburg studio, faced a classic narrow-space dilemma: her 10-foot-long hallway doubled as entry and coat storage. A standard 48-inch-diameter tree would block foot traffic and visually shrink the corridor. She chose a 7-foot-tall, 28-inch-diameter unlit slim tree with upward-angled PVC branches and installed eight vertical warm-white LED strands (30 feet each) using micro-clips.
Her breakthrough came in ornament strategy: instead of clustering, she placed exactly three ornaments per strand—at the top third, middle, and bottom third—using matte black ceramic cones and frosted glass icicles. She added a single 12-inch brushed-brass star topper and omitted a tree skirt entirely, letting the stand’s black metal base recede into shadow. The result? A luminous, gallery-like column that defined the hallway’s entrance without impeding movement. Neighbors began calling it “the light tower.” Maria notes: “It doesn’t feel like a compromise. It feels like the space finally got its own signature piece.”
Do’s and Don’ts for Vertical Lighting Success
| Action | Do | Don’t |
|---|---|---|
| Strand spacing | Keep 8–12 inches between parallel vertical strands on trees under 6 ft; 10–14 inches on taller models | Place strands closer than 6 inches—creates visual “bars” and overwhelms narrow profiles |
| Ornament weight | Use ornaments under 4 oz each; hang only on branch tips using ornament hooks with rubber grips | Attach heavy glass balls or large fabric ornaments—they torque branches and distort vertical alignment |
| Power management | Use a single 15-amp outlet timer with surge protection; daisy-chain no more than 3 strands per outlet | Plug multiple strands into multi-plug adapters without load calculation—overheating risk increases exponentially in confined areas |
| Tree placement | Position with at least 3 inches clearance from walls/furniture; use a wall-mountable bracket if space permits | Push flush against drywall—even slim trees generate static charge and heat buildup in tight gaps |
FAQ: Addressing Common Concerns
Can I mix vertical strands with some horizontal accents?
Yes—but sparingly and intentionally. Add *one* horizontal ring of lights only at the very base (just above the stand) to ground the composition. Or wrap a single, ultra-thin copper wire string (with micro-LEDs) once around the trunk at eye level (approx. 4.5 feet up) as a subtle “belt.” Never add horizontal wraps on upper tiers—they fracture vertical flow and create visual noise.
How do I store vertical light strands without tangling?
Wind each strand around a rigid 12-inch cardboard tube (like a paper towel roll cut in half), securing ends with Velcro straps—not rubber bands. Store tubes upright in a labeled plastic bin. Avoid folding or coiling loosely—vertical strands have memory wire cores that kink if bent sharply.
What if my slim tree has no central trunk access?
Many modern slim trees feature hollow, covered trunks. Drill two small (1/8-inch) ventilation holes near the top and bottom of the trunk sleeve. Thread a thin nylon cord through both holes, tie a loop inside, and hang your topmost strand from that loop. Use discreet black zip ties to secure the strand’s path along the exterior sleeve—hidden by branch density.
Conclusion: Redefine Space, Not Sacrifice Spirit
A slim Christmas tree styled with vertical light strands isn’t a concession to limited square footage—it’s an opportunity to curate meaning through precision. In cities where every inch carries intention, this approach honors both practicality and poetry. It asks us to slow down, measure thoughtfully, and celebrate verticality as a form of grace. You don’t need a mansion to host wonder; you need clarity of purpose, respect for proportion, and the quiet confidence to let light speak in clean, ascending lines. Whether you live in a converted loft, a historic brownstone hallway, or a compact new-construction unit, this method transforms constraint into character. Your space isn’t too small for celebration—it’s perfectly sized for intentionality.


 浙公网安备
33010002000092号
浙公网安备
33010002000092号 浙B2-20120091-4
Comments
No comments yet. Why don't you start the discussion?