
Succulents are among the most forgiving houseplants, prized for their sculptural beauty and minimal care needs. But beyond simply keeping them alive, one of the most rewarding aspects of succulent ownership is propagation—especially from individual leaves. With the right technique, a single leaf can grow into an entire new plant, giving you endless opportunities to expand your collection or share with friends. While many beginners assume leaf propagation is hit-or-miss, the truth is that success is nearly guaranteed when you follow a proven process. This guide walks you through every step, mistake to avoid, and insider tip needed to turn one leaf into dozens of thriving succulents.
The Science Behind Leaf Propagation
Succulents belong to a group of plants known as CAM (Crassulacean Acid Metabolism) species, which have evolved to survive in arid environments by storing water in their thick, fleshy leaves. This same adaptation makes them uniquely suited for vegetative propagation. When a healthy leaf is removed correctly, it contains enough stored energy and meristematic tissue—regions where new cells form—to generate both roots and a tiny rosette over time.
Not all succulents propagate equally well from leaves. Species in the Echeveria, Sedum, Graptopetalum, and Pachyphytum genera respond best. These produce “pups” or offsets naturally, meaning their cellular programming supports regeneration. In contrast, succulents like cacti or those with woody stems (e.g., Kalanchoe tubiflora) are less likely to root from a single leaf.
“Leaf propagation taps into the plant’s natural survival mechanism. In the wild, a broken leaf might roll down a hill and take root in a new location—your windowsill just becomes its new desert.” — Dr. Lena Ruiz, Botanist & Succulent Specialist, Desert Botanical Institute
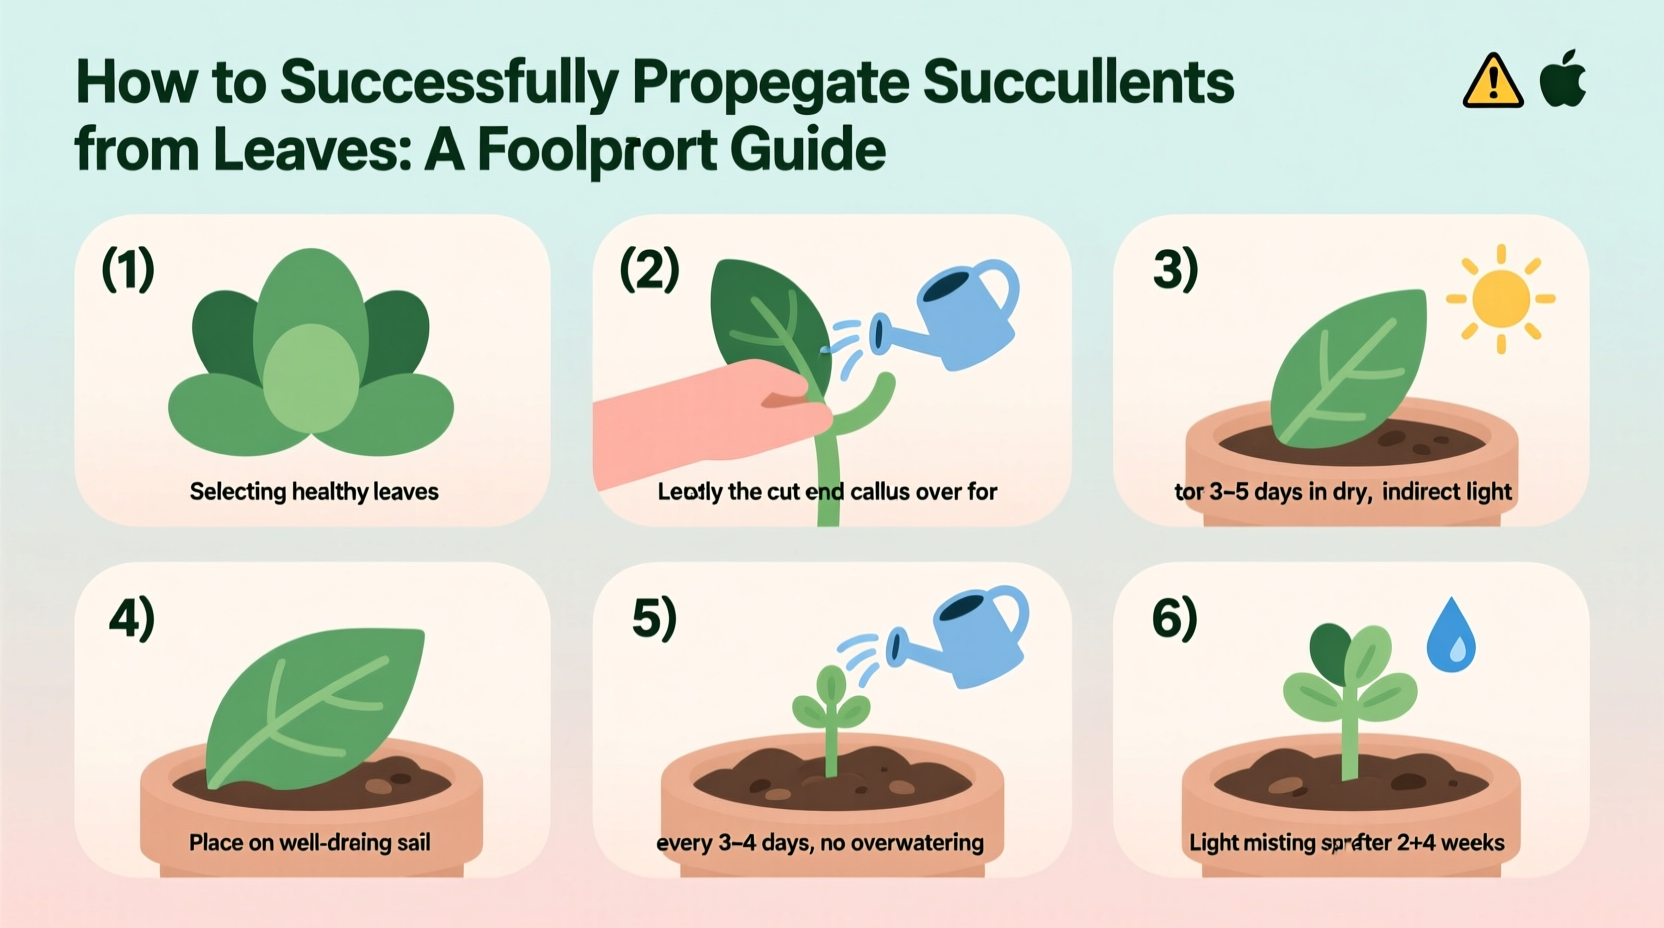
Step-by-Step Guide to Propagating Succulents from Leaves
Success begins long before the leaf touches soil. The method matters more than luck. Follow this precise timeline to maximize your results.
- Select Healthy Parent Plants: Choose mature, well-hydrated succulents free of pests or discoloration. Avoid stressed or flowering plants, as their energy is diverted elsewhere.
- Choose the Right Leaves: Pick plump, fully formed leaves from the lower or middle tiers of the plant. These are mature enough to store energy but still biologically active.
- Remove Leaves Correctly: Gently wiggle the leaf side-to-side until it detaches cleanly at the base. A clean pull ensures the entire growth point comes with the leaf. If the stem breaks off or leaves a tear, discard it—this won’t root.
- Dry the Leaves (Callus Over): Place leaves on a dry surface out of direct sun for 3–7 days. This forms a callus over the wound, preventing rot when moisture is introduced later.
- Prepare the Growing Medium: Use a fast-draining mix such as 50% perlite and 50% cactus soil. Avoid regular potting soil, which retains too much moisture.
- Position Leaves Properly: Lay callused leaves flat on the soil surface. Do not bury them. Roots will emerge from the cut end, and the baby plant (called a “chick”) will rise upward.
- Wait Patiently: For 2–6 weeks, do not water. Mist lightly only if the leaf begins to shrivel excessively. Premature watering causes rot.
- Maintain Ideal Conditions: Keep in bright, indirect light with temperatures between 65°F and 75°F (18°C–24°C). Avoid cold drafts or humid bathrooms.
- Water Sparingly Once Roots Form: When you see fine white roots and a tiny green rosette, mist the soil lightly every 7–10 days. Let it dry completely between sessions.
- Transplant the New Plant: After 6–8 weeks, once the mother leaf has dried up and the chick has several sets of leaves, gently transplant it into its own pot with drainage.
Common Mistakes That Cause Failure
Most failed attempts stem from preventable errors. Understanding these pitfalls dramatically increases your odds.
| Mistake | Why It Fails | Better Approach |
|---|---|---|
| Using damaged or torn leaves | No intact growth tissue means no root development | Only use leaves that detach cleanly with full base intact |
| Skipping the callusing phase | Open wound absorbs too much moisture and rots | Wait 3–7 days until the cut end forms a dry seal |
| Overwatering too early | Leads to fungal growth and mushy decay | Do not water until roots appear; mist only if leaf severely shrivels |
| Burying the leaf in soil | Limits oxygen flow and encourages rot | Rest leaf on top of soil, cut side down |
| Using dense, moisture-retentive soil | Stays wet too long, suffocating delicate roots | Use gritty, porous mix with perlite, pumice, or coarse sand |
Real Example: From One Leaf to a Full Tray
Sarah Kim, a hobby gardener in Tucson, AZ, decided to try propagating her large Echeveria ‘Perle von Nürnberg’ after noticing loose leaves during routine pruning. She carefully removed eight plump lower leaves, ensuring each came off cleanly. After letting them callus for five days on a ceramic plate, she placed them on top of a shallow tray filled with a perlite-sand mix.
She positioned the tray near a south-facing window but shielded it with a sheer curtain to avoid scorching. For four weeks, she resisted watering entirely. By week five, seven of the eight leaves had produced fine white roots and tiny pink-tinged rosettes. At six weeks, she began misting the soil lightly every 10 days. By week ten, the original leaves had withered completely, and each chick had developed three to four leaves of its own. Sarah transplanted them into small terracotta pots and now displays them as a cascading shelf garden.
Her key insight? “I almost gave up at week three when nothing seemed to happen. But I read that patience is part of the process. Waiting paid off.”
Propagation Success Checklist
Follow this checklist to ensure every stage is covered:
- ☐ Select healthy, plump leaves from lower/middle sections
- ☐ Remove leaves with a clean twist—no tears or stubs
- ☐ Allow leaves to callus for 3–7 days in a dry, shaded area
- ☐ Use a well-draining propagation medium (e.g., perlite + cactus mix)
- ☐ Place leaves cut-side down on soil surface—do not bury
- ☐ Provide bright, indirect light (avoid direct midday sun)
- ☐ Wait 2–6 weeks without watering
- ☐ Look for signs of roots and pups before introducing moisture
- ☐ Mist sparingly only when roots are visible and soil is dry
- ☐ Transplant once the mother leaf dries and the pup has 3+ leaves
Frequently Asked Questions
How long does it take for a succulent leaf to root?
Roots typically emerge within 2 to 6 weeks, depending on species, temperature, and humidity. Cooler conditions slow the process. Echeverias often take 4–5 weeks, while faster growers like Sedum may show roots in as little as 10–14 days.
Can I propagate any succulent from a leaf?
No. Rosette-forming succulents (Echeveria, Graptopetalum, Sempervivum) propagate reliably from leaves. However, succulents with thin leaves or upright growth habits—like Crassula ovata (jade plant)—are better propagated from stem cuttings. Always research your specific variety first.
What if my leaf turns black or mushy?
This indicates rot, usually caused by premature moisture or poor air circulation. Remove the affected leaf immediately to prevent mold spread. In the future, extend the callusing period and use a grittier soil mix. Never let leaves sit in damp conditions.
Maximizing Long-Term Success
Once your propagated succulents are potted, continue supporting their growth with appropriate care. Young plants are more sensitive to overwatering than mature ones. Water only when the soil is completely dry, and always ensure the pot has drainage holes.
Gradually introduce them to more direct sunlight over 2–3 weeks to avoid sunburn. Start with 2–3 hours of morning sun and increase exposure slowly. Fertilize sparingly—once in spring with a diluted, balanced fertilizer (10-10-10) at half strength.
Keep in mind that the original leaf will eventually dry up and fall off. This is normal and a sign of success—the baby plant has absorbed all available nutrients and is now independent.
“The magic of succulent propagation lies in its simplicity. You’re not forcing nature—you’re creating the quiet, stable conditions where life can unfold on its own terms.” — Jorge Mendez, Founder, Southwest Succulent Society
Conclusion: Grow Your Garden One Leaf at a Time
Propagating succulents from leaves isn’t just a gardening trick—it’s a lesson in patience, observation, and trust in natural processes. With the right approach, nearly every healthy leaf has the potential to become a new plant. The method is simple, the materials are inexpensive, and the rewards are lasting. Whether you're filling a windowsill, creating gifts, or rebuilding a collection after winter losses, leaf propagation puts abundance within reach.


 浙公网安备
33010002000092号
浙公网安备
33010002000092号 浙B2-20120091-4
Comments
No comments yet. Why don't you start the discussion?