
RGB lighting has transformed homes, studios, and events with vibrant, customizable color schemes. While many modern systems rely on smartphone apps for control and synchronization, not every setup requires digital intervention. In fact, syncing multiple strands of RGB lights without an app is not only possible—it’s often more reliable and immediate. Whether you're setting up ambient lighting for a room, decorating for an event, or building a permanent installation, understanding how to manually synchronize your lights ensures consistent performance even when Wi-Fi fails or devices aren’t compatible.
This guide explores practical, proven methods to align multiple RGB light strips so they operate in unison—no app needed. From identifying compatible hardware to leveraging built-in controller functions, we’ll walk through the technical details and real-world applications that make seamless synchronization achievable for any user.
Understanding RGB Light Synchronization Basics
Synchronization refers to the ability of multiple LED strips to display the same color, brightness, pattern, and transition at the exact same time. When lights are out of sync, one strip may lag behind another during a fade or flash, breaking visual cohesion. The key to syncing without an app lies in ensuring all strips receive identical control signals simultaneously.
Most non-app-based RGB systems use one of two protocols: analog (commonly 12V or 24V) or digital (like WS2812B). Analog strips rely on voltage levels sent via red-green-blue channels, while digital strips use data signals to control individual LEDs. For true synchronization without an app, both types can be managed—but the approach differs significantly.
Analog systems are typically easier to sync manually because they respond uniformly to shared voltage inputs. Digital strips require precise timing but offer greater flexibility once configured correctly. Regardless of type, the core principle remains: feed the same signal to all strips at the same time.
Matching Hardware for Seamless Syncing
The foundation of successful manual synchronization begins with selecting compatible components. Mismatched controllers, power supplies, or LED chipsets will prevent uniform behavior, no matter how carefully wired.
| Component | Requirement for Syncing | Common Pitfall |
|---|---|---|
| LED Strip Type | All strips must use the same chipset (e.g., all WS2811) | Mixing SK6812 with WS2812 causes timing mismatches |
| Controller | Single master controller or matched slave units | Different firmware versions cause mode drift |
| Power Supply | Voltage and amperage must match total load | Undersized supplies cause flickering and lag |
| Signal Source | One output feeding all strips directly or via splitter | Long daisy chains introduce delay |
For example, if you’re using three 5-meter RGB strips powered by a 12V supply, ensure each strip draws current within the supply’s rated capacity. A 60W power supply (5A at 12V) can safely run up to 5 meters of standard-density 12V RGB tape (about 12W per meter), but exceeding this leads to dimming and erratic behavior.
“Hardware consistency is the silent hero of LED synchronization. Even minor differences in component tolerances can throw off timing across strips.” — Daniel Reyes, Embedded Systems Engineer
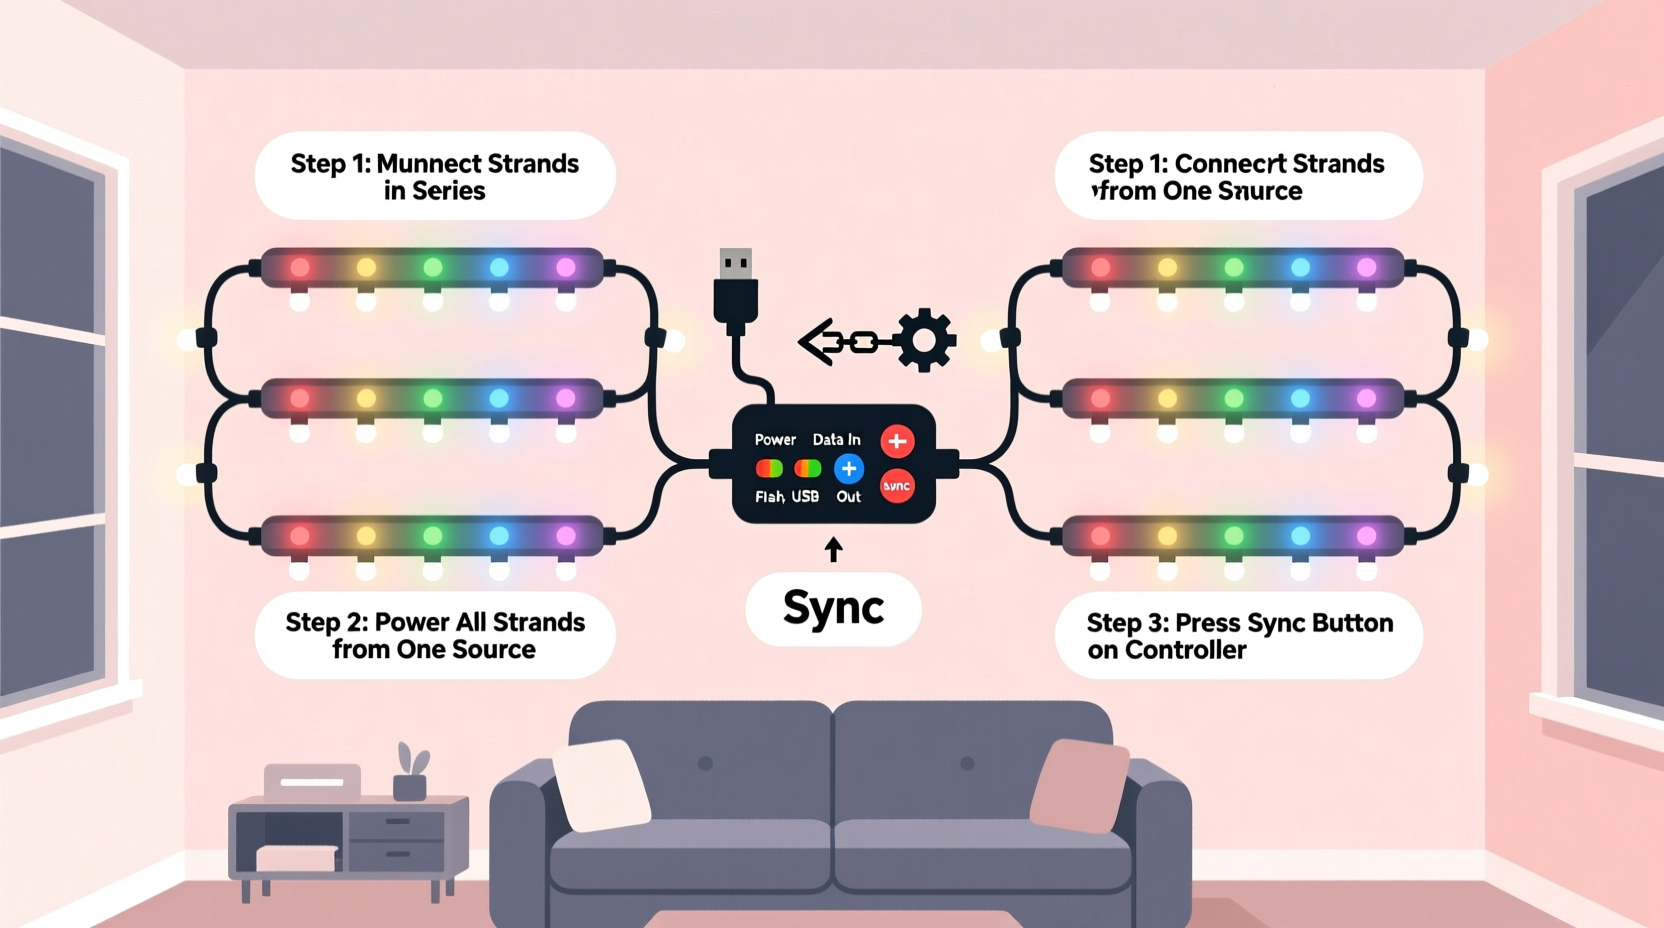
Step-by-Step Guide: Manual Sync Using a Master Controller
One of the most effective ways to sync multiple RGB light strands without an app is by using a single master controller to drive all strips simultaneously. This method works for both analog and digital setups.
- Choose a central controller: Select a remote-controlled or standalone RGB controller capable of driving your total LED load. Look for models labeled “multi-zone” or “amplifier-ready.”
- Connect all strips to the same signal source: Use a signal splitter (for digital) or parallel wiring (for analog) to send the same control output to each strip.
- Use amplifiers for long runs: If running more than 10 meters total or splitting to multiple locations, insert signal amplifiers to maintain data integrity.
- Power each strip locally: Avoid daisy-chaining power over long distances. Instead, connect each strip—or every 5 meters—to the power supply using thick-gauge wire to prevent voltage drop.
- Test the setup: Turn on the system and cycle through modes using the remote. Observe whether all strips change color and pattern at the same time.
- Adjust timing manually if needed: Some controllers have a “sync adjust” button or allow resetting all zones simultaneously via remote commands (e.g., hold “speed+” and “power” for 3 seconds).
In digital systems like those using WS2811 chips, ensure the data line is connected in parallel—not daisy-chained—across all strips. Daisy chaining introduces microsecond-level delays that become visible as motion lag in chasing effects. A better solution is to split the data signal from the controller using a dedicated LED signal amplifier or buffer board.
Using Remote Controls and Preset Modes
Many RGB controllers come with infrared (IR) or RF remotes that offer preset lighting modes such as fade, strobe, smooth, and jump. These presets are stored in the controller’s firmware and executed identically across all connected strips—making them ideal for app-free syncing.
To maximize effectiveness:
- Use a single remote to control all strips via one receiver.
- If using multiple receivers, pair them to the same channel or frequency.
- Ensure all controllers are reset before use to eliminate mode drift.
- Avoid mixing different brands unless confirmed cross-compatible.
Some advanced IR remotes support “group sync” functionality, allowing you to assign multiple controllers to Group A, B, or C. Pressing a button then sends the command to all units in that group simultaneously. This mimics app-based grouping without requiring Bluetooth or Wi-Fi.
Real-World Example: Backyard Lighting Installation
Consider Mark, a homeowner installing RGB lighting along his deck railing and pergola beams. He purchased four 5-meter waterproof RGB strips, two 12V 10A power supplies, and a dual-output RGB amplifier. His goal was uniform lighting for evening gatherings—no apps, no smartphones.
Mark began by connecting the first strip directly to a universal IR controller. Then, instead of daisy-chaining the remaining strips, he used a Y-splitter cable to duplicate the data signal and fed it into the amplifier. The amplifier rebroadcast the signal cleanly to the second and third strips. The fourth strip was powered and controlled from the same amplifier output.
Each strip received independent 12V power from the dual supply, connected via terminal blocks. After powering up, all four strips responded instantly to remote commands. Fade transitions were smooth and perfectly aligned. Strobe flashes occurred simultaneously across the entire structure.
When friends asked how he achieved such clean coordination, Mark explained: “I treated the whole setup like a single light fixture. One brain, one signal, multiple limbs.”
Do’s and Don’ts of App-Free Syncing
| Action | Do | Don't |
|---|---|---|
| Wiring | Split signal early; power locally | Daisy-chain long runs without amplification |
| Controllers | Use one master unit or matched sets | Mix different models or brands blindly |
| Power | Calculate total wattage and oversize supply by 20% | Run near maximum capacity of power supply |
| Troubleshooting | Reset all units and re-pair remotes | Assume failure is due to LEDs—check signal first |
Frequently Asked Questions
Can I sync RGB lights from different brands without an app?
Yes, but only if they use the same voltage, protocol, and chipset. For example, two 12V analog strips with common cathode configuration can be synced if driven by the same controller. However, a digital WS2812B strip cannot sync with an analog 12V strip without conversion hardware.
Why do my lights blink out of sync even when connected to the same controller?
This usually indicates either a weak power supply, excessive wire length causing signal degradation, or mismatched strip densities. Check connections, add an amplifier, and verify that all strips draw similar current. Also, inspect for cold solder joints or damaged segments.
Is it possible to sync lights without any remote or app?
Absolutely. You can hardwire strips to a fixed-color power source (e.g., always-on red) or use a physical switch to toggle between pre-wired color channels. For dynamic effects, however, some form of controller—even a basic manual one—is necessary.
Final Checklist for Perfect Sync
- ✅ All LED strips are the same model and batch
- ✅ Single controller or synchronized multi-controller setup
- ✅ Signal split at source, not daisy-chained
- ✅ Power supplied at multiple points to avoid voltage drop
- ✅ Amplifiers used for runs over 10 meters or complex layouts
- ✅ Remote control tested across all modes
- ✅ System reset before final testing
Conclusion: Take Control Without the App
Synchronizing multiple strands of RGB lights without an app isn’t just feasible—it’s often preferable. By relying on stable hardware, proper wiring, and intelligent signal distribution, you create a system that performs consistently under any condition. No dropped connections, no firmware updates, no dependency on a smartphone. Just pure, responsive light.
Whether you're illuminating a room, accenting architectural features, or creating ambiance for special occasions, mastering manual synchronization puts you in full control. Start small: test two strips together, refine your wiring technique, and scale up with confidence. Once you’ve experienced perfectly aligned lighting without a single tap on a screen, you may find you don’t miss the app at all.


 浙公网安备
33010002000092号
浙公网安备
33010002000092号 浙B2-20120091-4
Comments
No comments yet. Why don't you start the discussion?