
Taking a great selfie isn’t just about angles or filters—it starts with light. Natural lighting can transform an average photo into one that looks professionally shot. Unlike harsh overhead lights or dim indoor bulbs, sunlight provides soft, even illumination that enhances facial features, reduces shadows, and brings out true skin tones. The best part? You don’t need expensive equipment. With the right timing, positioning, and awareness of how light behaves, anyone can capture stunning selfies using only what nature provides.
Why Natural Light Outperforms Artificial Light
Artificial lighting often creates unflattering results: yellow tints, uneven highlights, or deep under-eye shadows. Fluorescent lights wash out skin, while phone flash flattens dimension and causes red-eye. In contrast, natural light is dynamic and full-spectrum, meaning it renders colors accurately and adds depth to your face.
Morning and midday sun offer crisp clarity, while golden hour—the period shortly after sunrise or before sunset—produces a warm, diffused glow ideal for portraits. Even on cloudy days, the sky acts as a giant softbox, scattering sunlight evenly across your face without harsh contrasts.
“Natural light is the most forgiving and authentic light source available. It shapes the face gently and reveals texture without overexposure.” — Lena Torres, Portrait Photographer & Visual Storyteller
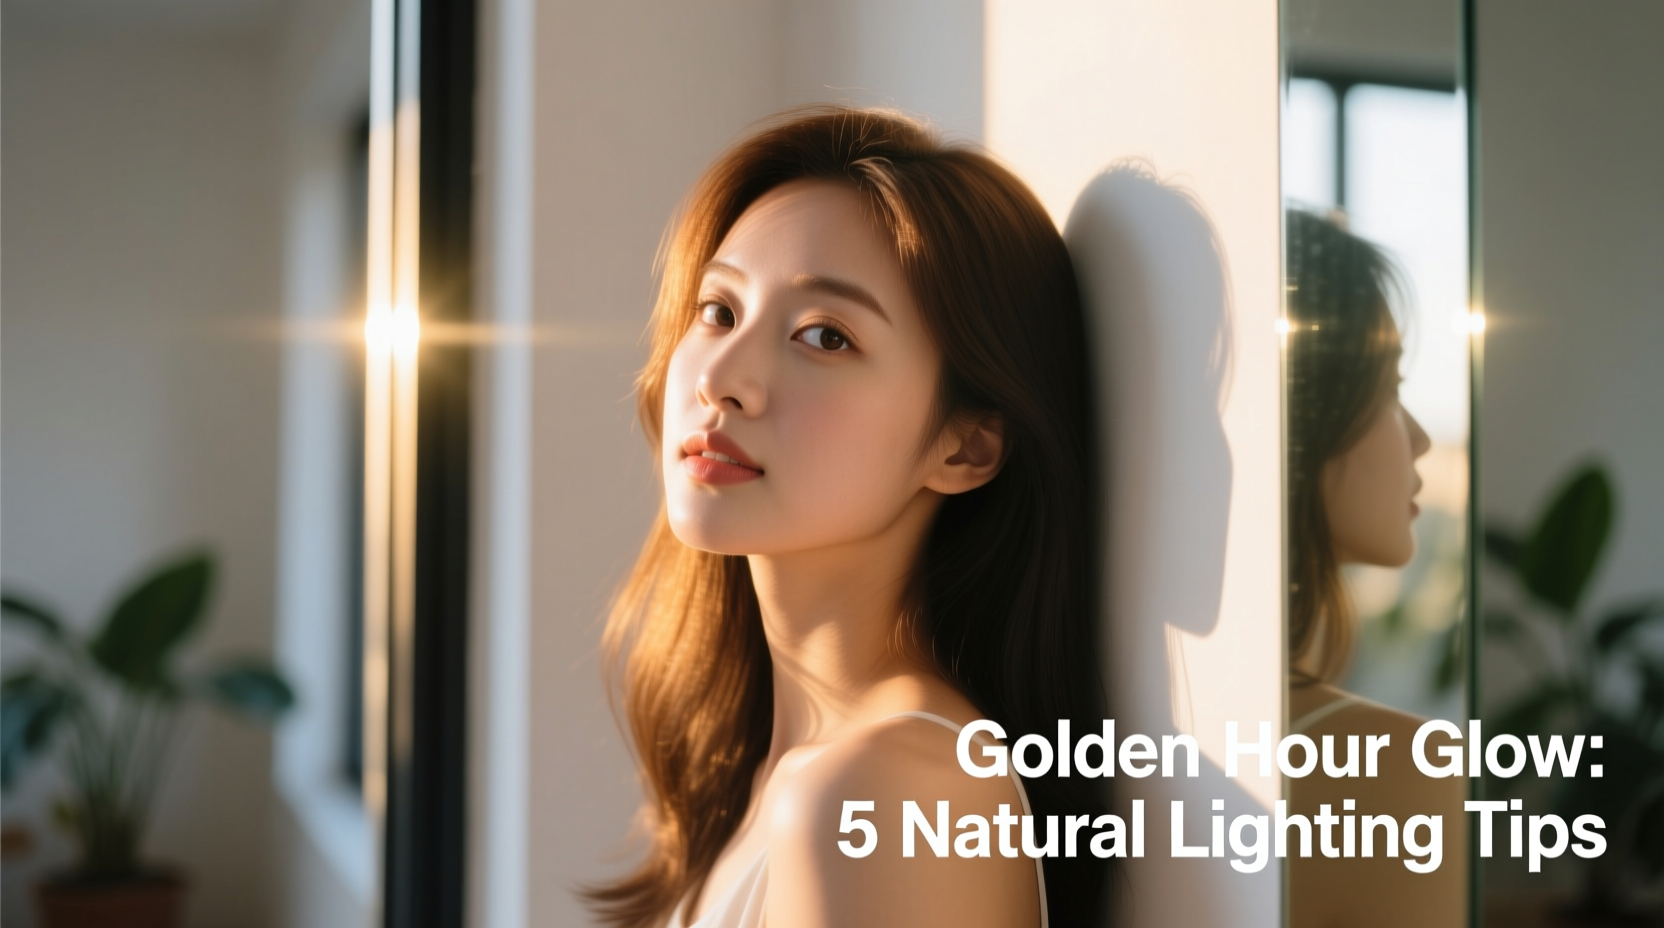
Best Times of Day for Selfies
The quality of sunlight changes throughout the day, affecting how your skin and features appear in photos. Timing your selfie session around these natural shifts makes a dramatic difference.
- Golden Hour (30–60 minutes after sunrise or before sunset): Warm, soft, and directional light that wraps around your face. Ideal for romantic, dreamy, or editorial-style selfies.
- Blue Hour (just before sunrise or after sunset): Cool-toned ambient light perfect for moody or atmospheric shots, especially if paired with city lights or reflections.
- Mid-Morning to Early Afternoon (9 AM – 2 PM): Bright, neutral daylight. Best used in shaded areas like under a tree, awning, or near a window indoors.
- Overcast Days: Cloud cover diffuses sunlight, eliminating harsh contrasts. This is arguably the most consistent lighting condition for selfies year-round.
How to Find Golden Hour in Your Location
Use free apps like Sun Seeker, PhotoPills, or even Google Search (“golden hour today [your city]”) to determine exact times. These tools also show sun direction, helping you plan where to stand.
Positioning Yourself for Optimal Light
Where you place your body relative to the sun determines how light falls on your face. Small adjustments can eliminate glare, soften lines, and highlight bone structure.
Front Lighting: Facing the Light Source
Stand directly facing a window or open shade area with the sun behind your camera (i.e., shining on your face). This minimizes shadows and ensures even exposure. Ideal for clean, bright, social media-ready selfies.
Side Lighting: Adding Dimension
Position yourself at a 45- to 90-degree angle to the sun. One side of your face will be brighter, creating depth and contour. Great for emphasizing cheekbones or jawlines—but be cautious not to let shadows obscure eyes or mouth.
Backlighting: Creating Silhouettes or Halo Effects
Face away from the sun so it’s behind you. This can create a glowing outline around your hair and shoulders. To avoid being underexposed, use your phone’s exposure adjustment: tap your face on-screen and drag the brightness slider up.
Using Reflectors and Bounce Surfaces
You don’t need professional gear to reflect light. Everyday surfaces can act as natural reflectors, filling in shadows and brightening key areas.
| Surface | Effect on Light | Best Use Case |
|---|---|---|
| White Wall or Door | Soft, neutral fill light | Brightening under-eye shadows when front-lit |
| Snow or Sand | Strong upward reflection | Outdoor beach or winter selfies—watch for overexposure |
| Water (lake, pool) | Gentle shimmering reflection | Adds subtle sparkle to skin in outdoor shots |
| Pavement or Dark Ground | Limited reflection; may deepen shadows | Avoid standing on dark asphalt in direct sun |
For maximum control, carry a portable foldable reflector (available online for under $10), or improvise with a white notebook, foam board, or even a light-colored piece of clothing held below your face.
Step-by-Step Guide: Capturing the Perfect Naturally Lit Selfie
Follow this sequence to consistently achieve well-lit, flattering selfies using only natural light.
- Check the time and weather: Aim for golden hour or an overcast day. If it’s sunny, find open shade.
- Choose your background: Pick a clean, non-distracting backdrop—brick walls, greenery, or large windows work well.
- Position your body: Turn your head and shoulders slightly toward the light. Avoid full frontal poses unless lighting is very soft. <4> Adjust your phone height: Hold the camera slightly above eye level to slim the face and elongate the neck.
- Tap to focus and expose: On your phone screen, tap your face to set focus, then slide your finger up to increase brightness if needed.
- Use burst mode or timer: Take multiple shots to increase chances of capturing a natural expression.
- Review immediately: Check for harsh shadows, blown-out highlights, or unwanted glare on glasses.
“I used to hate my selfies until I started paying attention to light. Now I wait for the right moment instead of rushing. The difference is night and day.” — Maya Chen, Lifestyle Blogger
Common Mistakes and How to Fix Them
Even with natural light, small errors can ruin an otherwise good shot. Here are frequent issues and their solutions.
| Mistake | Problem It Causes | Solution |
|---|---|---|
| Shooting in direct overhead sun | Pronounced shadows under eyes, nose, and chin | Move to shaded area or reposition so light comes from the side/front |
| Standing too far from window light | Underexposed, grainy image | Get within 3–5 feet of the window; close blinds slightly to intensify directional light |
| Ignoring white balance | Yellow or blue color casts | Use editing apps to adjust temperature; shoot in RAW format if your phone allows |
| Using flash outdoors | Harsh spotlight effect, washed-out foreground | Turn off flash completely in daylight |
Mini Case Study: From Harsh Shadows to Flawless Glow
Sophia, a freelance makeup artist, struggled with posting client work because her before-and-after selfies looked inconsistent. Some were too dark, others had glaring highlights. She decided to experiment with natural lighting only.
She began scheduling photo sessions between 8:00–9:30 AM near a large east-facing window in her studio. She positioned clients so light fell softly across their faces at a 45-degree angle and placed a white foam board beneath the camera to bounce light upward. Within a week, her Instagram engagement rose by 40%. Clients commented on how “clear” and “professional” the images looked—even though she was using just her iPhone and no additional gear.
The shift wasn’t in equipment, but in understanding light behavior. By mastering placement and timing, Sophia turned everyday conditions into a reliable studio setup.
Frequently Asked Questions
Can I take good selfies on a cloudy day?
Absolutely. Cloudy skies diffuse sunlight evenly, acting like a giant softbox. This eliminates harsh shadows and provides consistent, flattering illumination—ideal for beauty shots and detail-focused selfies.
What if I don’t have access to windows or outdoor space?
If you're in a low-light environment, maximize available light by opening curtains, turning off artificial lights, and standing as close as possible to any glass surface. Even indirect daylight from a nearby hallway or balcony can help. Consider using a white poster board opposite the light source to simulate a reflector.
Should I edit my naturally lit selfies?
Yes, but lightly. Use editing tools to fine-tune exposure, contrast, and white balance. Avoid heavy filters that mask skin texture. Apps like Snapseed, Lightroom Mobile, or VSCO allow precise adjustments while preserving the authenticity of natural light.
Essential Checklist for Better Natural-Light Selfies
- ☑ Check the time—aim for golden hour or overcast conditions
- ☑ Find open shade or soft window light
- ☑ Position your face at a 45-degree angle to the light
- ☑ Use a white surface to bounce light under your chin
- ☑ Tap your screen to focus and adjust exposure
- ☑ Hold the phone slightly above eye level
- ☑ Take multiple shots to capture the best expression
- ☑ Review for shadows, glare, and color balance
- ☑ Edit subtly to enhance—not alter—natural lighting
Final Thoughts: Make Light Work for You
Great selfies aren’t about having the latest smartphone—they’re about seeing and using light intentionally. Once you learn to observe how sunlight moves through your space, you’ll start anticipating opportunities rather than relying on luck. Whether you're documenting your day, building a personal brand, or simply wanting to look your best, natural lighting gives you a powerful, cost-free tool.
Start small: tomorrow morning, step near a window with your phone and take three test shots at different angles. Notice how light changes with each tilt of your head. Over time, these observations become instinctive. You’ll no longer ask how to take better selfies—you’ll already know.


 浙公网安备
33010002000092号
浙公网安备
33010002000092号 浙B2-20120091-4
Comments
No comments yet. Why don't you start the discussion?