
Drawing is not an innate talent reserved for a select few—it’s a skill that can be developed through consistent practice and the right guidance. With thousands of free, high-quality resources available online, anyone with internet access can learn to draw from scratch. Whether you're aiming to sketch portraits, design characters, or simply express ideas visually, this guide outlines a structured, self-directed path to building foundational drawing skills without spending a dime.
Start with the Fundamentals: What You Need to Know First
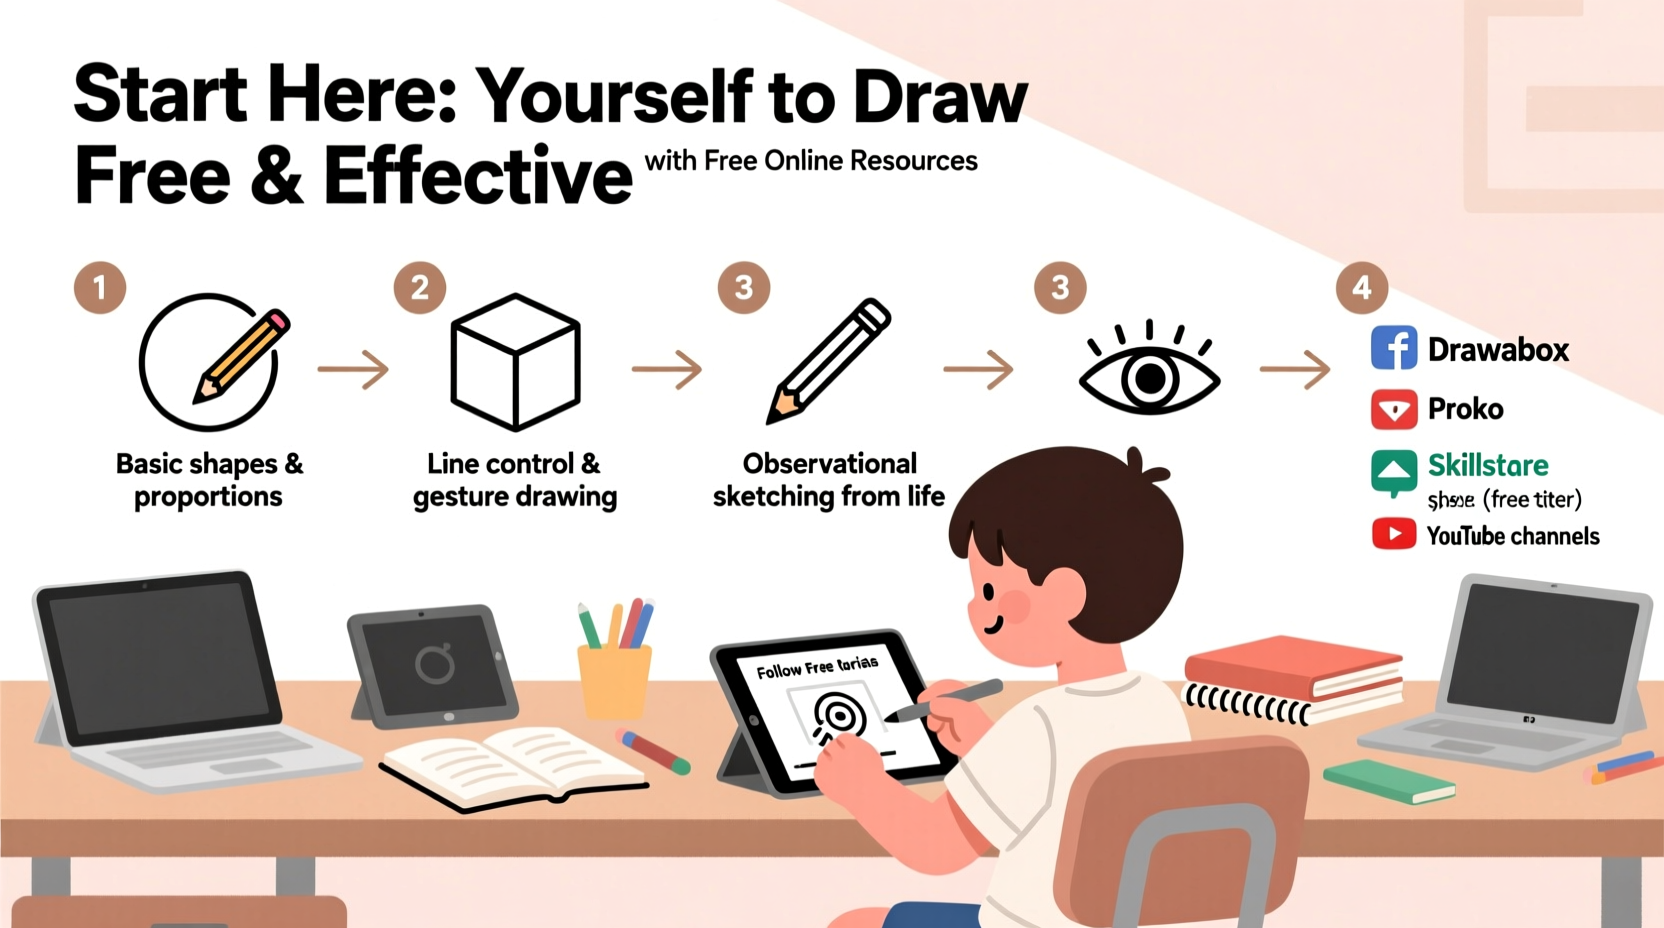
Before picking up a pencil, it's crucial to understand what drawing truly involves. At its core, drawing is about seeing—not just looking. It’s about observing shapes, proportions, light, shadow, and spatial relationships. Most beginner mistakes stem from drawing what they *think* an object looks like rather than what they actually see.
Beginners should focus on mastering five core principles:
- Line and contour: The ability to control your hand and create intentional marks.
- Shape and form: Translating flat shapes into three-dimensional volumes.
- Proportion and measurement: Understanding relative size and placement of elements.
- Value and shading: Creating depth through gradients of light and dark.
- Perspective: Representing space realistically on a flat surface.
Essential Free Online Resources for Self-Taught Artists
The internet offers a wealth of structured learning paths. Here are some of the most effective free platforms and tools to support your journey:
| Resource | Type of Content | Best For | Website |
|---|---|---|---|
| Drawabox | Structured lessons with exercises | Foundational skills, discipline | drawabox.com |
| Proko (Free Section) | Video tutorials on anatomy and figure drawing | Human form, gesture, structure | proko.com |
| Ctrl+Paint | Digital painting and drawing basics | Digital artists, beginners | ctrlpaint.com |
| YouTube Channels (e.g., RapidFireArt, Marco Bucci) | Tips, challenges, demos | Motivation, visual learning | youtube.com |
| SketchDaily & Quickposes | Reference images and timed drawing sessions | Life drawing, speed practice | sketchdaily.net, quickposes.com |
These platforms provide everything from technical drills to creative inspiration. Drawabox, for example, begins with simple line exercises and gradually introduces perspective and construction, all while emphasizing consistency and critique.
“Learning to draw is less about talent and more about training your perception. The best artists are often the ones who practiced seeing.” — Kimon Nicolaïdes, author of *The Natural Way to Draw*
Step-by-Step Learning Path for Absolute Beginners
Starting without a plan leads to frustration. Follow this 12-week roadmap to build competence systematically using only free tools.
- Weeks 1–2: Master Basic Lines and Shapes
Use Drawabox Lesson 1: Practice straight lines, ellipses, and random curves. Focus on smoothness and consistency. Aim for 30 minutes per day. - Weeks 3–4: Understand Form and Perspective
Learn to draw cubes, spheres, and cylinders in one- and two-point perspective. Use grid paper and vanishing points. Apply these forms to simple objects like boxes or mugs. - Weeks 5–6: Develop Observational Skills
Start still-life drawing. Place everyday objects (a bottle, book, fruit) under directional lighting. Sketch them using basic shapes first, then refine contours and add shading. - Weeks 7–8: Study Light and Shadow
Practice value scales (from white to black). Then, shade geometric forms under a single light source. Use blending stumps or tissue—no color yet. - Weeks 9–10: Gesture and Figure Drawing
Visit Quickposes.com and do 30-second to 2-minute gesture drawings daily. Focus on movement and proportion, not details. Supplement with Proko’s free figure drawing videos. - Weeks 11–12: Combine Skills into Finished Studies
Draw longer studies (30+ minutes) combining form, light, and composition. Try self-portraits using a mirror, or detailed still lifes with multiple objects.
A Real Example: How Sarah Went from Stick Figures to Confident Sketching
Sarah, a 29-year-old office worker with no prior art experience, decided to learn drawing during lockdown. She began by searching “how to draw for beginners” and found Drawabox. Skeptical but curious, she committed to 30 minutes a day.
At first, her lines were shaky, and her cubes looked distorted. But she followed the structured lessons, uploaded her work to the Drawabox subreddit for feedback, and repeated exercises until they improved. By week six, she was drawing recognizable coffee mugs and shoes with accurate shading.
She incorporated Proko’s gesture drawing videos and used SketchDaily for weekly challenges. After three months, she completed her first full portrait from a photo reference. It wasn’t perfect, but it was a far cry from where she started.
“I realized I wasn’t bad at drawing,” she said. “I just never learned how to look.” Today, Sarah maintains a sketchbook and shares her progress on Instagram, inspiring others to start their own journey.
Common Pitfalls and How to Avoid Them
Self-teaching comes with unique challenges. Recognizing these early prevents discouragement and wasted effort.
| Pitfall | Why It Happens | How to Fix It |
|---|---|---|
| Impatience with progress | Expecting fast results like professionals | Track progress monthly with dated sketches; celebrate small improvements |
| Copying instead of understanding | Tracing or mimicking without analyzing structure | Break subjects into basic forms; ask “why does this look like that?” |
| Neglecting fundamentals | Jumping straight into anime or portraits | Stick to foundational exercises for at least 8 weeks before stylized work |
| Fear of making mistakes | Perfectionism blocking practice | Embrace messy sketches—quantity builds quality |
| Inconsistent practice | Skipping days due to busy schedule | Set fixed time (e.g., 7 AM or post-dinner); use habit-tracking apps |
“The only way to improve at drawing is to draw. Not watch, not read—draw.” — James Gurney, artist and author of *Color and Light*
Tools You Can Use for Free
You don’t need expensive supplies to begin. Here’s what works—and what doesn’t—on a zero budget.
Physical Tools
- Pencil: HB or 2B pencils are ideal. Mechanical pencils offer precision but limit shading range.
- Paper: Printer paper works fine. Use a clipboard or hardcover book as a backing board.
- Eraser: A kneaded eraser lifts graphite gently; a vinyl eraser removes heavy marks.
Digital Options (Optional)
If you prefer digital, several free programs simulate real drawing:
- Krita: Professional-grade painting software, completely free. Excellent brush engine and layer support.
- FireAlpaca: Lightweight, intuitive interface. Great for beginners.
- MediBang Paint: Cloud-based, good for comics and concept art.
Use a standard mouse at first. A graphics tablet isn’t necessary but can be acquired later (Wacom Intuos Draw is affordable).
Checklist: Your First 30 Days of Drawing Practice
Follow this checklist to build momentum and avoid overwhelm.
- ✅ Set up a dedicated sketching space with minimal distractions.
- ✅ Complete Drawabox Lesson 1 (Lines, Ellipses, Boxes).
- ✅ Practice 20 minutes daily—consistency beats long, rare sessions.
- ✅ Do at least five still-life drawings of household objects.
- ✅ Learn to measure proportions using the pencil sighting method.
- ✅ Shade a sphere, cube, and cylinder under a single light source.
- ✅ Complete 20 gesture drawings (use Quickposes.com).
- ✅ Review your first and latest sketches side-by-side to assess progress.
Frequently Asked Questions
Can I really learn to draw well without formal classes?
Yes. Thousands have done so using free online resources. Success depends on consistent practice, honest self-assessment, and willingness to learn from mistakes. Formal education helps, but it’s not required to achieve strong skills.
How long does it take to become decent at drawing?
With daily practice, most beginners see noticeable improvement within 3–6 months. Mastery takes years, but functional drawing ability—enough to sketch people, objects, and scenes recognizably—can be achieved in under a year.
I keep drawing lopsided faces. What am I doing wrong?
This usually stems from poor proportion tracking. Always start with a centerline and guidelines for eyes, nose, and mouth. Use the “rule of fifths”: the face is roughly five eye-widths across. Practice facial features separately before combining them.
Conclusion: Start Drawing Today—No Excuses
Learning to draw from scratch is entirely possible with the wealth of free knowledge now available. You don’t need talent, expensive tools, or an art degree. You need curiosity, patience, and the courage to make imperfect marks on paper. Every expert artist was once a beginner who decided to start.
The resources are free. The time is yours to manage. The only barrier is action. Open your browser, visit Drawabox or Proko, grab a pencil, and draw your first line today. In six months, you’ll look back at that shaky first sketch and smile at how far you’ve come.


 浙公网安备
33010002000092号
浙公网安备
33010002000092号 浙B2-20120091-4
Comments
No comments yet. Why don't you start the discussion?