
For competitive gamers and precision-focused professionals alike, a gaming mouse is more than just a peripheral—it's an extension of the hand. At the heart of its performance lies the optical or laser sensor, responsible for translating physical movement into on-screen cursor accuracy. Over time, environmental factors, surface inconsistencies, and hardware wear can degrade sensor performance. When that happens, even the most high-end mouse may feel sluggish, jittery, or unresponsive. The solution often isn’t replacement—it’s calibration. Knowing when and how to recognize the signs of a misaligned sensor can save time, frustration, and costly upgrades.
Understanding How Gaming Mouse Sensors Work
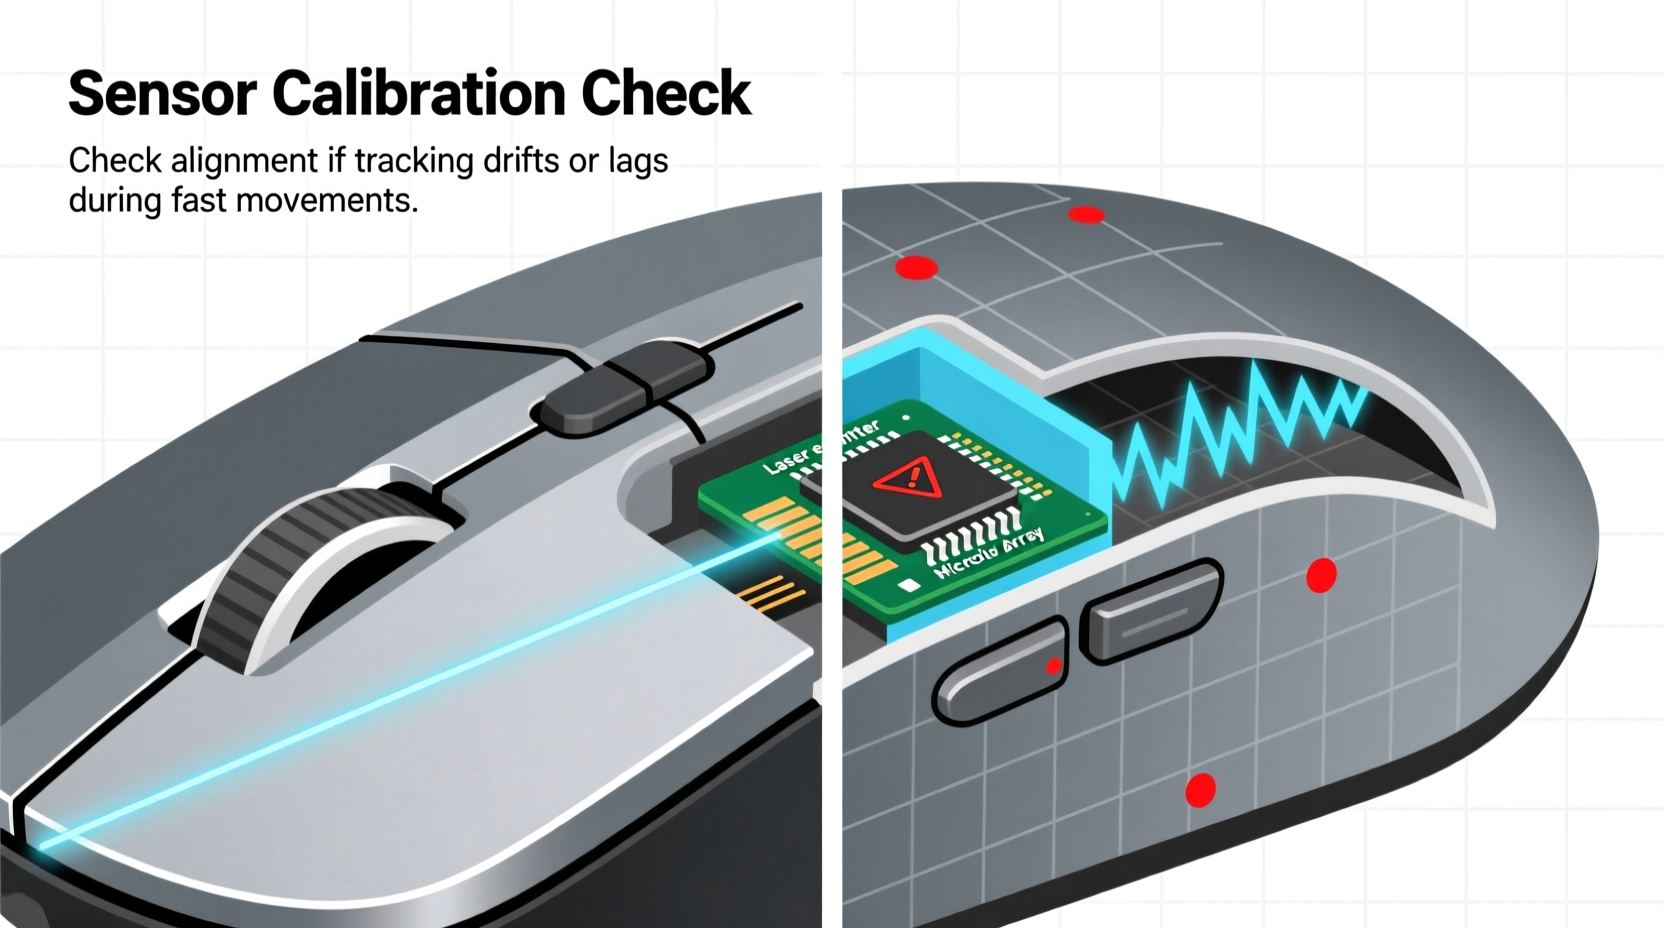
Gaming mouse sensors use either optical (LED-based) or laser technology to detect movement across surfaces. Optical sensors work best on consistent, non-reflective surfaces by capturing thousands of images per second and analyzing pixel shifts to determine direction and speed. Laser sensors offer higher sensitivity and work on more varied surfaces but are more prone to acceleration artifacts and surface noise.
The sensor's firmware interprets this data in real time, factoring in DPI (dots per inch), polling rate, and lift-off distance. Calibration ensures that the sensor correctly interprets these inputs relative to the surface beneath it. Without proper calibration, the system may report false movements, leading to cursor drift, inconsistent tracking, or erratic behavior during fast swipes.
Modern gaming mice from brands like Logitech, Razer, and SteelSeries include onboard calibration routines, often accessible through companion software. These routines help the sensor establish a baseline understanding of the current mousing surface, reducing interference from texture variations or ambient light.
Common Signs Your Mouse Sensor Needs Calibration
Not every tracking issue stems from a faulty sensor. However, several behavioral patterns strongly suggest that recalibration could restore optimal performance:
- Inconsistent cursor movement: The pointer accelerates unpredictably or lags behind physical motion.
- Cursor drift: The mouse moves slightly on screen even when stationary, especially after lifting and repositioning.
- Lift-off inconsistency: The cursor jumps or continues moving after the mouse is lifted from the surface.
- Surface dependency: The mouse works flawlessly on one pad but stutters or skips on another—without changing settings.
- Jitter or micro-stuttering: Small, rapid vibrations in cursor path during slow, controlled movements.
These issues often emerge gradually. Gamers might first notice them during precise aiming in first-person shooters or while editing timelines in creative software. If you're relying on pixel-perfect control, even minor inaccuracies compound over time.
Step-by-Step Guide to Diagnose and Calibrate Your Sensor
Before adjusting hardware or software settings, perform a diagnostic routine to confirm whether calibration is needed.
- Clean the sensor lens: Turn off the mouse and gently wipe the underside with a dry microfiber cloth. Remove any lint or smudges blocking the sensor window.
- Test on a known-good surface: Use a neutral-colored, textured mousepad without glossy finishes. Avoid glass or reflective materials unless your mouse explicitly supports them.
- Disable mouse acceleration: In your operating system settings, turn off pointer precision (Windows) or enhance pointer precision to ensure raw input reporting.
- Check DPI consistency: Switch between preset DPI levels and observe if tracking behavior changes drastically at lower sensitivities.
- Run a straight-line test: Move the mouse slowly in a straight horizontal line. Watch the cursor—if it wobbles or curves, sensor interpretation may be off.
- Perform a lift-off test: Lift the mouse 1–2 cm after movement and place it back down. The cursor should stop immediately and resume accurately without jumping.
If problems persist across multiple tests, proceed to calibration.
Calibrating the Sensor Using Manufacturer Software
Most premium gaming mice come with proprietary software that includes a surface calibration tool. For example:
- Logitech G HUB: Navigate to “Settings” > “Mouse” > “Surface Tuning.” Follow the on-screen instructions to complete calibration.
- Razer Synapse: Go to “Devices” > select your mouse > “Advanced Settings” > “Calibrate Surface.” Place the mouse flat and let the process finish.
- SteelSeries GG: Under device settings, enable “Surface Calibration” and keep the mouse still during the cycle.
The calibration process typically takes 5–10 seconds. During this time, the sensor analyzes surface texture and adjusts internal gain settings to optimize tracking fidelity. Once complete, avoid moving the mouse until prompted.
“Proper surface calibration can reduce effective CPI variance by up to 18% on mixed-texture pads.” — Adrian Lin, Senior Peripheral Engineer at Corsair
Do’s and Don’ts of Mouse Sensor Maintenance
| Do’s | Don’ts |
|---|---|
| Calibrate your mouse when switching pads or desks | Use compressed air directly on the sensor—moisture or force can damage components |
| Keep the sensor lens clean with a soft, dry cloth | Assume all surfaces are compatible—even high-DPI mice struggle on glass or satin |
| Update firmware regularly via manufacturer tools | Ignore persistent drift after calibration—this may indicate hardware degradation |
| Use consistent DPI settings across sessions for muscle memory | Place the mouse on uneven or curved surfaces during calibration |
| Store the mouse with the sensor facing up to prevent dust buildup | Tap or blow into the sensor housing—physical impact risks internal misalignment |
Real-World Example: A Competitive FPS Player’s Fix
Mark, a semi-professional CS:2 player, began noticing his crosshair would veer slightly left after quick flick shots. Initially, he blamed his technique. He adjusted grip, changed sensitivity, and even tried a new mousepad. The issue persisted only on his wooden desk, not on his fabric pad.
After ruling out software conflicts and cleaning the sensor, he opened Logitech G HUB and discovered the surface calibration setting had reset after a recent driver update. He recalibrated on the wooden surface, which has subtle grain variation. Post-calibration, the drift disappeared entirely.
This case illustrates how environment-specific sensor tuning matters—even experienced users can overlook simple fixes when symptoms resemble skill regression.
Frequently Asked Questions
How often should I calibrate my gaming mouse sensor?
Calibrate whenever you change mousing surfaces, especially between materials like cloth, hard plastic, or wood. For consistent setups, once every few months is sufficient unless tracking issues arise. Firmware updates or sudden environmental changes (e.g., moving to a brighter room) may also warrant recalibration.
Can I calibrate my mouse without software?
Some mice support hardware-only calibration via button combinations (e.g., holding DPI buttons while placing the mouse flat). Check your user manual for model-specific sequences. However, software-based calibration offers more precision and feedback, making it the preferred method when available.
Does calibration improve DPI accuracy?
Calibration doesn't change the set DPI value but improves tracking linearity and reduces interpolation errors. It ensures that 1 inch of physical movement translates as closely as possible to the expected number of screen pixels, minimizing deviation caused by surface reflectivity or texture noise.
When Calibration Isn’t Enough: Hardware Limits and Next Steps
While calibration resolves many tracking anomalies, it cannot compensate for failing hardware. If your mouse exhibits any of the following, consider professional repair or replacement:
- Persistent jitter across all surfaces and DPI settings
- Sensor blackout (cursor freezing intermittently)
- Failure to complete calibration cycles repeatedly
- Visible damage to the sensor lens or housing
Aging sensors, especially in mice used for 2+ years under heavy conditions, may lose sensitivity or develop internal dust contamination. In such cases, no amount of calibration will restore factory-level performance.
Before retiring a mouse, try resetting it to factory defaults and reinstalling drivers. Sometimes corrupted profiles or outdated firmware mimic hardware failure. If the problem remains, consult the manufacturer’s warranty policy—many brands offer replacements within 2–3 years of purchase.
Conclusion: Precision Starts with Proper Setup
Accurate tracking isn’t just about high specs—it’s about alignment between sensor, surface, and expectation. Recognizing the subtle signs of sensor misalignment empowers you to maintain peak performance without unnecessary spending. From erratic cursor drift to inconsistent lift-off behavior, the clues are there if you know where to look.
By integrating regular diagnostics, proper calibration routines, and mindful maintenance, you extend both the lifespan and reliability of your gaming mouse. Whether you're lining up a headshot or editing a detailed design, confidence in your tools makes all the difference.


 浙公网安备
33010002000092号
浙公网安备
33010002000092号 浙B2-20120091-4
Comments
No comments yet. Why don't you start the discussion?