
Laptops are essential tools for work, study, and entertainment, but their compact design makes them prone to heat buildup. The cooling system—primarily the fan and heatsink—is critical in maintaining safe operating temperatures. Over time, dust and debris accumulate inside, reducing airflow and forcing the fan to work harder. If left unchecked, this can lead to thermal throttling, performance drops, or even permanent hardware damage. Recognizing early warning signs of a clogged fan allows you to intervene before overheating becomes a serious issue. This guide outlines the subtle and overt indicators that your laptop fan needs cleaning, along with practical steps to maintain optimal cooling efficiency.
Understanding How Laptop Cooling Works
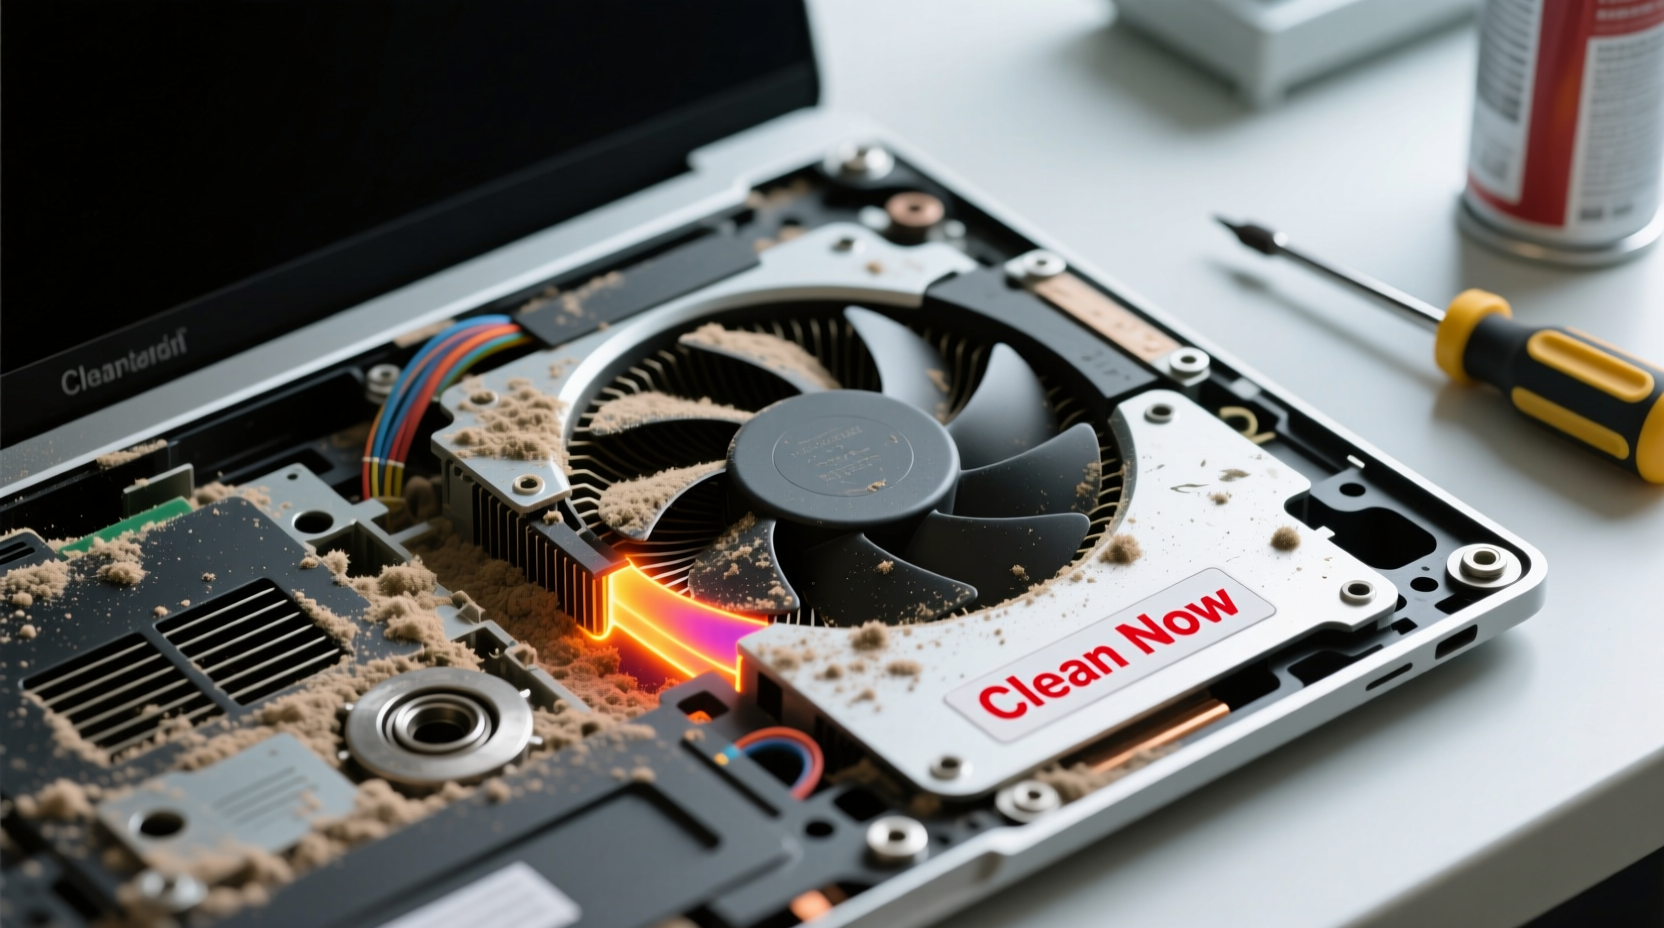
Most laptops rely on an internal fan paired with a heatsink to draw heat away from the CPU and GPU. As these components generate heat during operation, the fan pulls cool air in through intake vents and expels hot air via exhaust ports. Dust, pet hair, fabric fibers, and other airborne particles gradually collect on fan blades, heatsink fins, and ventilation grills. This accumulation acts as insulation, trapping heat and obstructing airflow. Even a thin layer of dust can significantly impair cooling performance over time.
The problem is often silent at first. You might not notice immediate slowdowns, but the system begins compensating by increasing fan speed. Eventually, sustained high temperatures trigger thermal throttling—a protective mechanism that reduces processor performance to lower heat output. In severe cases, the laptop may shut down unexpectedly to prevent hardware failure.
“Dust buildup is the number one cause of avoidable laptop overheating. A simple cleaning every 6–12 months can extend device life by years.” — Dr. Rajiv Mehta, Hardware Engineer & Thermal Systems Specialist
Key Signs Your Laptop Fan Needs Cleaning
Recognizing the early symptoms of restricted airflow can save you from costly repairs or premature replacement. These are the most common indicators that your laptop’s cooling system requires attention:
- Increased fan noise: If your laptop fan runs louder or more frequently—even during light tasks like browsing or document editing—it’s likely working harder to compensate for poor airflow.
- Hot surface temperature: Excessive heat on the keyboard deck, bottom casing, or near exhaust vents suggests inefficient heat dissipation.
- Sudden performance drops: Apps lagging, videos stuttering, or programs freezing without heavy usage may be due to thermal throttling.
- Unexpected shutdowns: When internal temperatures exceed safety thresholds, the system may power off abruptly.
- Fan running constantly: A fan that never powers down, even when idle, indicates it’s struggling to cool the system.
- Visible dust in vents: Using a flashlight to inspect intake and exhaust grills may reveal visible lint or debris buildup.
Step-by-Step Guide to Assess and Clean Your Laptop Fan
Cleaning your laptop fan doesn’t require advanced technical skills, but it does demand care and precision. Follow this timeline-based approach to safely evaluate and clean your device’s cooling system.
- Monitor temperatures (Day 1): Use free software like HWMonitor, Core Temp, or Open Hardware Monitor to track CPU and GPU temperatures under load. Normal idle temps range from 40–50°C; anything above 70°C under moderate use warrants investigation.
- Listen and observe (Day 1–3): Pay attention to fan behavior. Note when it kicks in, how loud it gets, and whether it correlates with system activity. Persistent high-pitched whirring is a red flag.
- Inspect vents visually (Day 3): Turn off and unplug the laptop. Use a bright flashlight to peer into intake and exhaust vents. Look for grayish dust clumps or fibrous buildup.
- Gather tools (Day 4): Prepare a can of compressed air, a soft-bristled brush (like a clean toothbrush), a microfiber cloth, and a small Phillips screwdriver if opening the case is necessary.
- External cleaning (Day 4): With the laptop powered off, hold it at a slight angle and use short bursts of compressed air to blow dust out of vents. Avoid tilting the can, as liquid propellant can damage components.
- Internal cleaning (Day 5, optional): For deeper access, consult your manufacturer’s service manual. Remove the back panel carefully, then gently blow air across the fan and heatsink. Do not spin the fan manually with compressed air, as this can damage bearings.
- Reassemble and test (Day 5): Reattach all components, power on the laptop, and run a stress test (e.g., Prime95 or FurMark) while monitoring temperatures. A successful cleaning should result in lower peak temps and quieter fan operation.
Do’s and Don’ts of Laptop Fan Maintenance
| Do’s | Don’ts |
|---|---|
| Use compressed air regularly (every 3–6 months) | Use vacuum cleaners directly on vents (can generate static) |
| Clean in a well-lit, static-free environment | Open the laptop if under warranty without checking terms |
| Store the laptop on hard, flat surfaces | Place laptops on beds, couches, or carpets during use |
| Use a laptop cooling pad in high-heat environments | Blow air with your mouth (moisture can corrode components) |
| Check fan status via BIOS or diagnostic tools | Ignore persistent grinding or clicking noises (sign of bearing failure) |
Real-World Example: Preventing Overheating in a Student’s Workstation
A university student in Chicago used her Dell XPS 13 daily for online classes, coding assignments, and video editing. After eight months of constant use—often on her bed during late-night sessions—she began noticing frequent freezes and sudden shutdowns. Initially, she assumed the issue was software-related and reinstalled her OS twice, with no improvement.
Upon visiting a local repair shop, the technician found thick layers of dust clogging the fan and heatsink. The CPU was reaching 98°C under light load. After a thorough internal cleaning and thermal paste reapplication, temperatures dropped to a stable 65–72°C during video rendering. The student reported smoother performance and eliminated crashes. This case underscores how everyday usage habits, combined with lack of physical maintenance, can silently degrade system reliability—even on premium devices.
Preventive Checklist for Long-Term Fan Health
To keep your laptop running cool and quiet, follow this quarterly maintenance checklist:
- ✅ Inspect intake and exhaust vents for visible dust
- ✅ Run a temperature check using monitoring software
- ✅ Blow out vents with compressed air
- ✅ Wipe down exterior vents with a dry microfiber cloth
- ✅ Avoid using the laptop on soft, fibrous surfaces
- ✅ Ensure ambient room temperature is moderate (ideally below 25°C)
- ✅ Verify fan operation in BIOS or system diagnostics
- ✅ Consider professional deep cleaning annually
Frequently Asked Questions
How often should I clean my laptop fan?
For most users, cleaning every 6 to 12 months is sufficient. However, if you use your laptop in dusty environments, around pets, or on soft surfaces frequently, every 3–4 months is recommended. Regular external blowing with compressed air can extend the interval between deep cleanings.
Can I damage my laptop while cleaning the fan?
Yes, improper techniques can cause harm. Avoid spinning the fan rapidly with compressed air, as this may damage the motor or dislodge wires. Never use water, household cleaners, or vacuums directly on internal components. If you're uncomfortable opening the device, seek professional help—many manufacturers offer certified cleaning services.
Is it normal for the fan to run all the time?
No. While brief bursts of fan activity are normal during processing tasks, continuous high-speed operation during idle or light use indicates a problem. This could be due to dust buildup, failing thermal paste, background processes consuming CPU, or a malfunctioning temperature sensor. Investigate the root cause promptly.
Conclusion: Act Before Heat Damages Your Device
Your laptop’s fan is a small component with an outsized impact on performance and longevity. By staying alert to changes in noise, temperature, and responsiveness, you can detect cooling issues long before they lead to overheating. Simple habits—like regular vent inspections, using compressed air, and avoiding soft surfaces—go a long way in preserving airflow. When done correctly, fan maintenance is fast, inexpensive, and highly effective.


 浙公网安备
33010002000092号
浙公网安备
33010002000092号 浙B2-20120091-4
Comments
No comments yet. Why don't you start the discussion?