
Tempering chocolate gives it that glossy finish, crisp snap, and stable structure—qualities essential for making professional-looking truffles, dipped strawberries, or chocolate bark. While most guides insist on using a thermometer, not everyone has one on hand. The good news? You can achieve perfectly tempered chocolate in your microwave without any special tools. This method relies on controlled heating and cooling techniques that mimic traditional tempering, making it ideal for home cooks who want reliable results without the fuss.
Understanding how chocolate behaves during melting and cooling is key. Chocolate contains cocoa butter, which forms different types of crystals when it solidifies. Only one type—the beta crystal—produces the smooth, shiny, and stable chocolate we associate with high-quality confections. Tempering encourages the formation of these desirable crystals. Without proper tempering, chocolate can appear dull, streaky, or soft at room temperature.
The microwave method simplifies this process by using time-tested intervals and physical cues instead of temperature readings. With attention to detail and a little patience, you can produce beautifully tempered chocolate every time—even without a thermometer.
Why Tempering Matters (Even Without Fancy Tools)
Untempered chocolate may taste just as sweet, but its appearance and texture often fall short. It tends to develop a grayish film known as \"bloom,\" caused by fat or sugar rising to the surface. Bloom isn’t harmful, but it signals poor crystallization and reduces shelf appeal. Properly tempered chocolate resists bloom, sets quickly, and holds up well in warm environments—important if you're gifting chocolates or storing them before serving.
Professional chocolatiers use precise temperatures: heating dark chocolate to 115°F (46°C), cooling to 82°F (28°C), then reheating slightly to 88–90°F (31–32°C). Milk and white chocolates require lower thresholds due to their higher milk fat content. But replicating these stages without a thermometer might seem impossible—until you understand the principle behind seeding and controlled heat exposure.
By carefully managing how much chocolate melts and how much remains solid, you create a self-regulating system where the unmelted pieces act as “seed” crystals. These guide the rest of the cocoa butter into forming the correct structure as it cools. The microwave becomes your ally in this process—not through precision readings, but through disciplined timing and observation.
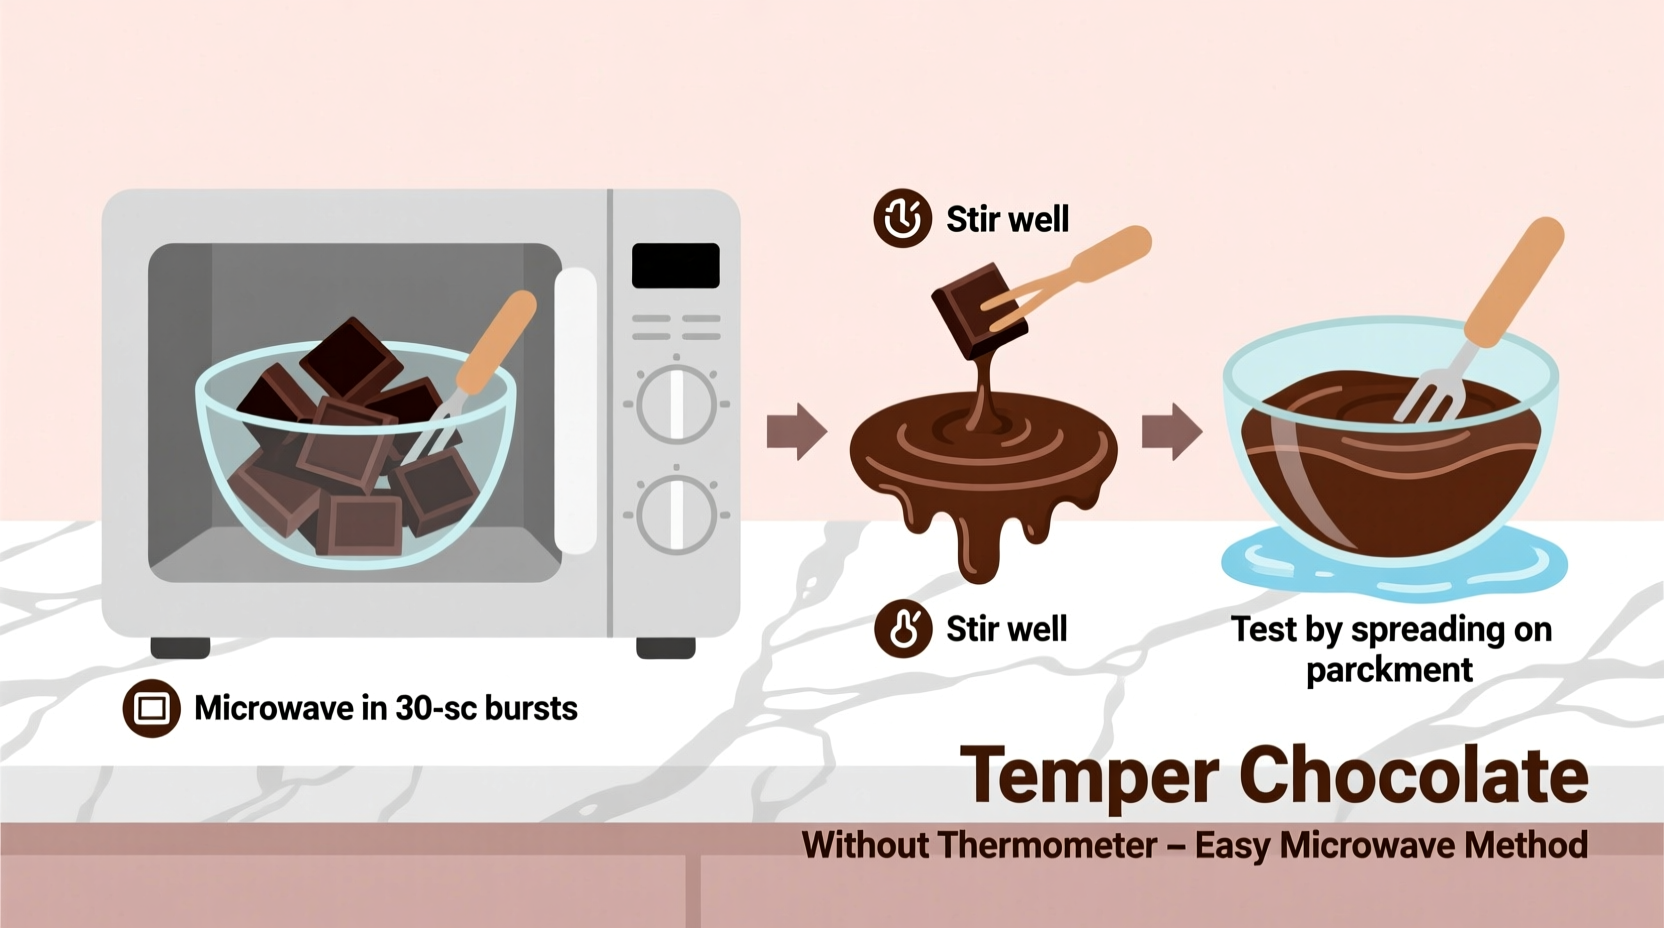
Step-by-Step Guide: Microwave Chocolate Tempering Without a Thermometer
This foolproof technique uses the “two-thirds melt” rule combined with gradual stirring and cooling. Follow each step closely for best results.
- Chop the chocolate finely and evenly. Use high-quality couverture chocolate if possible—it contains more cocoa butter and responds better to tempering. Break it into small, uniform pieces so they melt consistently. Place two-thirds of the chopped chocolate in a dry, microwave-safe bowl. Reserve the remaining third for later.
- Microwave in short bursts. Set your microwave to 50% power. Heat the chocolate for 30 seconds. Remove and stir gently with a silicone spatula. Repeat in 15-second increments at 50% power, stirring after each interval. Stop as soon as the chocolate is mostly melted with only a few lumps remaining. Do not overheat—even a few extra seconds can scorch the chocolate or destroy the delicate cocoa butter structure.
- Add the reserved chocolate. Sprinkle the remaining one-third of unmelted chocolate into the warm mixture. Stir continuously. The cold chocolate will cool the melted portion while acting as seed crystals. Keep stirring until all added pieces have melted and the entire batch feels smooth and slightly cooler to the touch—around 75–80°F (24–27°C), though you won’t measure it.
- Test for temper. Dip the tip of a clean knife or spoon into the chocolate and set it aside at room temperature (about 68–72°F / 20–22°C). If the chocolate sets within 3–5 minutes with a shiny surface and no streaks, it’s properly tempered. If it remains soft or looks cloudy, stir in a bit more finely chopped chocolate and retest.
- Use immediately. Once tempered, work quickly. Coat candies, drizzle over desserts, or pour into molds. Avoid returning used chocolate to the bowl, as introduced moisture or warmth can break the temper.
Do’s and Don’ts When Tempering Chocolate in the Microwave
Avoid common pitfalls by following this simple reference table:
| Do’s | Don’ts |
|---|---|
| Use high-quality chocolate with real cocoa butter | Use chocolate chips meant for baking—they often contain stabilizers that resist proper tempering |
| Chop chocolate finely for even melting | Use large chunks that melt unevenly |
| Stir frequently during microwaving | Walk away from the microwave—chocolate burns fast |
| Cool the chocolate by adding reserved solid pieces | Add liquid ingredients like extracts before tempering—they can disrupt crystal formation |
| Work in a cool, draft-free environment | Attempt tempering in a humid kitchen—moisture ruins everything |
Real Example: Successful Home Candy Making Without Equipment
Sarah, a home baker from Portland, wanted to make almond clusters for her daughter’s birthday party. She didn’t own a candy thermometer and was nervous about failing. After reading about the microwave seeding method, she tried it with dark chocolate bars from her local grocery store. She followed the step-by-step instructions precisely: chopped two-thirds of the chocolate, heated in 15-second bursts at half power, stirred, then added the last third gradually. Within five minutes, she had glossy, firm chocolate that set perfectly on parchment paper. Her clusters held shape at room temperature and received rave reviews. “I couldn’t believe I did it without any special tools,” she said. “Now I make chocolate gifts all the time.”
This example shows that success comes not from equipment, but from understanding the process and paying attention to visual and tactile cues.
Expert Insight: What Professionals Know About Chocolate Behavior
“Temperature control is important, but consistency and technique matter more for home cooks. If you learn how chocolate flows, shines, and sets, you’ll temper successfully—even blindfolded.” — Rafael Mendez, Pastry Chef & Chocolate Artisan
Chef Mendez emphasizes that experienced chocolatiers often rely on instinct developed through repetition. They recognize the right viscosity, the subtle drop in temperature, and the reflective sheen that indicates perfect temper. While thermometers help standardize production, sensory awareness is equally powerful. By practicing the microwave method multiple times, you train your senses to detect these signs naturally.
Tips for Consistent Results Every Time
- Choose the right chocolate. Real couverture chocolate (like Ghirardelli, Callebaut, or Lindt) works best. Avoid brands labeled “baking chips” unless specified as temperable.
- Keep your workspace cool. Ideal room temperature is between 65°F and 72°F (18–22°C). Warm kitchens make it harder for chocolate to set properly.
- Don’t rush the cooling phase. Adding too much cold chocolate too fast can cause premature setting. Add in small batches and stir thoroughly.
- Revive broken chocolate. If your chocolate seizes or loses temper, you can salvage it by adding a teaspoon of vegetable oil or clarified butter—but it won't temper again. Best used for brownies or sauces.
- Store leftover tempered chocolate wisely. If you have unused tempered chocolate, spread it thinly on parchment and let it harden. Re-melt it later using the same seeding method.
Frequently Asked Questions
Can I temper white chocolate the same way?
Yes, but be extra careful. White chocolate is more sensitive to heat and contains milk solids that burn easily. Use 30% power and shorter bursts (10 seconds). The final texture should be smooth and ivory-colored, never yellow or grainy.
What if my chocolate doesn’t set?
If the chocolate stays soft or sticky after several minutes, it likely wasn’t cooled enough or lost its temper. Stir in another handful of finely chopped chocolate and retest. Also, ensure your room isn’t too warm—above 75°F (24°C) prevents proper setting.
Is it safe to reheat already-tempered chocolate?
You can gently re-warm tempered chocolate, but only in 10-second bursts at low power. Overheating breaks the crystal structure. If it starts looking dull or thickens oddly, it has lost temper and should be used for non-decorative purposes.
Conclusion: Master Chocolate Tempering From Your Kitchen
Tempering chocolate without a thermometer isn’t guesswork—it’s skill built on understanding how cocoa butter behaves. The microwave method leverages simple physics: controlled melting, strategic cooling, and natural seeding. With practice, you’ll develop an intuitive sense for when chocolate is ready, based on its flow, shine, and response to touch. No gadgets required. Just patience, quality ingredients, and attention to detail.
This technique opens up possibilities for homemade gifts, holiday treats, and elegant dessert finishes—all achievable in a home kitchen. Whether you’re preparing for a special occasion or simply exploring confectionery arts, mastering this method empowers you to create chocolates that look and taste professionally made.


 浙公网安备
33010002000092号
浙公网安备
33010002000092号 浙B2-20120091-4
Comments
No comments yet. Why don't you start the discussion?