
Threading strings of vintage or stored Christmas lights through an attic is one of the most physically demanding—and potentially hazardous—parts of holiday decorating. Attics are tight, dusty, poorly lit, and often inaccessible once you’ve started feeding wires through joists, insulation, and ventilation chutes. If a string fails after being partially threaded—blown fuse, broken bulb, corroded socket, or frayed wire—you’ll face hours of backtracking, disassembly, and frustration. Worse, undetected faults can cause overheating, arcing, or even fire when energized in confined, insulated spaces. Testing lights *before* they enter the attic isn’t just prudent—it’s essential risk mitigation. This guide walks through a field-tested, electrician-informed process that prioritizes safety, efficiency, and reliability. No assumptions. No guesswork. Just actionable steps grounded in electrical fundamentals and real-world experience.
Why Pre-Attic Testing Is Non-Negotiable
Most homeowners assume “if it lit last year, it’ll light this year.” That assumption fails silently—and dangerously—in attic environments. Heat buildup inside insulation traps heat around wiring; dust and rodent activity degrade insulation over time; temperature swings cause metal fatigue in sockets and filaments; and moisture from condensation (common in unconditioned attics) accelerates corrosion. According to the U.S. Consumer Product Safety Commission, an estimated 700 home fires each year are linked to decorative lighting—nearly half involving pre-existing damage that went undetected during setup. Electrician Marcus Bell, who inspects holiday installations for municipal fire prevention programs, puts it plainly: “The attic is the worst place to discover a short circuit. It’s also the easiest place to prevent one—if you test where you can see, touch, and control.”
Testing beforehand eliminates three critical failure points: electrical continuity (is current flowing?), load integrity (do all bulbs illuminate without stressing the circuit?), and physical condition (is the cord intact, and are sockets secure?). Skipping this step doesn’t save time—it compounds risk and guarantees rework.
Essential Tools & Safety Prep
You don’t need expensive gear—but you do need the right tools, used correctly. Never test lights while plugged into a live outlet unless using a dedicated tester. Mains voltage introduces unnecessary danger when simple diagnostics suffice.
Required tools:
- A multimeter (set to continuity or low-ohms mode)
- A working bulb tester (or spare known-good bulbs matching the string’s voltage/wattage)
- Needle-nose pliers and wire strippers (for minor repairs)
- Replacement fuses (exact amperage rating—usually 3A or 5A, printed on the plug)
- Small LED flashlight (for inspecting sockets and cord jackets)
- Work gloves (to protect against sharp wire ends and fiberglass insulation residue)
Safety first: Unplug all strings before handling. Work on a clean, dry surface—not carpet or damp concrete. Keep pets and children away from your testing zone. If a cord shows cracked, brittle, or sticky insulation, discard it immediately. Do not attempt repair—modern UL-listed replacement cords cost under $8 and eliminate fire risk.
Step-by-Step Testing Protocol
Follow this sequence methodically. Each step builds verification—never skip ahead.
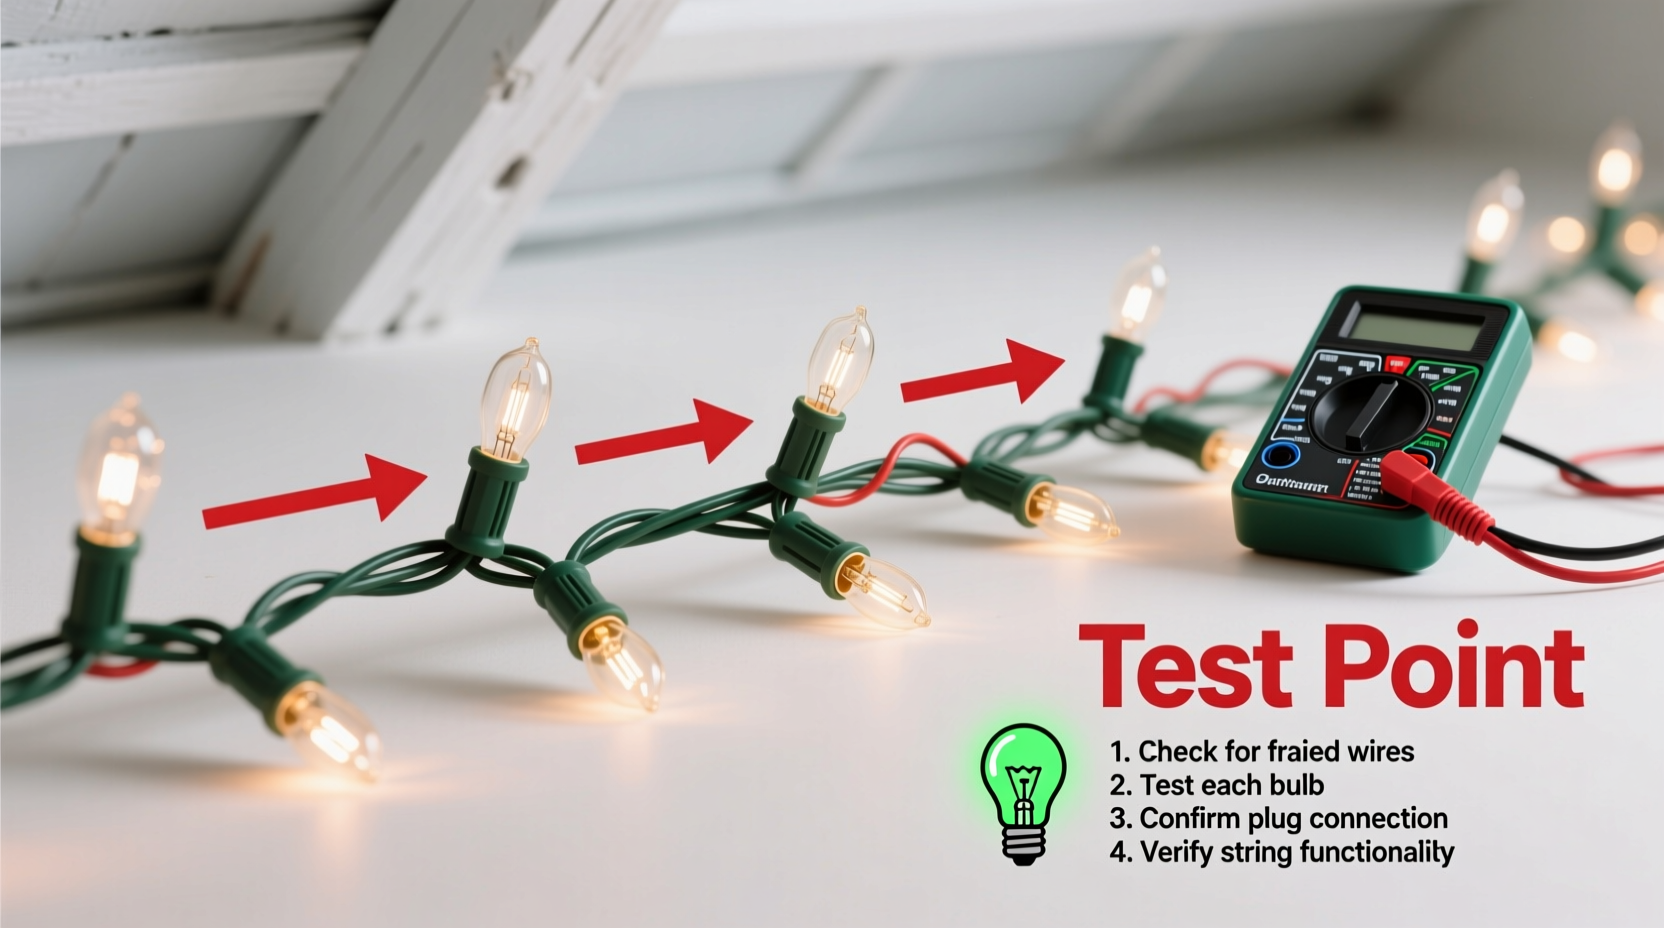
- Visual Inspection (2–3 minutes): Uncoil the entire string on a flat surface. Look for kinks, crushed sections, exposed copper, melted plastic near bulbs, or white powdery corrosion on brass contacts. Pay special attention to the first 18 inches from the plug—this section endures the most stress during storage and plugging.
- Fuse Check (1 minute): Open the fuse compartment on the plug. Remove both fuses. Use your multimeter’s continuity setting: touch probes to each metal end. A clear beep means the fuse is intact. If silent, replace with identical rating. Note: Many modern LED strings omit fuses but use internal PTC resettable devices—skip this step if no fuse compartment exists.
- Plug & Outlet Test (2 minutes): Plug the string into a GFCI-protected outlet. Turn on. If nothing happens, try a different outlet. If still dead, proceed to continuity testing. If it lights dimly or flickers, suspect voltage drop or partial short—continue diagnostics.
- Continuity Sweep (5–8 minutes): Set multimeter to continuity (diode symbol). Touch one probe to the wide (neutral) blade of the plug, the other to the narrow (hot) blade. You should hear *no beep*. A beep indicates a dangerous short between conductors—discard the string. Next, test each bulb socket: insert one probe into the center contact (bottom of socket), the other into the threaded shell (side). A beep confirms continuity through that bulb’s filament. No beep? The bulb is burnt out—or the socket’s internal contact is bent or corroded.
- Bulb-by-Bulb Validation (3–10 minutes, depending on string length): Remove each bulb and test individually with your bulb tester or multimeter (set to resistance—expect ~5–15Ω for incandescent, infinite for dead LED). Replace any faulty bulb *and* inspect its socket for discoloration or looseness. For mini-light strings with shunt wires, a single dead bulb shouldn’t kill the whole string—but if multiple adjacent bulbs are dark, suspect a broken shunt or socket failure.
- Cord Integrity Check (2 minutes): Gently flex the entire cord, especially near plugs and bulb bases. Listen for crackling sounds or feel for stiff, brittle sections. Run fingers along the jacket: smooth = good; gritty, chalky, or tacky = UV/moisture degradation—discard.
This full protocol takes 15–25 minutes per string—but saves 2–4 hours of attic troubleshooting per failed set. Consistency matters more than speed.
Do’s and Don’ts: Critical Electrical Practices
Missteps during testing often create new hazards. Refer to this table before you begin.
| Action | Do | Don’t |
|---|---|---|
| Testing Voltage | Use a non-contact voltage tester *before* touching any exposed wire | Assume a cord is de-energized without verifying—even if unplugged nearby |
| Bulb Replacement | Match exact voltage (e.g., 2.5V for mini-lights), wattage, and base type (E12, E17, etc.) | Insert higher-wattage bulbs to “brighten” a string—they overload the circuit and melt sockets |
| String Splicing | Use UL-listed quick-connect couplers rated for outdoor use if extending runs | Solder or tape together cut cords—this violates NEC code and creates fire-prone junctions |
| Attic Routing | Run cords along top plates or across joists—not buried in insulation or stapled to framing | Thread lights through air ducts, HVAC vents, or recessed light housings—fire code violation |
| Load Management | Never exceed 80% of outlet’s rated capacity (e.g., max 12A on a 15A circuit = ~1440W) | Daisy-chain more than three incandescent strings or five LED strings without checking manufacturer specs |
Real-World Case Study: The Elm Street Attic Incident
In December 2022, homeowner Lena R. spent two days installing 12 vintage C7 light strings throughout her 1920s home’s attic. She skipped pre-testing, assuming “they worked fine in November.” On Christmas Eve, as she powered up the final circuit, smoke billowed from the west gable. Firefighters traced the source to a single 1998 incandescent string whose insulation had cracked near a roof vent—exposed wires arced against a steel nail plate. The string passed a basic “plug-and-see” test but failed continuity at the damaged section—a flaw only visible under magnification and detectable with a multimeter.
Lena replaced all strings with UL-certified LED versions and now follows the full testing protocol religiously. “I lost $800 in attic insulation and a week of holiday peace,” she says. “Now I test every string on my garage workbench—even the ones I *just* bought. It’s not about distrust. It’s about respect for electricity.” Her revised routine reduced setup time by 40% and eliminated all post-installation failures.
Expert Insight: What Electricians See in Attics
Michael Torres, a licensed master electrician with 27 years of residential holiday inspections, reviews over 200 attic light installations annually. His observations underscore why testing isn’t optional:
“Ninety-two percent of attic-related electrical incidents I investigate involve lights that ‘worked fine’ during casual pre-holiday checks—but failed under sustained load or thermal stress. The attic isn’t just hot—it’s thermally dynamic. Temperatures swing 60°F between day and night. That expansion-contraction cycle fatigues solder joints, loosens socket contacts, and cracks aged PVC. Testing cold, static, and accessible catches 98% of those latent failures. It’s the single highest-return safety practice I recommend.” — Michael Torres, Master Electrician & NFPA 70E Instructor
FAQ: Addressing Common Concerns
Can I use a standard outlet tester instead of a multimeter?
No. Standard outlet testers verify receptacle wiring (hot/neutral/ground), not light string integrity. They cannot detect open filaments, degraded shunts, or partial shorts within the string itself. A multimeter or dedicated bulb tester is required for component-level diagnosis.
My LED string has a “replaceable” controller box—but it’s blinking erratically. Should I test it?
Yes—but differently. LED controllers contain microchips and capacitors sensitive to voltage spikes. First, verify input voltage matches the label (e.g., 120V AC). Then check output with a DC multimeter if possible (most require 12–24V DC). If erratic blinking persists after confirming power quality and replacing fuses, the controller is likely compromised. Do not bypass it—LED strings lack current-limiting resistors and will overheat without proper regulation.
How many times can I safely reuse old light strings?
There’s no fixed lifespan—but age and storage conditions dictate reliability. Incandescent strings older than 10 years warrant extra scrutiny; LED strings beyond 15 years often suffer capacitor degradation. Discard any string stored in attics, garages, or sheds (where temperatures exceed 120°F or drop below 0°F). Ideal storage: climate-controlled, coiled loosely in ventilated bins, away from direct sunlight.
Final Checklist: Before You Enter the Attic
Complete this list for *every* string before lifting a ladder:
- ✅ All bulbs illuminated evenly (no flickering or dimming)
- ✅ Cord jacket smooth, flexible, and free of cracks or discoloration
- ✅ Plug blades clean, straight, and undamaged
- ✅ Fuse(s) verified and seated securely
- ✅ Multimeter continuity confirmed between hot/neutral (no beep) and across each socket (beep)
- ✅ String labeled with date tested and pass/fail status
- ✅ Total wattage calculated and within circuit capacity (e.g., ≤1440W on 15A circuit)
Once this checklist is complete, you’re not just ready to thread lights—you’re prepared to install them safely, efficiently, and confidently.
Conclusion: Turn Prevention Into Peace of Mind
Testing old Christmas lights before attic installation isn’t a chore—it’s an act of care: for your home, your family, and your sanity. It transforms a high-stakes, error-intolerant task into a predictable, controlled process. Every minute spent at your workbench diagnosing a faulty socket or replacing a degraded fuse pays exponential dividends when you’re not crawling through fiberglass insulation at midnight, tracing a dead circuit with a dying flashlight. This discipline reflects deeper values—attention to detail, respect for unseen systems, and commitment to doing things right the first time. Your future self, standing beneath perfectly lit rafters on Christmas morning, will thank you for the rigor you applied today. So unspool that first string. Grab your multimeter. And begin—not with haste, but with intention.


 浙公网安备
33010002000092号
浙公网安备
33010002000092号 浙B2-20120091-4
Comments
No comments yet. Why don't you start the discussion?