
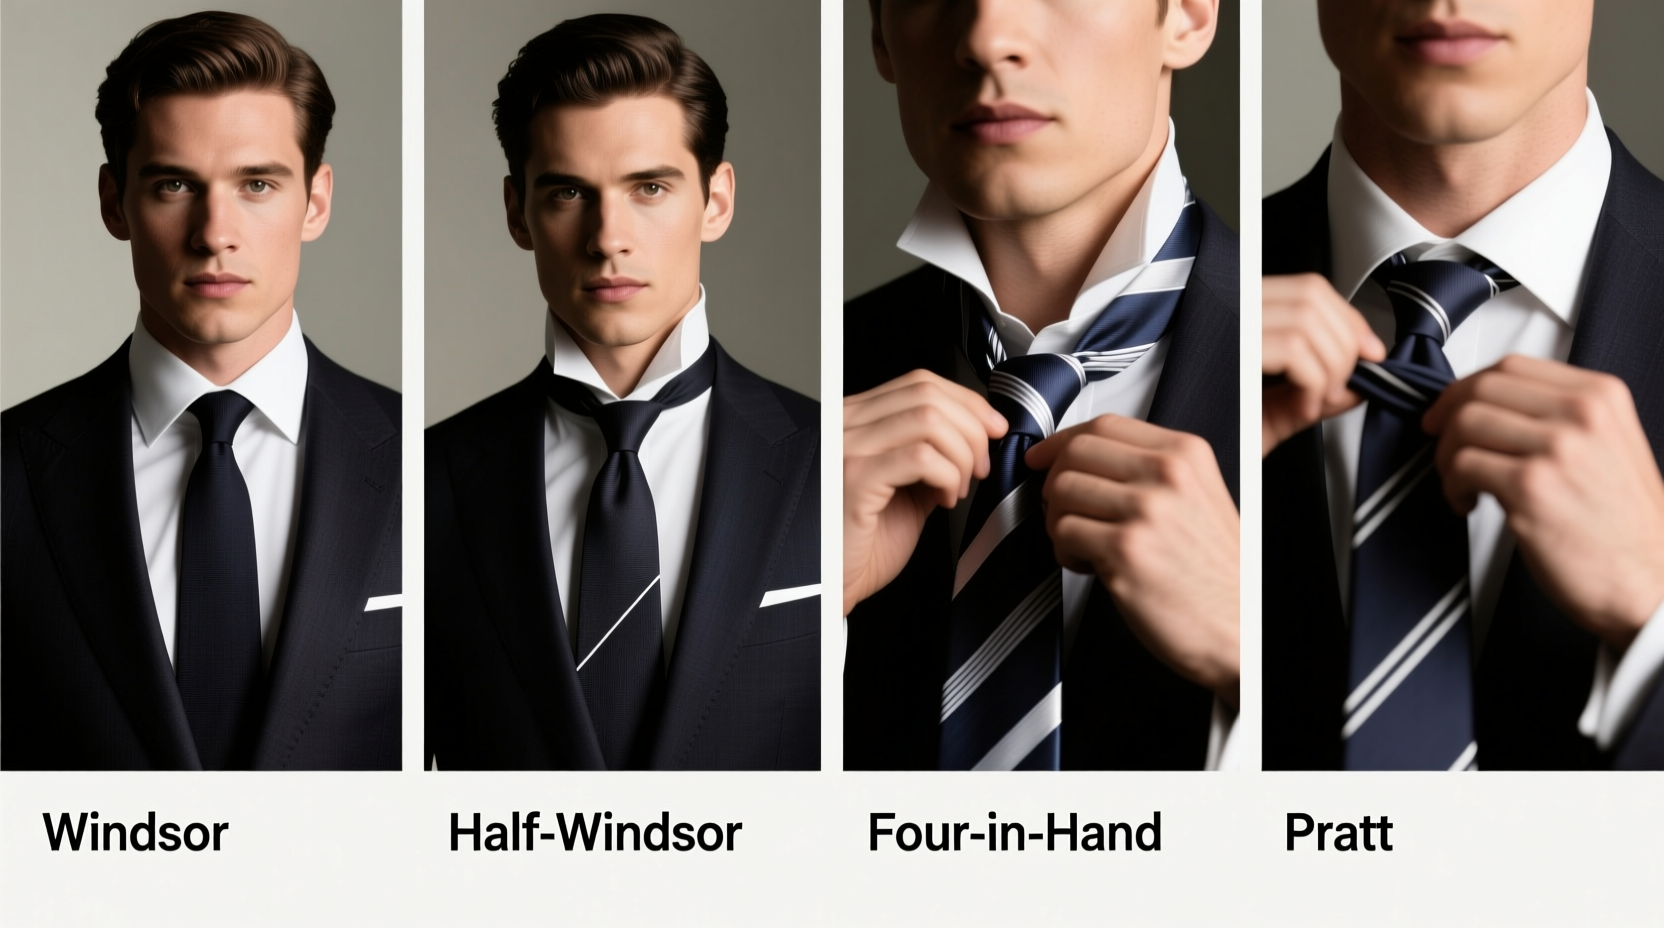
A well-tied tie can elevate your presence in any setting. Whether you're preparing for a job interview, attending a wedding, or stepping into a boardroom, the right knot conveys confidence and attention to detail. While many men own ties, fewer know how to tie them properly—or which knot suits which occasion. This guide breaks down four essential tie knots: the Four-in-Hand, the Half-Windsor, the Full Windsor, and the Pratt (Shelby) knot. Each has its strengths, suited to different collar types, tie widths, and social contexts.
The Four-in-Hand Knot: Simple, Slanting, and Versatile
The Four-in-Hand is the most widely used tie knot due to its simplicity and asymmetry. It produces a narrow, slightly tapered knot that works well with standard collared dress shirts and moderate-width ties. Ideal for daily office wear, it’s also appropriate for casual business settings.
This knot originated in 19th-century England among members of elite clubs who tied their neckwear before horseback rides—hence the name, referencing the method used to hold reins. Its subtle slant gives a relaxed yet polished appearance.
Step-by-Step Guide: How to Tie a Four-in-Hand Knot
- Start with the wide end of the tie on your right, hanging about 12 inches below the narrow end. Adjust based on your height.
- Cross the wide end over the narrow end, forming an \"X\" just below your chin.
- Bring the wide end under the narrow end from right to left.
- Loop it back over the narrow end from left to right, bringing it up through the neck loop.
- Pull the wide end down through the front loop that forms below.
- Hold the knot gently with one hand and slide it up toward the collar while adjusting tension.
The Half-Windsor Knot: Balanced, Symmetrical, and Professional
More structured than the Four-in-Hand, the Half-Windsor strikes a balance between elegance and ease. It creates a medium-sized, triangular knot ideal for button-down collars and semi-formal environments. Commonly worn in corporate offices, client meetings, and formal daytime events, this knot projects competence without appearing overly rigid.
Fashion historian Richard Anderson notes:
“The Half-Windsor remains the gold standard for professional attire—it’s symmetrical, substantial, and doesn’t overpower the face.” — Richard Anderson, Menswear Historian
Step-by-Step Guide: How to Tie a Half-Windsor Knot
- Begin with the wide end on your right, extending 10–12 inches below the narrow end.
- Cross the wide end over the narrow end.
- Bring the wide end up through the neck loop from right to left.
- Pass it behind the narrow end, moving from left to right across the back.
- Bring the wide end over the front of the existing knot from right to left.
- Loop it down through the neck loop again.
- Finally, pass it through the front loop and adjust the knot by pulling gently on both ends.
The result is a clean, balanced triangle. With practice, this knot takes less than 30 seconds to execute flawlessly.
The Full Windsor Knot: Bold, Wide, and Formal
If you’re attending a black-tie optional event, giving a keynote speech, or standing at the altar, the Full Windsor is the knot of choice. It produces a wide, perfectly symmetrical knot that fills spread-collar shirts beautifully. Known for its commanding presence, it's often associated with leadership roles and high-stakes environments.
Despite its reputation, the Full Windsor requires more fabric and precision. It’s best reserved for occasions where visual impact matters.
Step-by-Step Guide: How to Tie a Full Windsor Knot
- Position the wide end about two fists’ length below the narrow end (roughly 18 inches).
- Cross the wide end over the narrow end.
- Bring the wide end up through the neck loop.
- Pass it behind the narrow end from left to right.
- Bring it over the front from right to left, forming a second crossing.
- Again, pass the wide end up through the neck loop.
- Now bring it over the front from left to right.
- Thread it down through the front loop and tighten carefully.
This eight-move sequence creates a full, majestic knot. Take care not to overtighten—the goal is structure, not constriction.
The Pratt Knot (Shelby): Underestimated but Perfectly Proportioned
Developed at the U.S. State Department in the 1950s and popularized by actor Fred Astaire, the Pratt knot (also known as the Shelby knot) is ideal for those of average to shorter stature. It uses less tie length than other knots, making it perfect when the narrow end tends to come up short.
The Pratt produces a neat, symmetrical triangle similar to the Half-Windsor but forms faster and adapts better to narrower ties. It excels with button-down collars and conservative fabrics like silk or microfiber.
Step-by-Step Guide: How to Tie a Pratt Knot
- Start with the wide end on your left, extending about 12 inches below the narrow end—this is the only knot where the wide end begins on the left.
- Place the narrow end over the wide end.
- Bring the wide end up through the neck loop from right to left.
- Wrap it behind the narrow end, then bring it over the front from left to right.
- Pass the wide end up through the neck loop a second time.
- Bring it down through the front loop and tighten gently.
Once mastered, the Pratt becomes a go-to for its efficiency and proportionality.
Choosing the Right Knot for the Occasion: A Practical Guide
Selecting a tie knot isn’t just about skill—it’s about context. The wrong knot can undermine an otherwise impeccable outfit. Below is a comparison table summarizing each knot’s best use cases.
| Knot | Size & Shape | Best Collar Type | Occasion | Difficulty |
|---|---|---|---|---|
| Four-in-Hand | Narrow, slanted | Point, Button-down | Daily office, casual business | Easy |
| Half-Windsor | Medium, triangular | Semi-spread, Cutaway | Meetings, presentations, dinners | Moderate |
| Full Windsor | Wide, symmetrical | Spread, Cutaway | Weddings, speeches, formal events | Advanced |
| Pratt (Shelby) | Medium, balanced | Button-down, Point | Interviews, travel, moderate formality | Moderate |
Checklist: Selecting Your Daily Knot
- ✅ Is the collar wide enough to accommodate the knot?
- ✅ Does the knot complement the tie’s width and fabric weight?
- ✅ Is the occasion formal enough to justify a larger knot?
- ✅ Will I be seated for long periods? (Smaller knots avoid bunching.)
- ✅ Can the narrow end remain hidden when tied?
Real Example: Alex’s Job Interview Transformation
Alex, a marketing professional, had been turned down for three senior roles despite strong qualifications. After reviewing his interview footage, his coach noticed a recurring issue: his tie knot was crooked and undersized—a poorly executed Four-in-Hand that looked hasty. He switched to a Pratt knot, which better fit his body proportions and created a cleaner silhouette. At his next interview, he received compliments on his presentation—and landed the job. Small details, when refined, create outsized impressions.
Frequently Asked Questions
Which knot is easiest for beginners?
The Four-in-Hand is the most beginner-friendly. It involves fewer steps, forgives minor errors, and works with most off-the-rack shirts. Practice it five times, and it will become second nature.
Why does my tie knot look uneven?
Asymmetry usually stems from inconsistent tension or misaligned loops. Ensure each movement pulls evenly and that the tie lies flat before tightening. Also, check that the fabric hasn’t twisted along the length.
Can I wear a Full Windsor with a button-down collar?
Generally, no. The Full Windsor’s width pushes apart the collar points of a button-down, creating a gap. Stick to spread or cutaway collars for this knot to maintain a sharp, cohesive line.
Final Tips for Flawless Execution
No matter which knot you choose, consistency and grooming matter. Always dimple the tie just below the knot by pinching the fabric—this adds depth and prevents a flat, lifeless appearance. Store ties untied and hung vertically to preserve shape. And remember: the tip of the wide end should reach the center of your belt buckle. Too short looks sloppy; too long appears outdated.
Conclusion: Mastery Starts with the Knot
Tying a tie is more than a mechanical task—it’s a ritual of preparation. Whether you’re calming nerves before a presentation or honoring tradition at a wedding, the knot you choose speaks before you do. By mastering these four styles, you gain flexibility, confidence, and control over your personal brand. Don’t settle for one-size-fits-all solutions. Experiment. Adapt. Refine. The next time someone notices your tie, let it be because of how impeccably it’s tied.


 浙公网安备
33010002000092号
浙公网安备
33010002000092号 浙B2-20120091-4
Comments
No comments yet. Why don't you start the discussion?