
Tying a tie should not be a morning struggle. For many, it’s a daily frustration—fumbling with fabric, misjudging lengths, or relying on a mirror just to get it right. But what if you could tie a perfect knot in under 30 seconds, without looking? This skill is not reserved for seasoned professionals or fashion experts. With the right technique and a bit of practice, anyone can master it—even total beginners.
The key lies in simplicity, repetition, and tactile awareness. By focusing on feel rather than sight, you eliminate the need for a mirror and build confidence through consistency. This guide breaks down the process into manageable steps, introduces a foolproof method, and shares pro tips to help you tie your tie efficiently every single time.
The Half-Windsor: The Ideal Knot for Beginners
Among the dozens of tie knots, the Half-Windsor stands out as the most balanced choice for beginners. It’s symmetrical, moderately sized, and works well with most collar types and tie fabrics. Unlike the Four-in-Hand (which can look too narrow) or the Full Windsor (which requires more fabric and precision), the Half-Windsor strikes the perfect middle ground.
What makes it ideal for mirror-free tying is its repetitive structure. Once memorized, the movements become second nature—like typing or riding a bike. You’ll rely on touch, rhythm, and consistent starting positions rather than visual feedback.
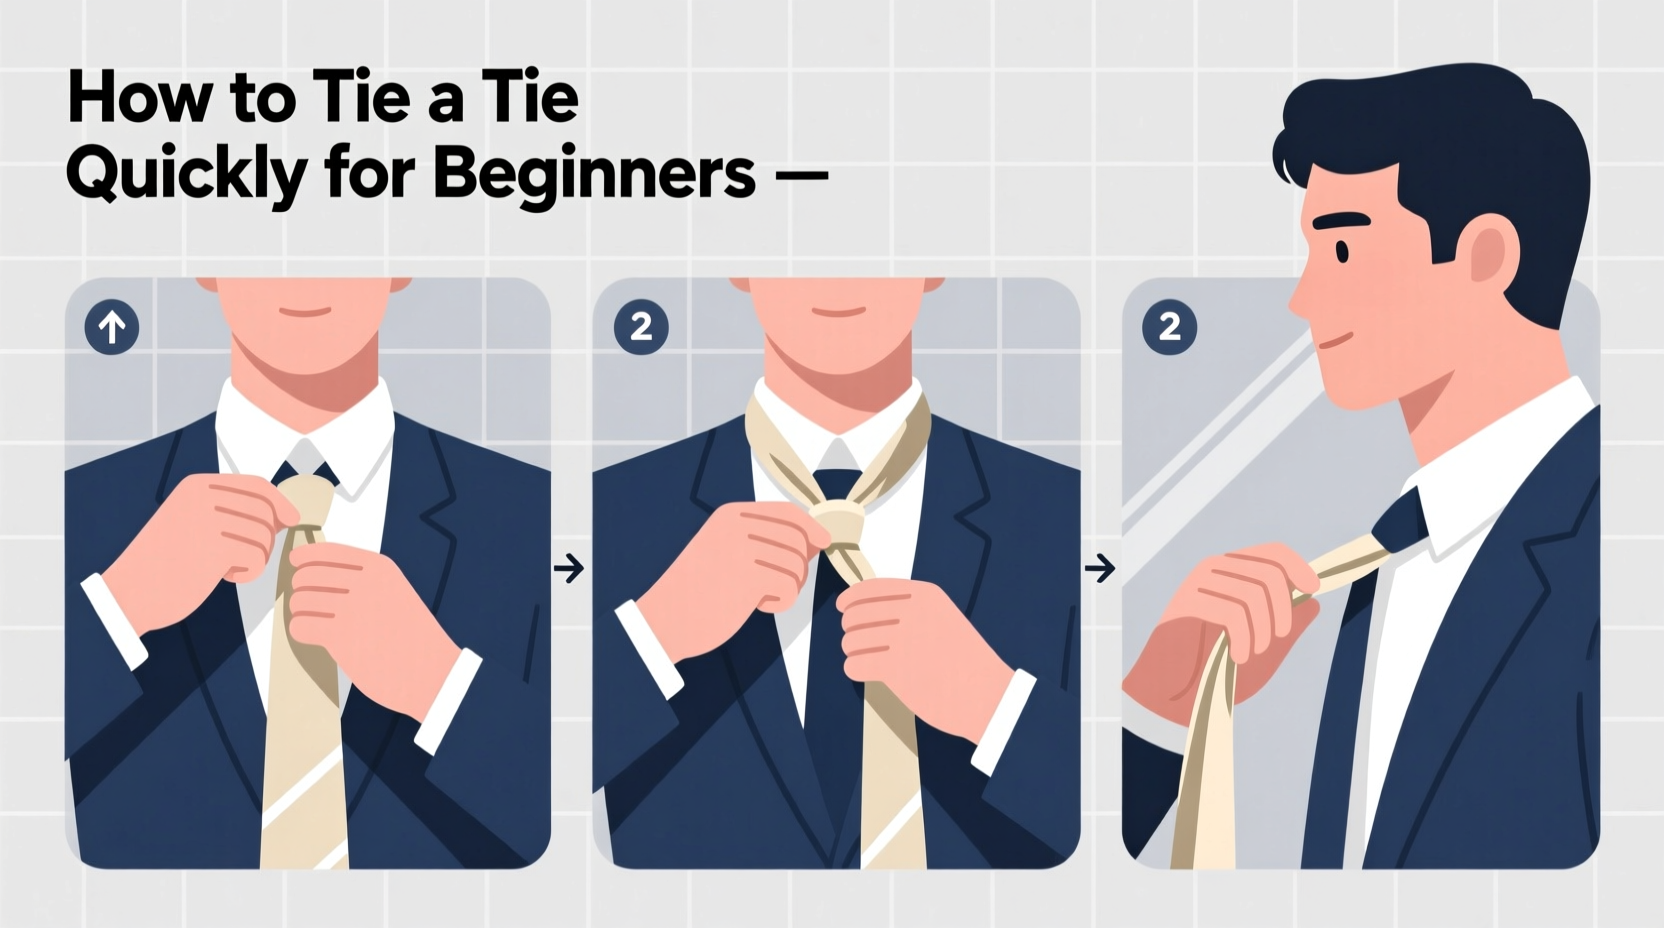
Step-by-Step Guide: Tying a Half-Windsor Without a Mirror
Follow this tactile-based sequence to tie a clean Half-Windsor blindfolded, in the dark, or during a rushed morning routine. The goal is to internalize each motion so that your hands “remember” the path.
- Start Position: Drape the tie around your neck with the seam facing inward. Let the wide end hang about 12 inches (30 cm) lower than the narrow end. Hold both ends in your right hand temporarily to adjust.
- Cross Over: Take the wide end over the narrow end, forming an “X” just below your chin. Secure the intersection between your left thumb and forefinger. This anchor point is crucial—it stays fixed throughout.
- Wrap Behind: Bring the wide end up and behind the narrow end, looping it through the neck loop from underneath. Keep tension light but firm. Your left hand still holds the knot base.
- Bring Across: Now, pull the wide end horizontally across the front of the knot, moving from right to left. It should lie flat against the emerging triangle.
- Loop Up and Through: Reach up with your right hand, grab the wide end, and pull it vertically upward through the neck loop again. Don’t tighten yet.
- Final Tuck: Guide the wide end straight down through the horizontal loop behind the knot—the one formed between the body of the tie and the front of the knot. This creates the dimple and secures the structure.
- Adjust by Feel: Gently pull the narrow end forward while holding the knot with your left hand. Slide the knot upward until snug under the collar. Run your fingers along the edges to center it.
This entire sequence takes less than 30 seconds once practiced. The real secret is consistency in starting position and finger placement. Muscle memory does the rest.
Building Confidence Without Visual Feedback
Most beginners depend on mirrors because they lack tactile trust. They worry about asymmetry, incorrect length, or a sloppy dimple. But reliance on sight slows you down and increases anxiety when no mirror is available.
To overcome this, shift your focus to physical cues:
- Length Check: When finished, the tip of the wide end should reach the center of your belt buckle. You can verify this with your hand before leaving home.
- Knot Firmness: A properly tied Half-Windsor will feel compact and triangular. If it feels loose or lopsided, untie and restart—consistency matters more than speed at first.
- Dimple Detection: Run your index finger down the center of the tie blade. You should feel a slight fold—a natural dimple formed during the final tuck.
One effective training method is to practice in complete darkness. This forces your brain to map the movements purely through sensation. After five to ten attempts, you’ll notice a dramatic improvement in accuracy and confidence.
“Confidence in tying a tie comes not from perfection, but from repetition. Do it the same way every time, and your hands will learn faster than your eyes.” — James Reed, Menswear Consultant & Tailoring Instructor
Common Mistakes and How to Avoid Them
Even with a clear method, small errors can derail the result. Here are frequent issues and their solutions—especially relevant when you can’t see what you’re doing.
| Mistake | Why It Happens | Solution |
|---|---|---|
| Knot is too loose or collapses | Insufficient tension during wrapping steps | Maintain gentle but steady pull throughout; avoid jerking motions |
| Wide end ends too short or too long | Incorrect starting length | Always begin with wide end ~12 inches below narrow end |
| Narrow end peeks out below knot | Forgetting to hide it during final tuck | Ensure only the wide end emerges at the end; tuck narrow end early if needed |
| Knot is off-center | Inconsistent hand positioning or uneven pulls | Anchor knot with left hand; pull both ends evenly during final adjustment |
| No dimple forms | Final tuck was too tight or misaligned | Create the dimple intentionally by pinching center before final tightening |
Mini Case Study: Alex’s Morning Routine Transformation
Alex, a 28-year-old project manager, used to spend seven minutes each morning wrestling with his tie—often needing to re-tie it three times. He avoided interviews and client meetings early in the day because he didn’t trust his ability to get it right without a mirror. After learning the tactile Half-Windsor method, he committed to practicing it blindfolded for five minutes each night.
Within a week, he could tie his tie correctly on the first try—while walking out the door. Two weeks later, he wore a new silk tie to a high-stakes presentation, tied it in the elevator without a mirror, and received a compliment on his polished appearance. “I didn’t even think about it,” he said. “My hands just did it.”
Checklist: Mastering Tie-Tying Without a Mirror
Use this checklist to ensure you're building the habit correctly and avoiding common pitfalls.
- ✅ Start with the wide end 12 inches below the narrow end
- ✅ Anchor the crossing point with your left hand
- ✅ Perform each wrap smoothly—no rushing
- ✅ Pull the wide end through the neck loop twice
- ✅ Tuck the wide end through the back horizontal loop
- ✅ Adjust by pulling the narrow end forward, not the wide end
- ✅ Verify length by touch: tip should hit belt center
- ✅ Practice at least 5 times daily for 3 days to build muscle memory
Frequently Asked Questions
Can I use this method with any tie length or material?
Yes, but adjust the starting position accordingly. Thicker ties (like wool) may require slightly looser tension. Extra-long ties might need you to start with the wide end only 8–10 inches below to avoid ending too long.
What if I forget a step mid-process?
It happens. If you lose track, undo the tie completely and restart. Never try to “fix” a half-formed knot. Clean slates build better habits. Over time, the sequence becomes automatic.
Is the Half-Windsor the only knot that works without a mirror?
It’s the most reliable, but the Four-in-Hand is simpler and also doable blind. However, it lacks symmetry and often looks uneven. The Pratt knot is another option, but it’s less common and harder to standardize by feel.
Conclusion: Make It Automatic, Make It Yours
Tying a tie without a mirror isn’t a party trick—it’s a practical life skill that saves time, reduces stress, and boosts confidence. Whether you’re dressing in a dimly lit hotel room, rushing out the door, or simply tired of staring at your reflection, mastering this technique puts you in control.
The method outlined here isn’t about perfection on day one. It’s about consistency, repetition, and trusting your hands. In less than a week of brief daily practice, you’ll develop a seamless routine that feels natural and looks sharp.


 浙公网安备
33010002000092号
浙公网安备
33010002000092号 浙B2-20120091-4
Comments
No comments yet. Why don't you start the discussion?