
Tying a tie is a hallmark of professional presentation, yet many people rely on mirrors to complete the task. What happens when one isn’t available? Whether you’re rushing out the door, traveling, or simply want to build confidence in your grooming routine, learning to tie a tie without a mirror is a valuable skill. With the right technique, tactile awareness, and repetition, you can master classic knots like the Four-in-Hand and Half-Windsor entirely by feel. This guide breaks down each movement into clear, actionable steps, offering practical tips, common mistakes to avoid, and real-world scenarios where this ability proves indispensable.
The Importance of Tying a Tie Without a Mirror
Dependence on a mirror creates vulnerability in situations where one isn’t accessible. Imagine boarding an early flight, preparing in a dimly lit hotel room, or helping a colleague adjust their tie backstage before a presentation. The ability to tie a knot accurately without visual feedback not only builds self-reliance but also enhances muscle memory and spatial awareness. Over time, this skill becomes second nature—like buttoning a shirt or tying shoelaces—freeing mental bandwidth for more pressing concerns.
Moreover, mastering blind knot-tying reinforces proper alignment and tension control. When you're not distracted by your reflection, you focus more intently on hand positioning, fabric glide, and symmetry through touch. This deeper engagement often results in cleaner, more consistent knots than those tied while watching every move in a mirror.
Step-by-Step Guide: Tying a Four-in-Hand Knot Blind
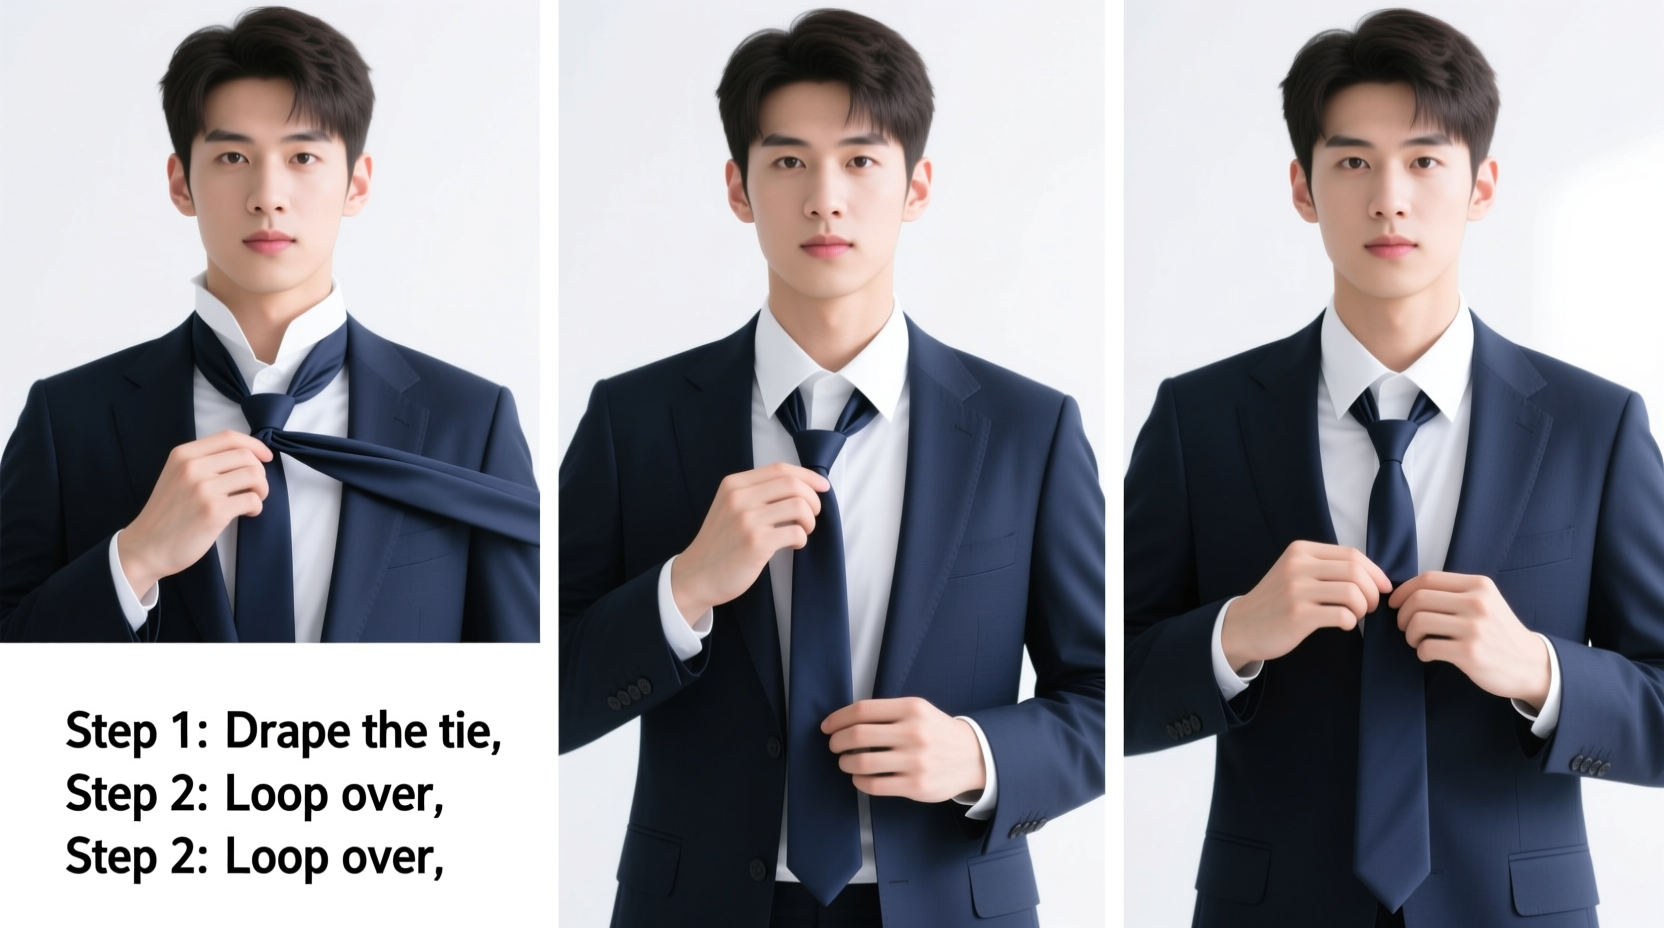
The Four-in-Hand is the most widely used tie knot due to its simplicity, asymmetry, and suitability for standard collar spreads. It’s also the easiest to learn without visual confirmation. Follow these tactile-focused steps:
- Position the tie around your neck. Drape the tie over your collar with the wide end on your right side. Adjust so the wide end hangs about 12 inches (30 cm) below the narrow end. You can estimate this by letting the wide end fall naturally and pinching it just past your belt line.
- Cross the wide end over the narrow end. Use your dominant hand to bring the wide blade across the narrow blade, forming an \"X\" just below your chin. Secure the intersection between your thumb and forefinger of your non-dominant hand.
- Loop the wide end under the narrow end. Bring the wide end beneath the narrow end and up through the neck loop behind the X. You should feel a new loop form at the base of your neck. Pull the wide end through smoothly.
- Bring the wide end over the front again. Angle it horizontally across the front of the knot from right to left. This forms the top layer of the knot.
- Pass the wide end through the neck loop a second time. Guide it down through the same neck loop you used earlier. Keep tension light to allow adjustment later.
- Slide the knot up and tighten. Hold the narrow end steady with one hand and use the other to pull the wide end downward. Simultaneously push the knot upward with your fingers until it rests snugly against your collar. Adjust tension evenly to prevent twisting.
The finished Four-in-Hand should feel compact and slightly slanted. If the tie lies flat and the dimple above the knot is pronounced, you’ve executed it correctly—all without sight.
Step-by-Step Guide: Tying a Half-Windsor Knot Without Visuals
The Half-Windsor is fuller and more symmetrical than the Four-in-Hand, ideal for spread or cutaway collars. Though slightly more complex, it’s entirely feasible to tie by touch with practice.
- Drape the tie with correct length. Place the wide end about 8–10 inches (20–25 cm) below the narrow end. This shorter starting point accommodates the bulkier knot.
- Cross the wide end over the narrow end. Form the initial X near your throat. Anchor the crossing point with your non-dominant hand.
- Bring the wide end up through the neck loop. Lift it vertically from underneath and feed it through the space behind your head. Pull it straight up and then forward over the knot area.
- Move the wide end horizontally behind the knot. Take it behind the emerging knot from left to right, wrapping it around the back. You’ll feel resistance as it tucks into position.
- Bring the wide end down through the front. Point it toward the center of your chest, aligning it vertically over the developing knot.
- Loop it through the neck loop again. Feed the wide end down through the neck loop a second time, ensuring it passes cleanly without twisting.
- Tighten gradually. Pull the wide end downward while pushing the knot upward. Apply even pressure to maintain symmetry. The Half-Windsor should feel triangular and balanced against your collar.
This knot requires more precision in hand transitions, but its structured shape provides tactile feedback—if it feels lopsided or loose, you likely missed a loop or twisted the fabric.
“Tying a tie without a mirror isn’t about memorizing steps—it’s about training your hands to recognize correct alignment through repetition.” — James Holloway, Menswear Consultant & Grooming Instructor
Common Mistakes and How to Avoid Them
Even experienced professionals make errors when relying solely on touch. Awareness of frequent pitfalls helps refine technique.
| Mistake | Why It Happens | How to Fix It |
|---|---|---|
| Knot is too loose or slips | Inadequate tension during looping | Apply consistent, moderate tension on each pass; never yank suddenly |
| Tie ends uneven | Incorrect starting length | Adjust starting position: wide end ~12” below narrow for Four-in-Hand, ~8–10” for Half-Windsor |
| Knot is crooked or twisted | Fabric rotated during threading | Ensure the wide end remains flat and faces outward throughout |
| No dimple forms | Rushed tightening or poor tension control | Pinch the fabric just below the knot as you slide it up |
| Knot too bulky or small | Wrong knot choice for tie length or thickness | Select knot based on tie material and collar height |
Real-World Scenario: The Last-Minute Presentation
Consider Daniel, a sales executive arriving at a client’s office after a red-eye flight. His hotel had no full-length mirror, and his rental car’s sun visor mirror was broken. With 15 minutes before a high-stakes pitch, he needed a sharp appearance—but couldn’t see his progress.
Instead of panicking, Daniel relied on muscle memory developed through daily blind practice. He tied a crisp Half-Windsor using only tactile cues, adjusted the dimple by feel, and confirmed symmetry by lightly running his fingers along both sides of the knot. Confident and composed, he entered the meeting looking polished. The client later remarked on his “put-together presence,” unaware that the entire process occurred without a single glance in a mirror.
This scenario underscores how preparedness translates into professionalism—even under pressure.
Checklist: Mastering Mirror-Free Tie Tying
- ✅ Choose a quiet environment for initial practice
- ✅ Use a standard-length silk tie (easier to manipulate)
- ✅ Start with the Four-in-Hand before advancing to Half-Windsor
- ✅ Perform each step slowly and deliberately
- ✅ Repeat the sequence 10 times per session for three days
- ✅ Test yourself in low-light conditions
- ✅ Verify results afterward in a mirror until confidence builds
- ✅ Focus on consistent end length and knot tightness
Frequently Asked Questions
Can I tie any knot without a mirror?
Yes, but some are easier than others. The Four-in-Hand and Half-Windsor are most practical for blind tying due to their structured sequences. The Full Windsor and Pratt knots are possible with advanced practice but require finer motor control.
How long does it take to learn this skill?
Most people achieve consistency within 3–5 practice sessions of 10–15 minutes each. Factors like prior experience, hand dexterity, and frequency of repetition influence learning speed. Daily practice accelerates mastery.
What if my tie ends up uneven?
If the ends are misaligned, untie completely and restart. Do not attempt to “fix” it by pulling one end excessively, as this distorts the knot. Instead, refine your starting length estimation through repeated trials.
Conclusion: Confidence Beyond Reflection
Tying a tie without a mirror is more than a party trick—it’s a demonstration of competence, preparation, and attention to detail. By internalizing the physical rhythm of each knot, you gain autonomy over your appearance regardless of circumstance. The techniques outlined here transform what seems like a visual task into a tactile discipline, rooted in repetition and sensory awareness.
Begin today. Spend ten minutes practicing the Four-in-Hand in the dark or with your eyes closed. Repeat until the movements flow seamlessly. In weeks, you’ll tie a perfect knot anywhere—at dawn, backstage, or en route to success—without needing to look.


 浙公网安备
33010002000092号
浙公网安备
33010002000092号 浙B2-20120091-4
Comments
No comments yet. Why don't you start the discussion?