
A stair railing is often overlooked as just a functional necessity. Yet, in many homes, it’s one of the first architectural features visitors see when entering from the entryway or ascending from the lower level. With minimal effort and basic tools, an ordinary railing can become a luminous centerpiece that enhances ambiance, improves safety, and reflects personal style. This transformation doesn’t require rewiring, professional contractors, or expensive materials. Instead, it relies on strategic lighting choices, clever placement, and attention to detail.
The key lies not in complexity, but in thoughtful execution. Whether your staircase winds through a two-story foyer or hugs a tight corner in a townhouse, integrating soft, warm light along the handrail can elevate the entire space. The glow adds depth, draws the eye upward, and creates a sense of welcome. Most importantly, it can be achieved in a weekend with tools likely already in your garage or toolbox.
Why Illuminate Your Stair Railing?
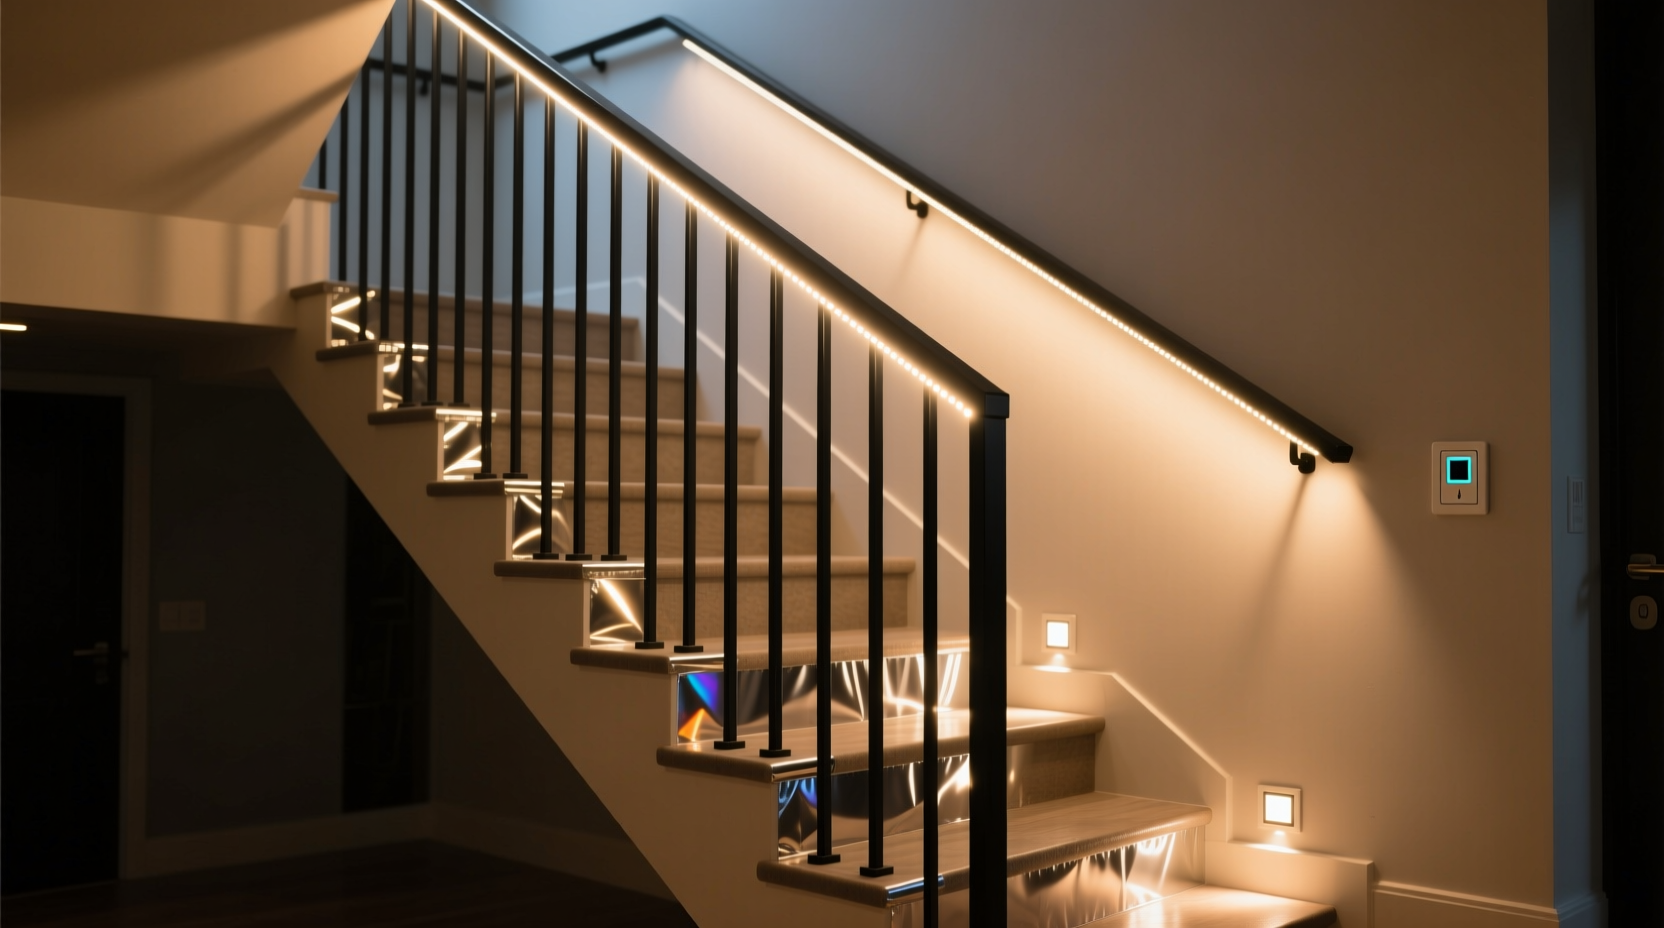
Lighting a stair railing serves more than aesthetic purposes. It combines form and function in a way few home upgrades can. Strategically placed illumination increases visibility on steps, reducing the risk of missteps in low-light conditions—especially valuable at night or for elderly household members. But beyond safety, it transforms the staircase from a transitional zone into a curated design element.
In open-concept homes, where staircases are visible from multiple rooms, a glowing railing becomes part of the interior narrative. It can echo the warmth of adjacent living areas or introduce contrast with cooler tones. Unlike overhead lighting, which casts broad shadows, rail lighting offers directional, human-scaled brightness that feels intimate and intentional.
“Architectural lighting should guide movement and emotion. A well-lit railing does both—it reassures and impresses.” — Daniel Ruiz, Residential Lighting Designer
Essential Tools and Materials (No Special Skills Needed)
The beauty of this project is its accessibility. You don’t need a degree in electrical engineering or a full workshop. Most tasks involve drilling, measuring, and securing components—skills within reach of any DIY enthusiast. Here’s what you’ll typically need:
- Measuring tape
- Level
- Drill with screwdriver bits
- Wire cutters or scissors (depending on strip type)
- Ladder or step stool
- Cable clips or adhesive mounts
- LED strip lights (preferably warm white or tunable color)
- Power supply/transformer
- Optional: remote control or smart plug for dimming
Among these, LED strips are the cornerstone. Choose high-quality, low-voltage strips with a minimum of 300 lumens per meter. Look for models labeled “cuttable every 3 LEDs” so you can customize length without damaging circuits. IP65-rated strips offer moisture resistance, useful in homes with humidity or temperature fluctuations.
Step-by-Step Installation Process
Follow this sequence to ensure clean, safe, and visually balanced results. Allow 4–6 hours for completion, depending on staircase length.
- Measure the railing length: Use a flexible tape measure along the underside or inner edge of the handrail. Note total linear feet. Add 10% extra for routing around posts or connectors.
- Plan light placement: Decide whether to mount under the rail (most common), inside balusters, or along the top edge. Underside mounting hides fixtures while casting downward ambient light onto steps.
- Cut LED strips to size: Using manufacturer guidelines, cut only at designated lines. Never slice through copper pads.
- Attach mounting clips or adhesive backing: If using self-adhesive strips, clean the surface thoroughly with isopropyl alcohol. Press firmly for 30 seconds per section. For uneven or porous wood, use plastic clips secured with small screws.
- Install power supply: Plug-in transformers are safest for beginners. Mount near an existing outlet, preferably hidden behind baseboard or furniture. Avoid daisy-chaining more than two 16-foot strips to prevent voltage drop.
- Connect and test: Link strips to power supply. Turn on to verify uniform brightness. Adjust positioning if gaps or dark spots appear.
- Conceal wires: Use raceways, paintable wire channels, or tuck cords behind trim. For a seamless look, run wiring inside hollow newel posts if accessible.
- Final inspection: Walk up and down the stairs at night. Check for glare, hotspots, or inconsistent color temperature.
For curved or spiral staircases, consider flexible neon-style LED rope lights. They bend smoothly around turns and emit even glow without visible dots. Secure with silicone-based adhesive every 6 inches to prevent sagging.
Design Considerations for Maximum Impact
A glowing railing should complement, not compete with, your home’s style. The choice of color temperature, brightness, and fixture style makes a significant difference.
Warm white (2700K–3000K) blends naturally with wood finishes and traditional interiors. Cool white (4000K+) suits modern, minimalist spaces with metal or glass railings. Tunable RGB strips allow mood-based changes—soft amber for evenings, bright white for cleaning, or festive colors during holidays.
Consider layering this lighting with other sources. Pair rail illumination with recessed ceiling lights or wall sconces to create depth. Avoid over-lighting; the railing should enhance, not dominate, the visual field.
| Lighting Type | Best For | Installation Difficulty | Cost Range (per 16 ft) |
|---|---|---|---|
| Adhesive LED Strip | Straight railings, smooth surfaces | Low | $15–$30 |
| Rigid LED Bars | Precision alignment, commercial look | Medium | $40–$70 |
| Neon Flex Rope Light | Curved stairs, retro aesthetics | Low–Medium | $25–$50 |
| Smart Wi-Fi Strip | Remote control, scheduling, voice integration | Low | $35–$60 |
When choosing brightness, aim for subtle rather than stark. The goal is gentle guidance, not runway-level illumination. Strips with diffusers produce softer edges and eliminate pixelation, giving a continuous ribbon of light.
Real-Life Example: A Mid-Century Home Upgrade
In Portland, Oregon, homeowner Maria Tran decided to refresh her 1960s split-level home. The original oak staircase felt dark and narrow, especially in winter months with limited daylight. She wanted to preserve the wood’s character while adding modern functionality.
Maria selected a 3000K adhesive LED strip with a frosted cover, cutting it into three sections to accommodate the two landings. She mounted it along the underside of the handrail, using plastic clips where the adhesive failed on textured wood. A smart plug allowed her to set automatic on/off times synced with sunset.
Within a week, guests began commenting on the “cozy elegance” of the stairs. More importantly, her mother, who visits frequently, reported feeling more confident navigating the steps at night. The total cost was under $60, and installation took less than five hours over a Saturday morning.
This case illustrates how minimal intervention can yield maximum impact—especially in homes where architecture and aging residents intersect.
Common Pitfalls and How to Avoid Them
Even simple projects can go awry without planning. These mistakes are frequent but easily preventable:
- Voltage drop: Long runs of LED strips lose brightness at the far end. Prevent this by powering from both ends or using amplified segments every 16 feet.
- Peeling adhesive: Dust, oil, or temperature swings weaken bond strength. Clean surface with alcohol, let dry, and apply firm pressure during installation.
- Visible dots: Cheap strips show individual LEDs. Use a diffuser channel or choose strips rated “high-density” (60 LEDs per meter).
- Overcomplication: Avoid complex wiring or hardwiring unless licensed. Stick to plug-in systems for safety and flexibility.
Also, resist the urge to install lights too close to the edge. Position them centered under the rail so glow wraps evenly around the balusters. Misalignment creates uneven shadows and diminishes the floating effect.
Frequently Asked Questions
Can I install rail lighting on a rented property?
Yes. Use removable adhesive strips and cord covers instead of permanent fixtures. Most LED kits can be detached without damage, leaving only minor residue. Always check with your landlord before modifying any structure.
Are LED strips safe near wooden railings?
Low-voltage LED strips generate minimal heat and are generally safe. Ensure proper ventilation and avoid covering them with insulation or fabric. Use UL-listed products to meet safety standards.
How do I maintain illuminated railings?
Dust accumulation can dull brightness. Wipe strips gently every 3–6 months with a dry microfiber cloth. Avoid liquids unless the strip is fully sealed (IP67+). Replace any flickering sections promptly to prevent circuit strain.
Checklist: From Planning to Completion
Use this checklist to stay organized and ensure no step is missed:
- ☐ Measure total railing length
- ☐ Choose LED type (strip, rope, bar) and color temperature
- ☐ Confirm power source location and outlet access
- ☐ Purchase all materials including clips, transformer, and wire covers
- ☐ Clean railing surface thoroughly
- ☐ Test LED strip before permanent attachment
- ☐ Install mounting hardware or apply adhesive
- ☐ Attach and connect LED sections
- ☐ Route and conceal power cord
- ☐ Test final setup in low light
- ☐ Schedule automation (if using smart controls)
- ☐ Perform monthly visual checks for wear or flickering
Conclusion: Light as Design, Safety, and Soul
Transforming a plain stair railing into a glowing feature isn’t about extravagance—it’s about intention. It’s recognizing that everyday elements deserve thoughtful attention. With a few meters of LED strip and a few hours of focused work, you can redefine how a space feels, moves, and welcomes people.
This upgrade costs less than a weekend dinner out, yet its effects linger daily. It’s practical for nighttime navigation, emotional in its warmth, and expressive of personal taste. And because it’s modular and reversible, there’s little risk—only reward.


 浙公网安备
33010002000092号
浙公网安备
33010002000092号 浙B2-20120091-4
Comments
No comments yet. Why don't you start the discussion?