
Trimming your cat’s claws is an essential part of responsible pet care. Overgrown nails can snag on furniture, cause discomfort during walking, or lead to painful ingrown claws. Yet, many cat owners avoid this task—not because they don’t want to help their pets, but because the process often ends in scratches, hisses, and mutual frustration.
The truth is, with the right tools, timing, and technique, you can trim your cat’s claws calmly and confidently. This guide walks you through every step of the process, from choosing the best clippers to handling even the most resistant feline. The goal isn’t just to cut nails—it’s to build trust, reduce stress, and keep both you and your cat safe.
Why Trimming Your Cat’s Claws Matters
Cats naturally shed the outer layers of their claws by scratching, but indoor cats often don’t get enough wear on their nails. Without regular trimming, claws can grow too long, curl into the paw pads, or become brittle and prone to splitting. Older cats, in particular, may struggle to maintain their claws due to reduced mobility or arthritis.
Regular nail maintenance also protects your furniture, clothing, and skin. While declawing is widely discouraged—and illegal in many countries—routine trims are a humane and effective alternative.
“Routine nail trims prevent pain, infection, and mobility issues in cats. It’s one of the simplest ways owners can support their pet’s long-term health.” — Dr. Lena Patel, DVM, Feline Wellness Specialist
Essential Tools and Supplies
Before attempting a trim, gather everything you’ll need. Being unprepared increases stress and raises the risk of injury. Here’s what belongs in your feline first-aid kit:
- Nail clippers: Choose between guillotine-style or scissor-style clippers designed specifically for cats. Scissor models offer better control and are easier on arthritic hands.
- Styptic powder: A must-have for stopping bleeding if you accidentally cut the quick (the pink vein inside the claw). Cornstarch can work in a pinch.
- Treats: High-value rewards like freeze-dried chicken or tuna flakes help create positive associations.
- Soft towel or blanket: Useful for gently wrapping an anxious cat (a “purrito” wrap) to limit movement.
- Flashlight (optional): For cats with dark claws where the quick isn’t visible.
| Tool | Recommended Type | Avoid |
|---|---|---|
| Clippers | Scissor-style or small guillotine | Human nail clippers, dog clippers (too large) |
| Styptic Agent | Commercial styptic powder or cornstarch | Hydrogen peroxide (irritating to tissue) |
| Restraint | Light towel wrap or helper’s hand | Excessive force or squeezing |
Step-by-Step Guide to Safe Claw Trimming
Success lies in patience and precision. Follow this timeline-based approach to minimize resistance and maximize safety.
- Choose the right time. Wait until your cat is relaxed—after a nap, meal, or play session. Never attempt a trim when your cat is alert or agitated.
- Handle the paws daily. For several days before trimming, gently press each toe to expose the claw. Reward calm behavior with treats. This desensitizes your cat to the sensation.
- Test one claw. In your first real session, trim only one nail. Praise and reward immediately. If your cat pulls away, stop and try again later.
- Position correctly. Sit with your cat on your lap or beside you. Use one hand to gently squeeze the toe pad, extending the claw. Hold the foot firmly but gently.
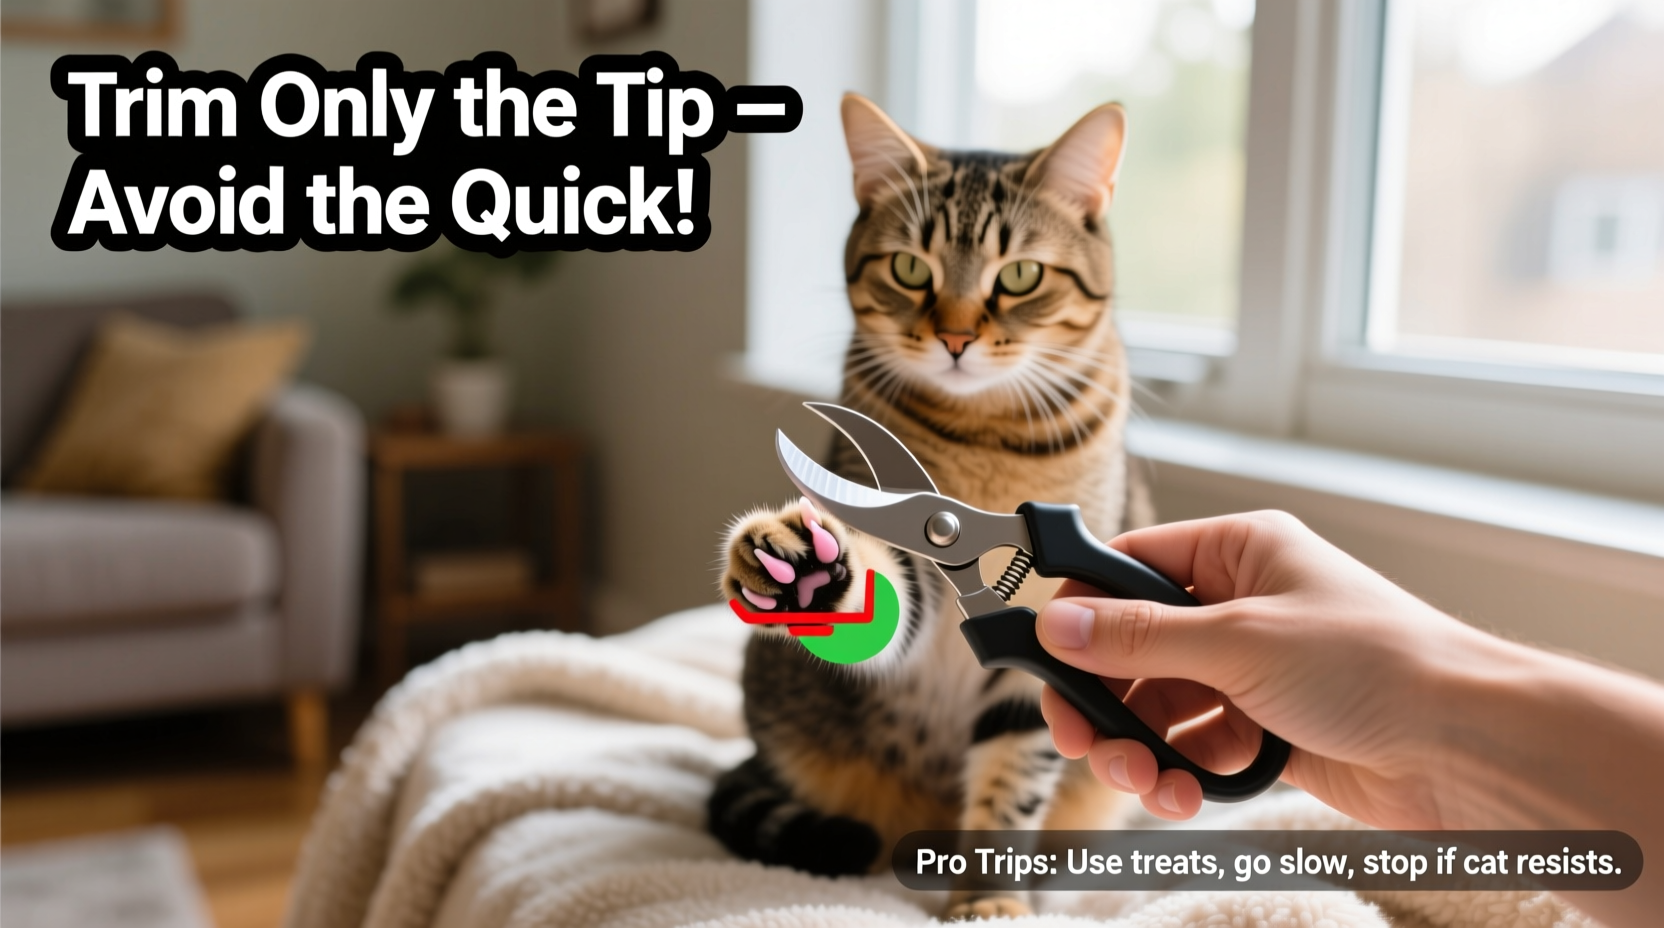
- Identify the quick. In light-colored claws, the quick appears as a pinkish core. Avoid cutting within 2 mm of it. For black claws, make tiny cuts and look for a small dark circle in the center—this signals you’re near the quick.
- Cut at a 45-degree angle. Clip just the sharp tip. Use a clean, single motion. Dull blades can crush rather than cut, causing discomfort.
- Repeat slowly. Trim two to three claws per session if needed. You don’t have to finish all four paws at once.
- Apply styptic powder if needed. If you nick the quick, dab the tip with styptic powder. Hold gentle pressure for 30 seconds. The bleeding usually stops quickly.
- Reward generously. Offer treats, affection, or playtime after each completed paw.
Real Example: From Fearful to Cooperative
Sarah adopted a two-year-old rescue cat named Milo who flinched at any touch near his paws. After consulting her vet, she began a two-week prep phase: touching his legs, then his toes, always followed by a treat. She used a soft towel to gently restrain him during the first attempt, trimming just one claw on a back paw. Milo squirmed but didn’t scratch.
Over the next month, Sarah increased exposure gradually. By week six, Milo would sit on her lap while she trimmed two claws at a time. Now, every three weeks, he tolerates a full trim—sometimes even falling asleep mid-session. The key wasn’t speed; it was consistency and respect for Milo’s boundaries.
Common Mistakes and How to Avoid Them
Even well-meaning owners make errors that turn nail trims into traumatic events. Recognizing these pitfalls can save you—and your cat—unnecessary stress.
- Mistake: Rushing the process. Trying to trim all claws in one sitting often leads to panic. Instead, spread the task over multiple short sessions.
- Mistake: Cutting too close. Bleeding scares both cat and owner. When in doubt, clip less. You can always trim again in a few days.
- Mistake: Holding too tightly. Excessive restraint triggers defensive reactions. Use just enough pressure to extend the claw without pinching.
- Mistake: Skipping desensitization. Jumping straight to clipping without prior handling sets the stage for failure. Build trust first.
- Mistake: Using dull tools. Blunt clippers require more force and can split the nail. Sharpen or replace them every 6–12 months.
“Cats respond to calm energy. If you’re tense, they’ll be tense. Breathe deeply, move slowly, and let your cat set the pace.” — Rachel Kim, Certified Feline Behavior Consultant
Checklist: Preparing for a Stress-Free Nail Trim
Use this checklist before each session to ensure you’re fully prepared:
- ✅ Clippers are clean and sharp
- ✅ Styptic powder and cotton swabs are within reach
- ✅ Cat is calm (not playing, eating, or sleeping)
- ✅ Treats are ready and highly appealing
- ✅ Distractions are minimized (no loud noises, other pets, or children nearby)
- ✅ Towel or helper is available if needed
- ✅ You have at least 10 minutes of uninterrupted time
Frequently Asked Questions
How often should I trim my cat’s claws?
Most cats need trimming every 2 to 3 weeks. Active scratchers may require less frequent attention, while older or indoor-only cats often need more regular care. Check weekly by gently pressing the toes—if the claws extend past the fur or click on hard floors, it’s time to trim.
What if my cat absolutely refuses?
If your cat won’t tolerate handling, consider alternatives: use soft plastic nail caps (like Soft Paws), increase scratching opportunities with posts, or consult a professional groomer or veterinarian. Forcing the issue damages trust and can lead to aggression.
Can I trim my cat’s rear claws too?
Yes. Rear claws do wear down less than front ones, especially in sedentary cats. They should be trimmed using the same method, though many cats are more sensitive about their back feet. Proceed slowly and offer extra rewards.
Conclusion: Turning Struggle into Success
Trimming your cat’s claws doesn’t have to end in scratches and regret. With preparation, empathy, and a steady hand, you can transform a dreaded chore into a bonding ritual. The secret isn’t strength—it’s patience. Every small step you take builds your cat’s confidence and your own skill.
Start today: pick up the clippers, offer a treat, and gently touch a paw. That simple gesture is the foundation of a safer, more comfortable life for your cat. And when you finally trim that first claw without a single scratch? You’ll know you’ve earned a badge of honor in the quiet, rewarding world of responsible pet care.


 浙公网安备
33010002000092号
浙公网安备
33010002000092号 浙B2-20120091-4
Comments
No comments yet. Why don't you start the discussion?