
Birds in captivity often don’t get the natural wear on their nails that wild birds do from climbing, perching, and foraging. As a result, their nails can grow too long, leading to discomfort, difficulty gripping perches, or even getting caught in fabric and cage accessories. While regular veterinary visits are ideal, many bird owners choose to trim their bird’s nails at home to maintain comfort and prevent complications. When done correctly, this task is safe and manageable. However, improper technique can lead to bleeding, pain, or stress for your bird. This guide provides a thorough, practical approach to trimming bird nails at home—ensuring safety, minimizing stress, and promoting long-term foot health.
Understanding Bird Nail Anatomy
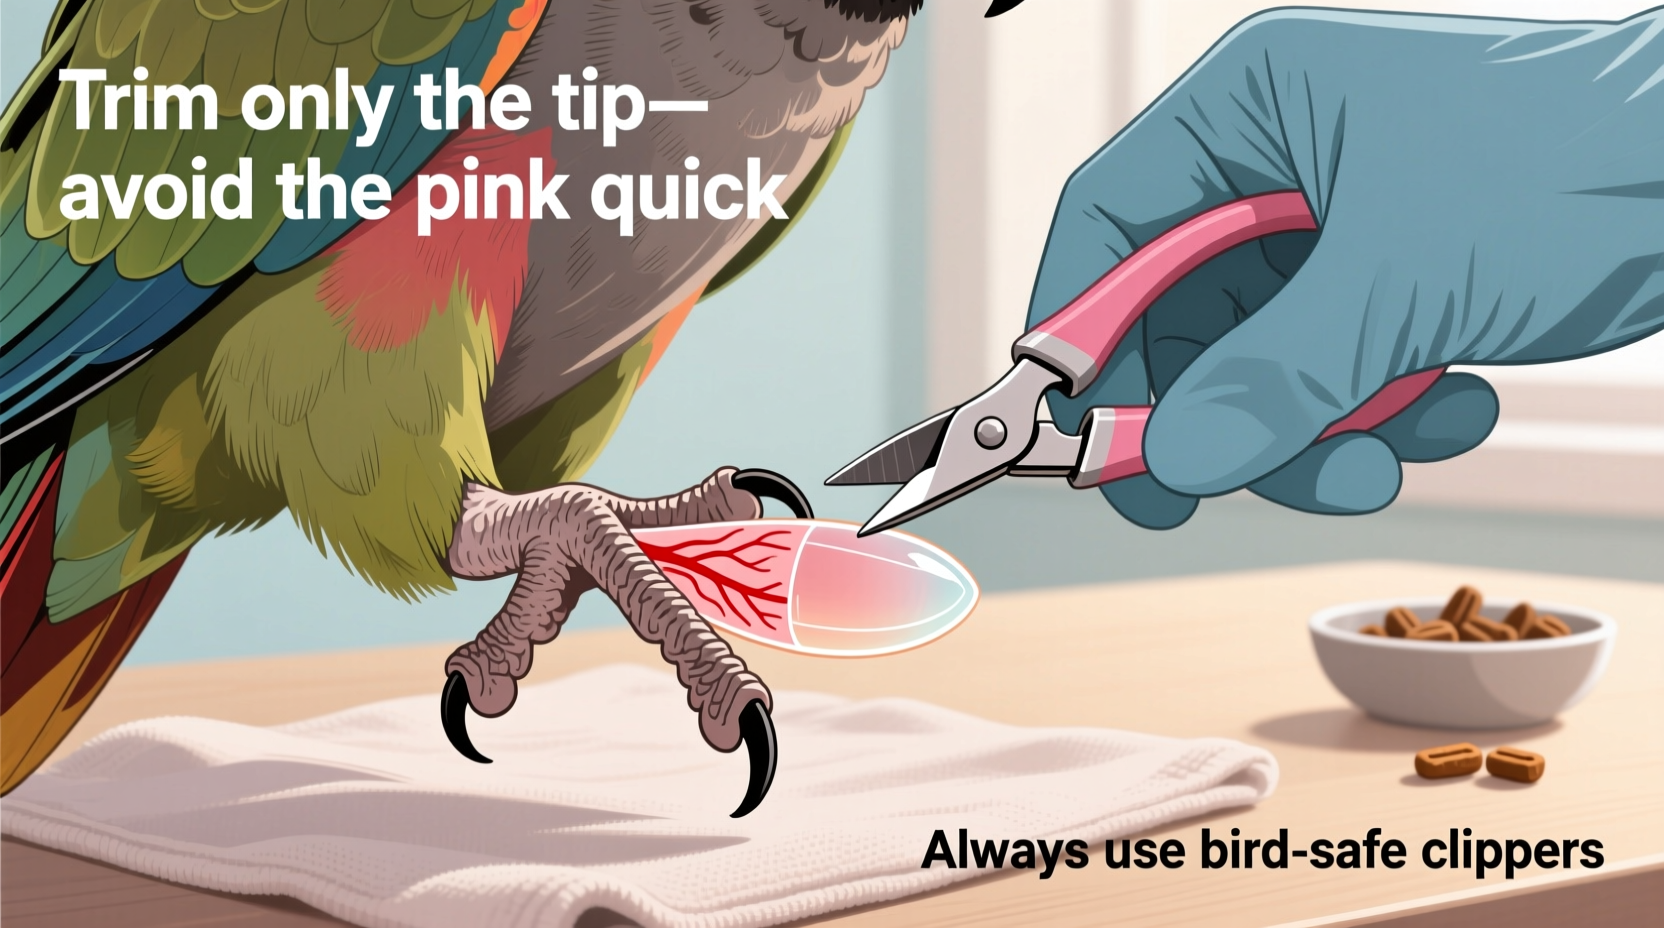
Bird nails, like human fingernails, are made of keratin. But unlike our nails, bird claws contain a blood vessel and nerve supply called the “quick.” This sensitive core runs through the center of the nail and must be avoided during trimming. Cutting into the quick causes pain and bleeding, which can distress both the bird and owner.
In light-colored nails, the quick appears as a pinkish streak extending from the base toward the tip. In dark or black nails, the quick isn’t visible, making trimming more challenging. For these cases, small, incremental cuts are essential to avoid injury.
It's important to note that overgrown nails not only affect mobility but can also alter a bird’s posture and gait, potentially leading to joint strain or pressure sores on the feet. Regular inspection—once every 2–4 weeks—is recommended to determine when trimming is necessary.
“Birds rely heavily on their feet for balance, feeding, and interaction. Maintaining proper nail length supports overall musculoskeletal health.” — Dr. Lena Torres, Avian Veterinarian
Essential Tools and Preparation
Before attempting to trim your bird’s nails, gather the right tools. Using inappropriate clippers or lacking emergency supplies increases the risk of complications.
Here’s what you’ll need:
- Small animal or bird nail clippers: Guillotine-style or scissor-style clippers designed for small pets work best. Human nail clippers may crush rather than cut cleanly.
- Styptic powder or cornstarch: Essential for stopping bleeding if the quick is accidentally cut. Keep it within immediate reach.
- A towel (optional): Useful for gently restraining larger or more active birds.
- A well-lit workspace: Natural daylight or bright LED lighting helps identify the quick in translucent nails.
- Treats: Positive reinforcement reduces stress and encourages cooperation.
Never use human toenail clippers unless they’re specifically suitable for small animals. Dull blades can cause splitting or crushing, increasing the chance of infection.
Step-by-Step Guide to Safe Nail Trimming
Trimming bird nails requires patience, precision, and calmness. Follow this sequence to minimize risk and ensure a smooth process.
- Choose a quiet time: Pick a moment when your bird is relaxed—usually mid-morning after breakfast and preening.
- Restrain gently: Hold your bird securely but comfortably. For smaller birds (like budgies or cockatiels), cup your hands around them with one hand supporting the body and the other free to handle the feet. For larger birds, use a light towel to wrap the body while leaving one leg exposed at a time.
- Inspect each nail: Examine the length and look for the quick. In light nails, avoid cutting within 2–3 mm of the pink zone. For dark nails, make tiny diagonal cuts—about 1/16th of an inch at a time—and watch for a small dark dot in the center of the cut surface. That’s the beginning of the quick; stop immediately.
- Cut at a 45-degree angle: This mimics the natural curve of the claw and prevents sharp points that could snag.
- Trim one nail at a time: Focus on front toes first, then the back (hind) toe. Most birds have three front toes and one rear-facing toe.
- Reward after each step: Offer a treat or verbal praise after trimming a few nails to build positive association.
- Check for bleeding: If a nail bleeds, apply styptic powder or cornstarch with firm but gentle pressure for 30–60 seconds. Avoid panicking—birds can lose small amounts of blood without serious harm, but clotting should be swift.
- Release and soothe: Once finished, return your bird to its cage and offer water and a favorite snack.
Do not attempt to trim all nails in one session if your bird becomes agitated. It’s better to complete two nails today and the rest in a few days than to force the process and create fear.
Common Mistakes and How to Avoid Them
Even experienced bird owners can make errors when trimming nails. Awareness of common pitfalls improves safety and outcomes.
| Mistake | Why It’s Risky | How to Avoid |
|---|---|---|
| Cutting too close to the quick | Causes pain, bleeding, and potential infection | Leave at least 2–3 mm margin; use magnification if needed |
| Using dull or incorrect clippers | Crushes the nail instead of cutting cleanly | Use sharp, appropriately sized pet nail clippers |
| Trimming during stressful times | Bird resists, increasing risk of injury | Pick a calm moment; acclimate bird gradually |
| Ignoring signs of distress | Leads to fear of future handling | Pause or stop if bird struggles excessively |
| Not having styptic powder ready | Delays clotting, increases stress | Always prepare emergency supplies beforehand |
Real-Life Example: Trimming a Nervous Cockatiel
Sarah adopted a rescue cockatiel named Milo who had severely overgrown nails due to lack of maintenance. His nails curled under, making perching difficult. Sarah consulted her avian vet, who demonstrated a safe trim and advised starting slowly.
For the first week, Sarah simply held Milo’s feet for a few seconds each day, offering millet sprays as rewards. By week two, she introduced the clippers—showing them, letting him touch them, and clicking them near him without use. On day 18, she trimmed just one front nail. Milo stayed calm, received a treat, and showed no signs of fear.
Over the next 10 days, she completed the remaining nails in pairs. She used a flashlight to check each translucent nail and stopped well short of the pink zone. When one nail bled slightly, she applied cornstarch quickly and calmly. Within three weeks, Milo was perching normally again—and didn’t resist handling.
This gradual, trust-based approach prevented trauma and built a cooperative relationship. Now, Milo allows full nail checks monthly with minimal restraint.
When to Seek Professional Help
While home trimming is feasible for many owners, some situations require professional intervention:
- Severely overgrown or curled nails: These may have altered the quick’s position, requiring careful filing or staged trimming by a vet.
- Birds with health issues: Arthritis, infections, or poor circulation increase risks.
- First-time owners: Observing a veterinarian perform the procedure builds confidence.
- Aggressive or fearful birds: Sedation or specialized handling may be needed.
Veterinarians can also use motorized dremel tools to file nails down gradually, reducing the risk of cutting the quick. This method is especially useful for large parrots with thick, dark nails.
Frequently Asked Questions
How often should I trim my bird’s nails?
Nail growth varies by species, age, diet, and perch variety. Most birds need trimming every 4–8 weeks. Inspect weekly and act when nails extend noticeably beyond the toe pad or start hooking.
Can I file instead of clip the nails?
Yes. A fine-grit emery board or rotary tool (like a Dremel) can safely file down nails. Filing avoids the risk of cutting the quick but takes longer. Always keep the tool cool and moving to prevent heat buildup.
What if I accidentally cut the quick?
Stay calm. Apply styptic powder or cornstarch with firm pressure for 30–60 seconds. Most minor bleeds stop quickly. Comfort your bird with soothing words and a treat. If bleeding persists beyond 5 minutes, contact your avian vet.
Final Checklist Before You Begin
Use this checklist to ensure you’re fully prepared before starting:
- ✅ Bird is calm and healthy (not molting or stressed)
- ✅ Clippers are clean, sharp, and appropriate for size
- ✅ Styptic powder or cornstarch is within arm’s reach
- ✅ Workspace is well-lit and distraction-free
- ✅ Treats are ready for positive reinforcement
- ✅ One person is dedicated to holding the bird (if assistance is needed)
- ✅ Emergency vet contact information is accessible
Conclusion: Confidence Through Care
Trimming your bird’s nails at home is a skill that grows with practice and patience. With the right tools, understanding of anatomy, and a calm approach, you can maintain your bird’s foot health safely and effectively. Remember, the goal isn’t perfection on the first try—it’s progress through consistent, gentle care. Each successful session strengthens the bond between you and your bird, turning a potentially stressful task into a routine act of love.


 浙公网安备
33010002000092号
浙公网安备
33010002000092号 浙B2-20120091-4
Comments
No comments yet. Why don't you start the discussion?