
Trimming your own bangs might seem like a quick fix between salon visits, but one wrong snip can turn a simple refresh into weeks of awkward growing-out. Yet, with the right tools, technique, and patience, it’s entirely possible to maintain your fringe at home—without regretting it later. Whether you have straight, wispy, or side-swept bangs, this guide walks you through every step to ensure precision, symmetry, and confidence.
Why DIY Bang Trimming Is Risky (And How to Minimize It)
Bangs are among the most expressive parts of a hairstyle—they frame the face, influence perceived hair volume, and dramatically alter appearance. Because they’re front and center, even minor unevenness is immediately noticeable. Most at-home trimming disasters happen due to poor lighting, dull tools, rushing the process, or failing to section hair properly.
The key isn’t avoiding DIY cuts altogether—it’s approaching them with strategy. Professionals don’t rely on instinct alone; they use structure, tension, and controlled cutting angles. You can replicate that success by slowing down and following a methodical routine.
“Bangs grow faster than the rest of your hair because they’re shorter and under less tension. That means you’ll likely need touch-ups every 2–3 weeks—but always err on the side of caution: cut less now, more later.” — Dana Reyes, Master Stylist & Educator at L’Oréal Professionnel
Essential Tools for a Clean, Precise Cut
Using the right equipment is non-negotiable. Regular household scissors will crush hair ends, leading to split ends and jagged lines. Invest in a few basic salon-grade tools to make a significant difference in results.
| Tool | Purpose | Recommended Type |
|---|---|---|
| Professional Hair Scissors | Clean, sharp cuts without splitting ends | 7–8 inch straight shears, sharpened regularly |
| Thinning Shears | Blend harsh lines and reduce bulk | With 5–7 teeth for subtle texturizing |
| Fine-Tooth Comb | Precise parting and detangling | Metal-tined for accuracy |
| Clips or Sectioning Clips | Isolate bangs from the rest of the hair | Alligator clips or duckbill clamps |
| Mirror (Dual Setup) | Check front and back views simultaneously | Wall mirror + handheld mirror |
| Spray Bottle | Dampen hair for better control | Filled with water only |
Before starting, clean and dry your tools. A quick wipe with rubbing alcohol removes residue and prevents slippage during cutting.
Step-by-Step Guide to Trimming Your Bangs Safely
Follow this detailed timeline to minimize risk and maximize symmetry. Allow 20–30 minutes so you’re not rushed.
- Wash and dry your hair as usual. Trim your bangs when they’re in their natural state—whether air-dried or styled with heat. Avoid cutting soaking wet hair unless you normally wear your bangs straightened, as shrinkage upon drying can result in unexpectedly short lengths.
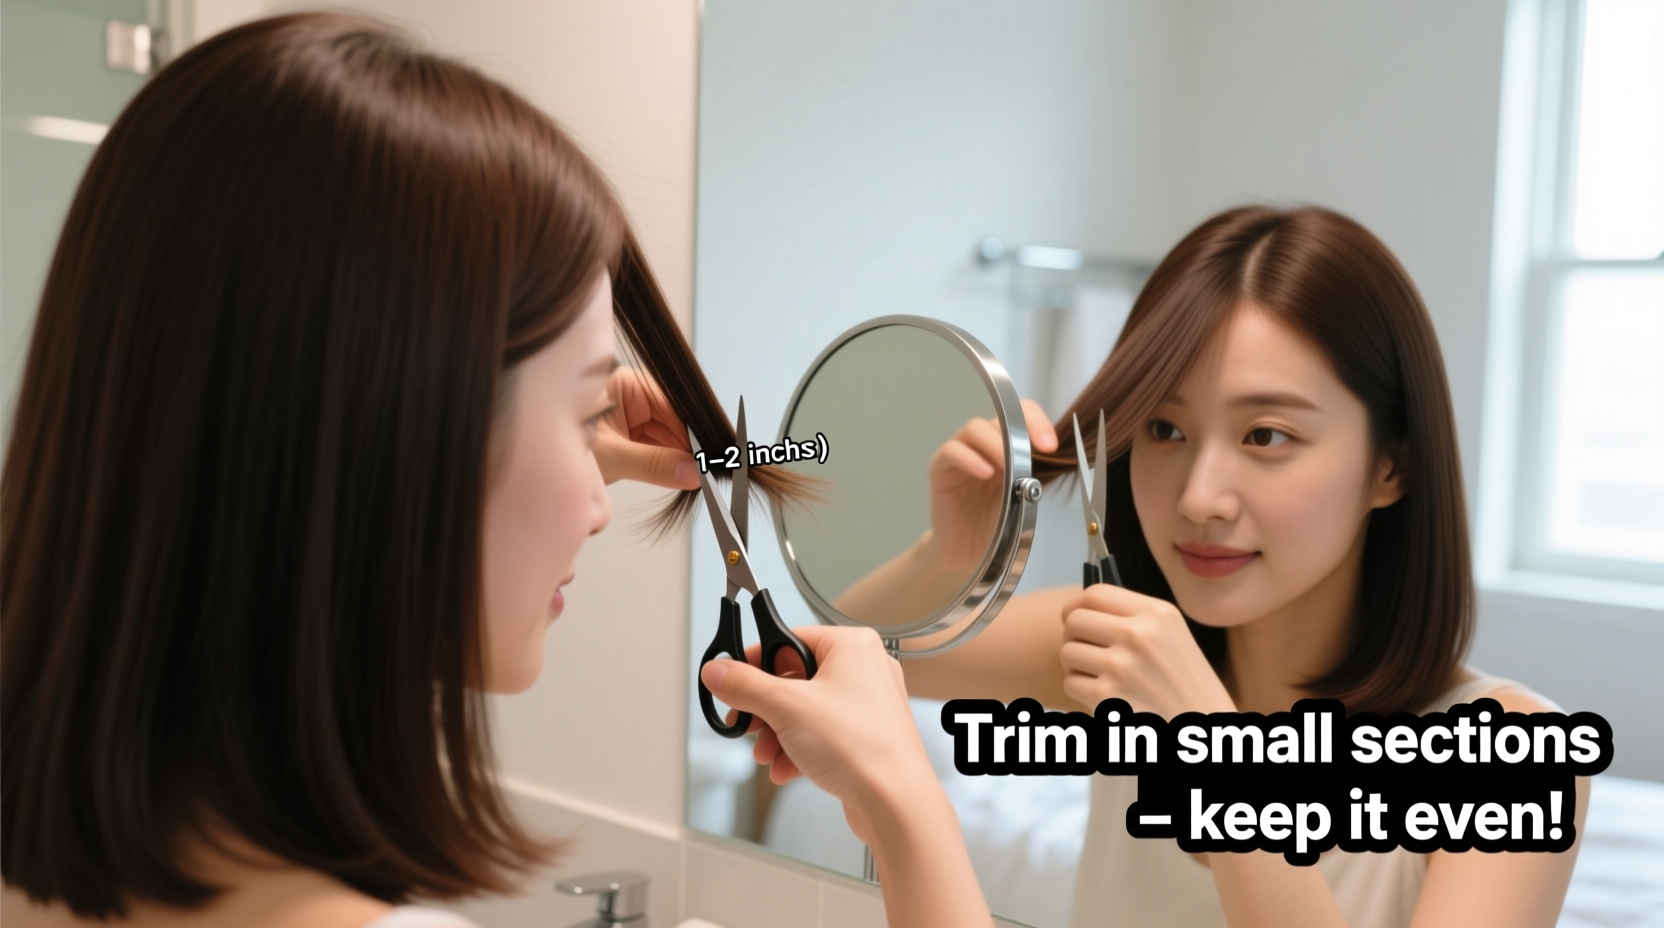
- Section off your bangs. Use a fine-tooth comb to part your hair where your bangs naturally fall. Draw a clean line from temple to temple across your forehead. Clip away the sides and back securely. Only the triangular section of hair from your hairline forward should remain loose.
- Determine your desired length. Hold your bangs straight up from the root and let them fall naturally. Mark the target length by gently pinching the ends between your fingers just below where you want to cut. For safety, leave at least ½ inch longer than your goal—you can always trim more later.
- Begin cutting vertically. Hold the hair taut between your index and middle fingers. Position scissors pointing downward and cut upward in small vertical snips, rather than slicing horizontally across. This technique creates soft, layered ends and reduces the risk of blunt, choppy lines.
- Check symmetry frequently. Lower your hands and look in the mirror. Turn your head side to side. Compare both temples. If one side appears longer, re-clamp the other sections and carefully trim the longer side—not both—to correct imbalance.
- Texturize the edges. Once the base length is even, use thinning shears or point-cutting with regular shears to soften the bottom edge. This prevents a heavy, blunt look and helps the bangs blend seamlessly into the rest of your hair.
- Style and evaluate. Blow-dry or flat-iron your bangs as you normally would. Wet hair lies differently than styled hair. If needed, make micro-adjustments once fully dry—but only remove tiny amounts at a time.
Common Mistakes That Lead to Disaster—and How to Avoid Them
Even experienced DIYers make errors. Awareness is the first step toward prevention.
- Cutting too much at once. The most frequent error. Hair grows slowly, but it doesn’t grow back instantly. When in doubt, leave it long.
- Using dull scissors. Dull blades tug and crush hair, causing split ends that worsen within days. Sharpen shears every 3–6 months.
- Ignoring face shape. Round faces benefit from longer, side-swept bangs; square jaws suit soft, arched fringes. Cutting straight-across bangs on a round face can emphasize width.
- Skipping sectioning. Failing to clip back surrounding hair leads to accidental over-thinning or uneven blending.
- Trimming while distracted. Don’t multitask. One slip while texting or watching TV can mean an asymmetrical line.
“I had a client who trimmed her bangs after yoga class—hair was damp, lighting was dim, and she didn’t use clips. She ended up with a diagonal fringe that took six weeks to fix. Always prepare like it’s a salon appointment—even if you’re in pajamas.” — Marcus Tran, Celebrity Hairstylist
Real Example: Recovering From a DIY Bang Mishap
Lena, a graphic designer in Portland, decided to trim her curtain bangs after noticing they’d grown past her cheekbones. She used kitchen scissors and cut while looking down into her bathroom sink. The result? One side reached her jawline; the other stopped at her nose.
Instead of panicking, she followed damage-control steps: she pinned back the shorter side, blow-dried the longer side to stretch it slightly, and booked a stylist appointment within two days. Her stylist blended the disparity by texturizing both sides and recommending biweekly micro-trims. Lena now keeps professional shears in her vanity and only trims in 10-minute sessions with full focus.
Her takeaway: “It’s not about perfection. It’s about learning what works for your hair type and face shape—and respecting the process.”
Do’s and Don’ts: Quick Reference Table
| Do’s | Don’ts |
|---|---|
| Trim every 2–3 weeks for maintenance | Wait until bangs are overly long before cutting |
| Use sharp, dedicated hair scissors | Use dull or multipurpose scissors |
| Cut in natural light with dual mirrors | Cut in dim or yellow-toned lighting |
| Start long and gradually shorten | Try to fix a mistake by cutting more immediately |
| Point-cut for softer ends | Slice horizontally like paper |
| Style hair before final evaluation | Assess results on wet, unstyled hair only |
FAQ: Your Top Bang-Trimming Questions Answered
Can I trim curly bangs at home?
Yes, but with extra caution. Curly hair shrinks significantly when dry. Cut curly bangs 20–30% longer than desired, and style them completely before assessing length. Avoid over-thinning, as curls rely on density for bounce.
How do I fix split or jagged bangs?
If ends are frayed but length is acceptable, schedule a professional trim as soon as possible. At home, apply a lightweight serum to smooth appearance temporarily. Never attempt to “clean up” split ends with dull scissors—that worsens the damage.
What if my bangs are already too short?
Work with what you have. Side-sweep them using a styling product and volumizing spray. Pin them back creatively with clips or barrettes. Grow-out typically takes 4–8 weeks, depending on genetics. In the meantime, embrace temporary styles that keep them out of your face.
Final Checklist Before You Cut
- ☑ Wash and dry hair in its usual style
- ☑ Gather professional scissors, comb, clips, and mirrors
- ☑ Ensure bright, natural lighting
- ☑ Section bangs cleanly from the rest of the hair
- ☑ Determine desired length and leave room for adjustment
- ☑ Cut vertically in small snips, not horizontal slices
- ☑ Check symmetry from multiple angles
- ☑ Style hair completely before final judgment
- ☑ Store tools properly after use
- ☑ Schedule next trim in 2–3 weeks if needed
Conclusion: Confidence Starts With Careful Cuts
Trimming your own bangs doesn’t have to end in regret. With preparation, the right tools, and a disciplined approach, you can maintain your fringe between salon visits and even develop a reliable personal technique. Remember: precision beats speed, and patience pays off in symmetry. Every great haircut begins with a single careful snip—make yours count.


 浙公网安备
33010002000092号
浙公网安备
33010002000092号 浙B2-20120091-4
Comments
No comments yet. Why don't you start the discussion?