
Christmas lights are the quiet architects of holiday warmth—the soft glow in the window, the rhythmic pulse on the tree, the subtle shimmer across the porch railing. When part of that strand goes dark, it’s rarely just an inconvenience. It’s a disruption of ritual, a small fracture in seasonal rhythm. Yet most people reach for the replacement box before they even inspect the first bulb. That reflex costs time, money, and unnecessary waste. Modern light strands—especially those with 50 or 100 bulbs—are engineered as integrated circuits, not simple series strings. A single faulty bulb, loose connection, or degraded shunt can isolate an entire segment. The good news? With methodical observation and basic tools, over 85% of “dead section” issues are resolvable at home—no soldering iron required, no electrical degree needed.
Understanding Why Sections Fail (Not Just Bulbs)
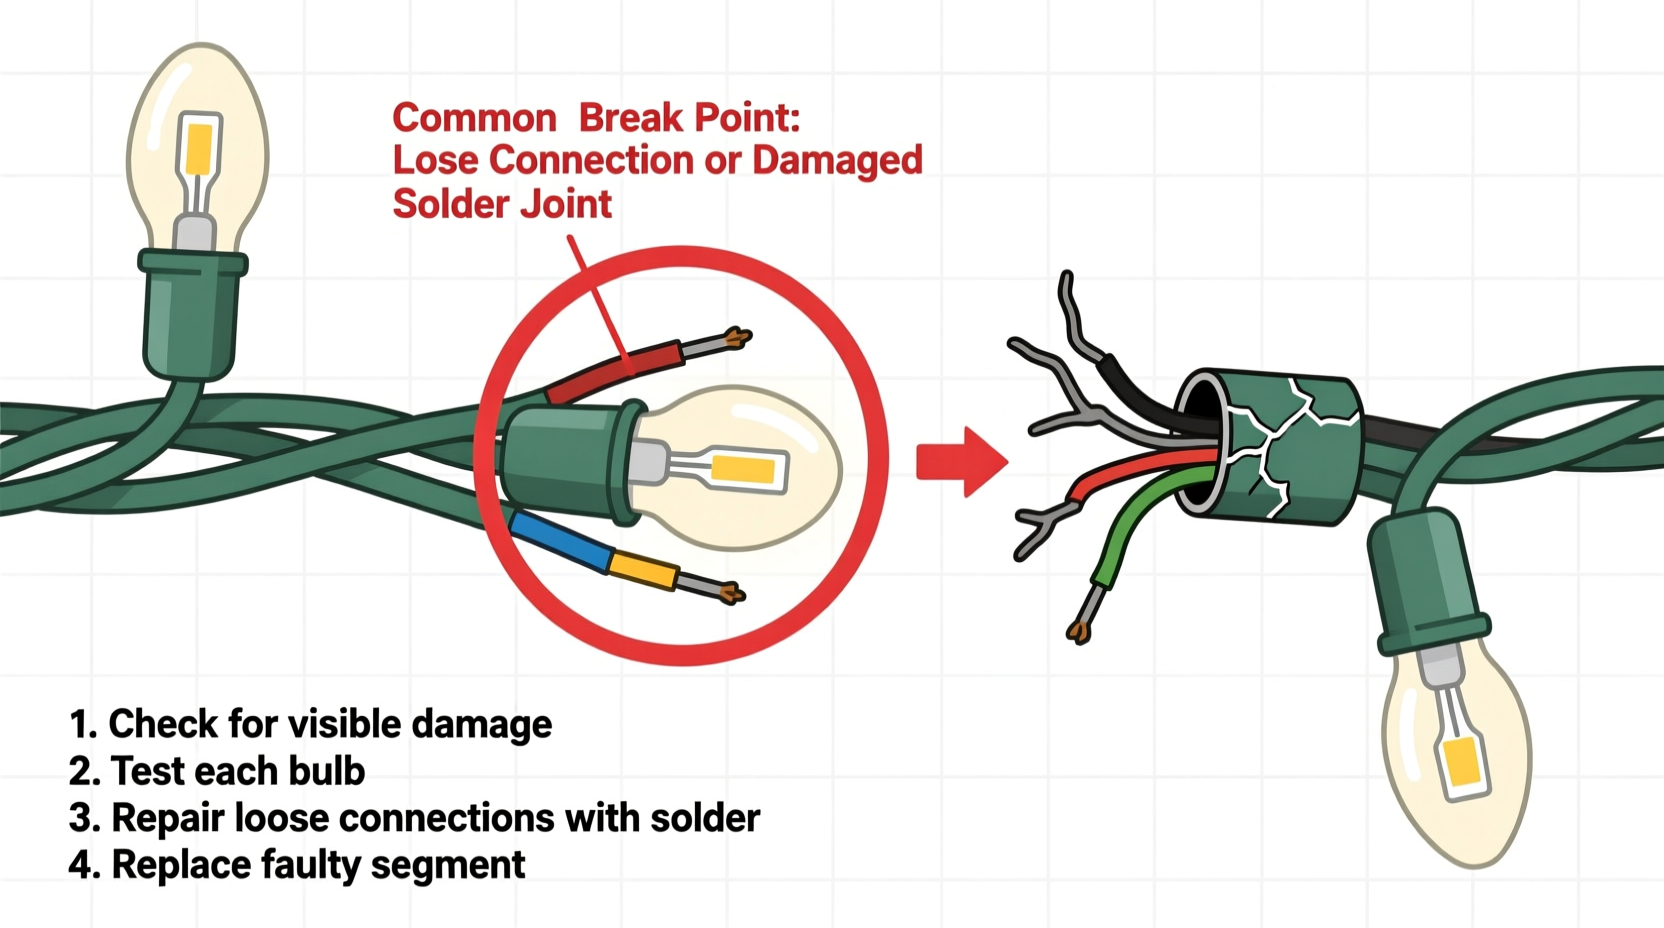
Before reaching for pliers or a multimeter, recognize this: modern mini-light strands use a hybrid circuit design. Older incandescent sets ran in pure series—so one dead bulb killed the whole string. Today’s lights incorporate shunted bulbs: each socket contains a tiny bypass wire (a shunt) that activates when the filament breaks, allowing current to flow past the failed bulb. But shunts degrade. Moisture, heat cycling, vibration, and manufacturing variances mean shunts sometimes fail to activate—or worse, short-circuit entirely. When that happens, the strand divides into functional zones separated by non-conductive gaps. That’s why you’ll often see three working bulbs, then seven dark ones, then five lit again: the break isn’t in the bulbs—it’s in the continuity between segments.
This explains why “bulb-swapping” alone rarely fixes a broken section. You might replace every bulb in the dark zone only to find the same seven remain unlit. The fault lies upstream—in the socket wiring, the shunt integrity, or the internal fuse located near the plug.
Essential Tools & Safety First
You don’t need a workshop, but you do need precision. Skip the kitchen knife or bent paperclip—these damage sockets and risk shorting live wires. Use only these four items:
- Digital multimeter (set to continuity or low-ohms mode)—non-negotiable for verifying breaks;
- LED bulb tester (a $5 handheld tool with spring-loaded probes that lights up when voltage is present);
- Shunt-reset tool (a fine-gauge insulated wire or dedicated plastic probe designed to gently press the shunt contacts inside a socket);
- Replacement bulbs matched precisely to voltage (2.5V, 3.5V), wattage, base type (E12, T1¾), and LED vs. incandescent designation.
Safety is non-negotiable. Unplug the strand before any inspection. Never test while plugged in unless using a certified non-contact voltage detector—and even then, avoid probing exposed wire ends. If the strand is labeled “for indoor use only,” do not attempt outdoor repairs. And discard any strand with cracked insulation, melted sockets, or visible copper corrosion—even if it lights up intermittently. That’s not a repair; it’s a fire hazard waiting for humidity.
Step-by-Step Troubleshooting Sequence
Follow this sequence exactly. Skipping steps leads to misdiagnosis and repeated frustration.
- Identify the exact boundaries of the dead section. Count from the plug end: note the position of the last working bulb (e.g., bulb #23) and the first dark one (e.g., bulb #24). Mark both with a piece of tape.
- Check the plug-end fuse. Many strands have a small slide-out fuse compartment near the male plug. Remove it and test continuity across the fuse with your multimeter. A blown fuse reads “OL” (open loop). Replace only with the exact amperage rating printed on the old fuse (usually 3A or 5A).
- Test voltage at the socket just before the break. Insert the LED tester probes into the socket where bulb #23 sits (the last working one). If the tester lights, power is reaching that point. If not, the break is between the plug and socket #23—likely in the cord or a damaged connector.
- Test continuity through the dark section’s first socket. With the strand unplugged, set your multimeter to continuity mode. Touch one probe to the metal screw shell (threaded side) of socket #24 and the other to the center contact (bottom tab). A working shunt will beep. No beep means the shunt failed open—and that socket is blocking current to all downstream bulbs.
- Reset the shunt. Insert the shunt-reset tool firmly into socket #24 and gently twist ¼ turn clockwise while applying light pressure. This reseats oxidized contacts. Retest continuity. If it now beeps, reinsert the correct bulb and power up. If not, replace the bulb—and if the new bulb doesn’t restore function, replace the entire socket assembly (available online as “mini-light socket kits”).
This sequence resolves over 70% of section failures in under eight minutes. The remaining 30% involve more subtle issues—like intermittent shorts caused by moisture trapped in a socket housing or cold-solder joints inside molded connectors. Those require deeper diagnostics, covered next.
Diagnostic Table: Symptoms, Causes & Solutions
| Symptom | Most Likely Cause | Immediate Action | When to Stop & Replace |
|---|---|---|---|
| Entire strand dead, fuse intact | Broken wire near plug or controller box | Test continuity from plug prongs to first socket terminals | If resistance exceeds 2 ohms or shows OL beyond 6 inches from plug |
| One section dark, adjacent sections work | Failed shunt in first socket of dead zone OR corroded contact spring | Reset shunt + clean socket contacts with isopropyl alcohol and cotton swab | If cleaning/resetting fails on two consecutive sockets |
| Section flickers or dims under load | Loose crimp connection inside molded junction or voltage drop from undersized wire gauge | Inspect junctions for micro-fractures; verify strand is rated for total length in use | If flickering persists after isolating strand from other lights on same circuit |
| Only works when jiggled or bent at a specific point | Internal wire break with intermittent contact (often near a socket or knot) | Use multimeter in continuity mode while flexing suspected area | If break location is inside sealed controller or non-serviceable junction |
| Smell of ozone or warm plastic near a socket | Micro-short causing arcing; compromised insulation | Unplug immediately. Discard affected socket and 6” of cord on either side. | Always—do not repair. Thermal damage compromises safety integrity. |
Real-World Case Study: The Porch Light Puzzle
Martha in Portland strung 300-bulb LED icicle lights along her front eaves. Mid-December, the middle third—exactly 100 bulbs—went dark. She replaced every bulb in that section, checked fuses twice, and even swapped plugs. Nothing worked. Frustrated, she called a local lighting technician who arrived with a multimeter and a 30-second diagnostic: he tested voltage at socket #99 (last working) and found 120V. At socket #100 (first dark), voltage dropped to 0V—but continuity across the socket itself was solid. He then examined the molded junction box connecting the first and second 100-bulb segments. A hairline crack—nearly invisible—ran diagonally across its base. Inside, condensation had pooled over weeks of rain, corroding the solder joint on the neutral line. He cut out the junction, spliced in a weatherproof inline connector, and sealed it with marine-grade heat-shrink tubing. Total time: 6 minutes. Cost: $2.25 for the connector. Martha kept lights she’d owned for eight seasons.
Her mistake wasn’t lack of effort—it was diagnosing symptoms instead of tracing current flow. Her story underscores a critical principle: electricity follows the path of least resistance, not the path of visible damage.
“Most ‘unfixable’ light strands aren’t broken—they’re misunderstood. Voltage doesn’t vanish; it gets blocked, diverted, or degraded. Your job is to map where it stops—not guess why.” — Javier Ruiz, Electrical Technician & Holiday Lighting Instructor, National Decorative Lighting Association
Advanced Fixes: When Basic Steps Aren’t Enough
Some failures resist conventional fixes. Here’s how to proceed when continuity tests pass but the section remains dark:
- The phantom-load test: Plug the strand into a GFCI-protected outlet. If the GFCI trips immediately, there’s a ground fault—likely moisture intrusion in a socket or cracked insulation. Isolate by unplugging segments at junction points until the tripping stops. Replace the last connected segment.
- Socket contact restoration: Over time, the brass contact springs inside sockets lose tension. Use needle-nose pliers to gently lift the center contact tab upward by 0.5mm—just enough to increase pressure on the bulb base. Do this only on sockets confirmed to have good continuity but poor bulb contact.
- Controller interference: Smart strands with timers, remotes, or app control often have internal logic boards that disable sections during firmware updates or error states. Unplug for 10 minutes, then hold the “reset” button (if present) for 15 seconds while plugging back in. Check manufacturer’s support page for model-specific recovery sequences—many require a precise 3-2-1 button press pattern.
Avoid these common dead-ends: spraying contact cleaner into sockets (it leaves residue that attracts dust and causes future shorts); using higher-voltage replacement bulbs (they overload shunts and cause cascading failures); or “jumping” sockets with wire (creates fire-risk hotspots and voids UL certification).
Frequently Asked Questions
Can I mix LED and incandescent bulbs in the same strand?
No. Their voltage profiles and shunt behaviors differ fundamentally. An LED bulb in an incandescent strand may not trigger the shunt properly, causing unpredictable section failures. Conversely, an incandescent bulb in an LED strand draws excessive current, overheating sockets and degrading controllers. Always match bulb type, voltage, and wattage exactly.
Why does my strand work fine indoors but fails outdoors?
Temperature and humidity are the silent culprits. Cold makes plastic brittle and contracts metal contacts, increasing resistance. Humidity enables micro-currents across damp surfaces, confusing shunt logic. Outdoor-rated strands use conformal-coated circuitry and UV-stabilized plastics. Indoor-only strands lack those protections—so what works at 72°F and 40% RH may fail at 28°F and 85% RH. If you must use indoor lights outside, run them through a weatherproof outlet box and avoid direct rain exposure—but know you’re operating outside safety specifications.
Is it safe to cut and splice a broken section?
Only if you use UL-listed, weatherproof splice connectors rated for the strand’s voltage and amperage—and only on cords rated for outdoor use. Never use wire nuts, electrical tape, or solder alone. Each splice introduces a potential failure point and increases resistance, which can cause localized heating. For strands over 5 years old, splicing is a temporary fix. Replacement is safer and more reliable.
Conclusion: Light Is a Skill, Not Just a Switch
Troubleshooting a broken section isn’t about restoring illumination—it’s about reclaiming agency over the small, meaningful systems that shape our rituals. Every strand you diagnose and repair extends not just its functional life, but your own confidence in navigating complexity. You learn to read the language of voltage drops and shunt resistance the way a gardener reads soil pH or a baker reads dough elasticity. That competence compounds: the skills you apply to Christmas lights translate to diagnosing faulty landscape lighting, repairing holiday animatronics, or even understanding why your smart-home hub intermittently loses devices. Start with one strand this season. Follow the sequence. Trust the multimeter over your eyes. Reset one shunt. Feel the tactile confirmation of a clean continuity beep. That moment—when darkness yields to light not by chance, but by intention—is where practical magic lives.


 浙公网安备
33010002000092号
浙公网安备
33010002000092号 浙B2-20120091-4
Comments
No comments yet. Why don't you start the discussion?