
Wrinkled shirts can ruin an otherwise polished appearance, but traditional ironing is time-consuming, requires setup, and risks scorching delicate fabrics. Enter the clothes steamer: a faster, safer, and more versatile alternative. When used correctly, a steamer removes creases with minimal effort, preserves garment integrity, and works on a broader range of materials than irons. Yet many people underutilize their steamers or apply them incorrectly, missing out on their full benefits. This guide reveals how to maximize your steamer’s potential specifically for shirts—whether cotton dress shirts, linen button-downs, or synthetic blends—so you can ditch the iron for good.
Why Steaming Beats Ironing for Shirts
Ironing forces heat and pressure onto fabric, flattening wrinkles by breaking and reforming fiber bonds. While effective, this method carries risks: high temperatures can yellow whites, melt synthetics, or leave shine marks on wool. Steamers, in contrast, use moist heat to relax fibers without direct contact. The result is gentler treatment that maintains fabric texture and elasticity.
Shirts benefit particularly from steaming because they often feature structured areas like collars, cuffs, and plackets that are difficult to press evenly with an iron. A steamer allows you to work vertically, preserving drape and avoiding distortion. Additionally, steaming disinfects fabric by killing bacteria and dust mites, offering hygiene advantages beyond mere wrinkle removal.
“Steaming is not just about removing wrinkles—it’s about rehydrating fabric. Cotton and linen shirts especially respond well because steam helps fibers return to their natural state.” — Daniel Park, Textile Care Consultant at FabricWell Labs
Choosing the Right Steamer for Shirt Care
Not all steamers deliver equal performance. For shirts, consider three main types:
- Handheld steamers: Compact and affordable, ideal for travel or quick touch-ups. Limited water capacity means frequent refills during full wardrobe sessions.
- Standing garment steamers: Full-sized units with large tanks and stronger output. Best for regular home use, especially when managing multiple shirts.
- Steamer-iron combos: Hybrid devices that offer both vertical steaming and flat ironing. Useful if transitioning from ironing, but often compromise on steam power.
For consistent shirt care, a standing steamer with at least 1.5-liter capacity, adjustable steam settings, and a concentrator nozzle delivers optimal control. Look for models with anti-drip technology to avoid water spots on light-colored fabrics.
Key Features to Prioritize for Shirt Steaming
| Feature | Why It Matters | Recommended for Shirts? |
|---|---|---|
| Steam Output (g/min) | Higher output (≥20 g/min) penetrates thick cotton and layered seams faster | Yes |
| Heat-Up Time | Under 45 seconds reduces waiting between uses | Yes |
| Nozzle Type | Concentrator nozzles target collars and cuffs precisely | Yes |
| Water Tank Size | Larger tanks (≥1L) minimize interruptions during multi-shirt routines | Yes |
| Cord Length | Long cords (≥6 ft) allow movement around a hanging garment | Moderately |
| Auto Shut-Off | Safety feature, but irrelevant if used attentively | No |
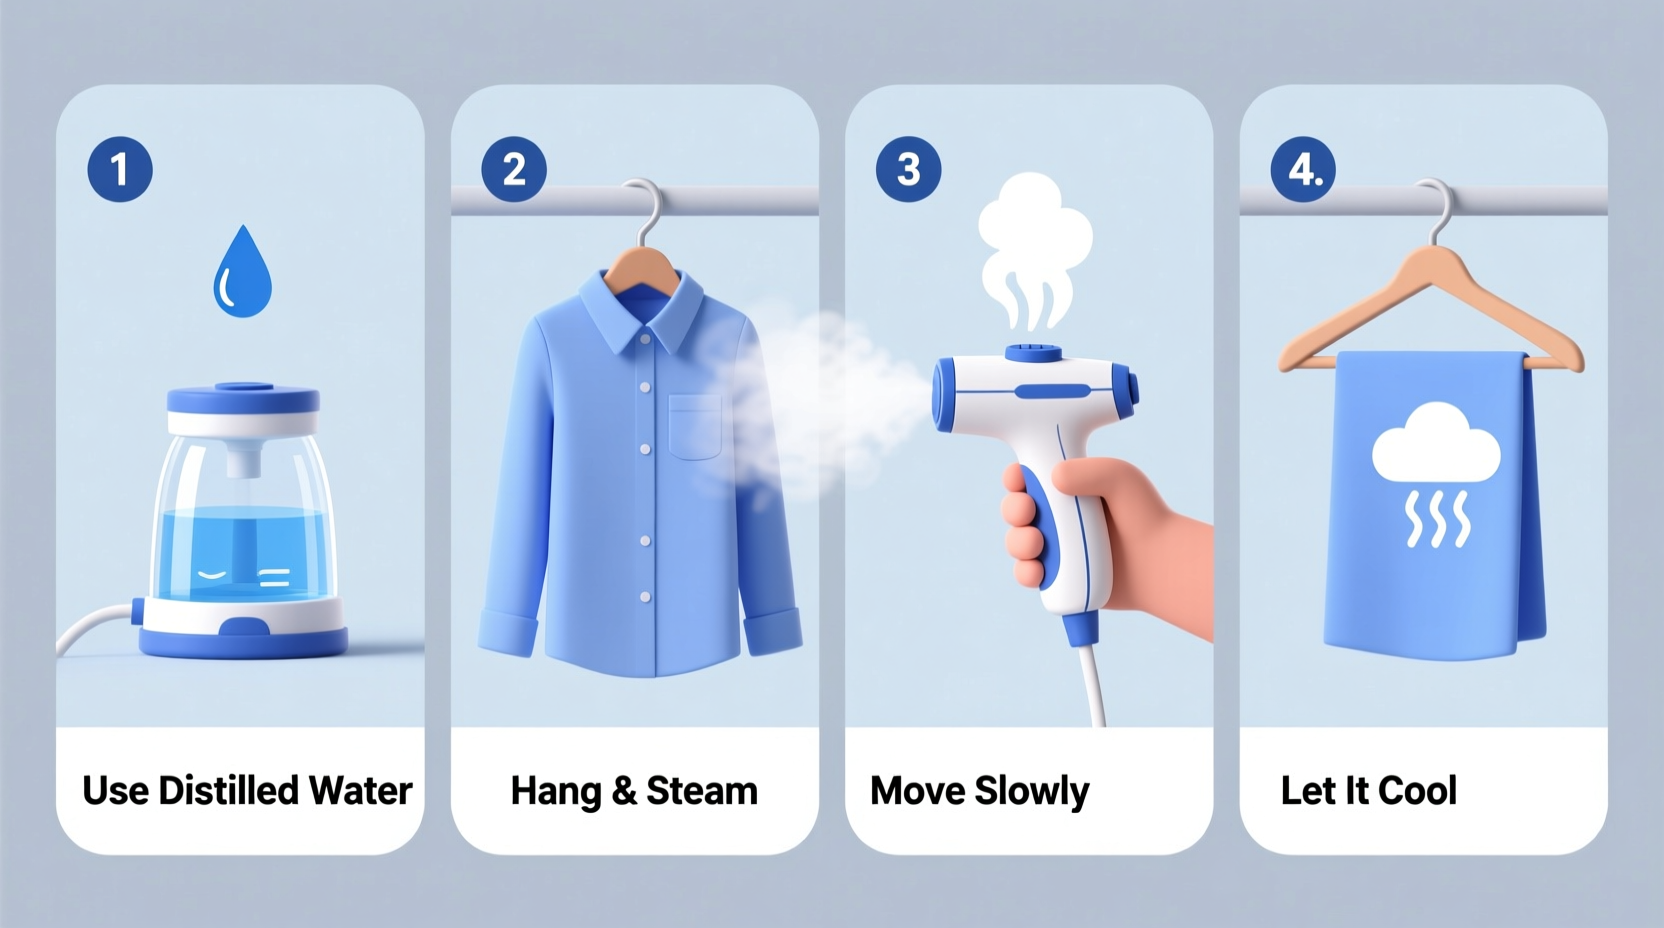
Step-by-Step Guide to Steaming a Shirt Effectively
Proper technique ensures thorough wrinkle release without over-wetting or stretching fabric. Follow this sequence for reliable results every time.
- Prepare the shirt: Hang it on a sturdy hanger. Unbutton the collar, cuffs, and front placket slightly to allow steam penetration. Smooth the shoulders and sleeves with your hands.
- Fill and heat the steamer: Use distilled water to prevent mineral buildup. Allow the unit to reach full operating temperature—most indicate readiness with a light or sound.
- Start at the top: Begin with the collar. Hold the steamer nozzle 1–2 inches from the fabric and move slowly downward along each side, pulling gently on the opposite edge to create tension.
- Move to the yoke and shoulders: Work from the center back toward the shoulder seams. Avoid saturating shoulder pads, which may retain moisture.
- Tackle the back panel: Glide the steamer vertically from neckline to hem. Overlap strokes slightly to ensure even coverage.
- Address the front panels: Open one side fully and steam from top to bottom. Repeat on the other side. Pay attention to the placket where buttons cause folds.
- Finish with sleeves: Extend each sleeve fully. Start at the shoulder seam and move toward the cuff. Rotate the sleeve to treat inner and outer surfaces.
- Final check: Inspect for remaining creases. Reapply steam only where needed—excessive steaming weakens fibers over time.
Common Mistakes That Reduce Steamer Effectiveness
Even experienced users make errors that undermine results. Avoid these pitfalls:
- Holding the nozzle too far away: Distance reduces steam concentration, requiring longer exposure and increasing wetness risk.
- Using tap water: Minerals clog internal components and may spray residue onto fabric. Always use distilled or demineralized water.
- Steaming folded or bunched fabric: Wrinkles trapped in layers won’t release. Hang garments fully open before starting.
- Touching fabric with the nozzle: Hot metal can scorch or melt delicate weaves like silk or polyester blends.
- Skipping post-steam air drying: Putting a damp shirt directly into a closet invites mildew. Let it hang 5–10 minutes until dry to the touch.
Do’s and Don’ts Summary Table
| Action | Do | Don't |
|---|---|---|
| Distance from fabric | 1–2 inches | More than 3 inches |
| Water type | Distilled or demineralized | Tap water |
| Garment position | Fully unbuttoned and spread | Folded or compressed |
| Contact with fabric | Nozzle never touches | Pressing nozzle into fabric |
| Drying time | 5–10 minutes hanging | Immediately folding or storing |
Real-World Example: From Rushed Morning to Polished Commute
Mark, a financial analyst, used to spend 15 minutes ironing a single dress shirt before work. His cotton poplin shirts often developed shiny patches near the collar from repeated pressing. After switching to a standing steamer, he adjusted his routine: the night before, he hangs up the next day’s shirt on the bathroom door. In the morning, he spends four minutes steaming it while brushing his teeth. He starts at the collar, works down the back, then fronts and sleeves. The entire process takes less than five minutes, and his shirts now look crisp without signs of wear. “I was skeptical,” he says, “but once I learned to keep the nozzle close and pull the fabric taut, the difference was instant. No more ironing board setup or worrying about burns.”
Expert Tips for Specific Shirt Fabrics
Different materials react uniquely to steam. Adjust your approach accordingly:
- Cotton: Responds exceptionally well. Use full steam and moderate tension. Ideal for heavily wrinkled work shirts.
- Linen: Highly prone to creasing but also very receptive to steam. Pull gently—linen fibers are strong but can stretch if overstressed.
- Silk: Use low or medium steam setting. Never hold the nozzle in one spot for more than 2 seconds. Keep moving to prevent water spotting.
- Polyester and blends: Lower heat tolerance. Use short bursts and avoid prolonged exposure to prevent melting or sheen formation.
- Wool: Steam from the reverse side if possible. High moisture can cause felting, so use brief pulses and allow ample drying time.
“With silk and fine wools, think of steaming as refreshing, not reshaping. The goal is relaxation, not reconstruction.” — Lena Torres, Master Tailor at Atelier Thread & Drape
Essential Checklist: Perfect Shirt Steaming Routine
Use this checklist each time you steam a shirt to maintain consistency and quality:
- ☐ Hang shirt on a padded hanger
- ☐ Unbutton collar, cuffs, and placket
- ☐ Fill steamer with distilled water
- ☐ Wait for full heat-up signal
- ☐ Start with collar, using light tension
- ☐ Move down back, then front panels
- ☐ Treat sleeves from shoulder to cuff
- ☐ Check for missed wrinkles and re-treat sparingly
- ☐ Hang for 5–10 minutes before wearing or storing
- ☐ Empty remaining water after use to prolong steamer life
FAQ: Common Questions About Steaming Shirts
Can I use a steamer on a wrinkled shirt I’m already wearing?
Yes, but with caution. Handheld steamers are designed for this. Keep the nozzle moving, avoid lingering on one area, and ensure adequate ventilation to prevent overheating. Never steam directly on skin.
Does steaming shrink shirts?
Proper steaming does not shrink shirts. However, excessive heat and moisture on untreated natural fibers (like raw cotton or wool) can cause slight contraction. Most commercially finished shirts are pre-shrunk and safe to steam.
How often should I descale my steamer?
If using distilled water, descaling may be needed only once every 6–12 months. With tap water, monthly cleaning is advisable. Follow manufacturer instructions, typically involving vinegar or citric acid solution cycles.
Conclusion: Embrace Smarter Shirt Care
Switching from ironing to steaming isn’t just a convenience upgrade—it’s a smarter way to care for your shirts. With less physical strain, reduced risk of damage, and faster turnaround, steaming aligns with modern lifestyles that value efficiency and garment longevity. The key lies in technique: proper distance, correct water type, strategic tension, and fabric-specific awareness. Once mastered, the process becomes second nature, transforming a chore into a seamless part of your routine. Invest a few minutes learning these methods, and you’ll never miss the ironing board again.


 浙公网安备
33010002000092号
浙公网安备
33010002000092号 浙B2-20120091-4
Comments
No comments yet. Why don't you start the discussion?