
Hanging Christmas lights on a home with sloped, warped, or architecturally varied eaves is one of the most common holiday frustrations—and one of the most preventable. A crooked string of lights doesn’t just look amateurish; it creates tension imbalances that strain clips, loosen fasteners, and invite wind damage. Worse, many homeowners assume a level is only for carpenters—not decorators—so they skip it entirely, relying instead on “the eye test.” But the human eye is easily fooled by roof pitch, shadow, and fatigue. A true horizontal reference isn’t optional: it’s the foundation of safe, symmetrical, long-lasting light displays.
This guide walks through exactly how to use a level—not as a one-time check, but as an active tool integrated into every phase of your lighting project. You’ll learn how to adapt to varying eave conditions (including gables, dormers, and multi-level fascias), choose the right level for the job, interpret subtle bubbles, and compensate for structural imperfections without compromising aesthetics or safety. No assumptions. No guesswork. Just repeatable, field-tested methodology used by professional holiday installers and meticulous DIYers alike.
Why a Level Matters More Than You Think
Most people reach for a level only after the lights are up—to “check if it looks straight.” That’s too late. By then, you’ve already committed to anchor points, stretched wires, and clipped dozens of bulbs into place. If the line is off, correcting it means unclipping, repositioning, and potentially damaging clips or wire insulation.
A level’s real value lies in *prevention*. When used proactively, it helps you:
- Establish consistent height across disparate eave sections (e.g., matching the front porch overhang to the garage roofline)
- Prevent cumulative drift—where each successive clip shifts slightly upward or downward, resulting in a visible wave after 30 feet
- Minimize ladder repositioning by confirming alignment before committing to a mounting point
- Identify underlying structural issues (like sagging soffits or rotted fascia) before they become safety hazards
- Ensure even weight distribution across clips—critical for heavy LED rope lights or vintage incandescent strands
And crucially: a level eliminates subjective judgment. What looks “level” standing at the base of your ladder may appear dramatically tilted from the sidewalk—or worse, from your neighbor’s second-floor window. Lighting is viewed from multiple vantage points. Your standard must be objective.
Selecting and Preparing the Right Level
Not all levels are created equal for exterior holiday lighting. Here’s what actually works—and what doesn’t:
| Level Type | Best For | Limitations | Pro Tip |
|---|---|---|---|
| Torpedo level (24\") | Fascia-mounted clips, gutter hooks, corner transitions | Too short for long runs without frequent repositioning | Choose one with rare-earth magnets—sticks securely to metal gutters and aluminum fascia |
| Laser level (self-leveling, cross-line) | Multi-point alignment across gables, dormers, or detached garages | Requires stable surface; battery life drops in cold temps | Mount on a tripod or clamp to a ladder rung—never hold by hand for accuracy |
| String level (line level + mason’s line) | Long, straight runs (e.g., 40+ ft across a flat roofline) | Vulnerable to wind; requires two anchor points | Use high-visibility fluorescent line and tension it firmly—sag ruins accuracy |
| Digital angle finder | Measuring exact pitch deviation on sloped eaves | Doesn’t provide visual bubble reference | Pair with a traditional level: use digital to quantify slope, then adjust clip spacing accordingly |
Before you begin, calibrate your level. Place it on a known-flat surface (a granite countertop, glass tabletop, or even a new sheet of plywood). Note the bubble position. Flip the level 180° end-to-end. If the bubble moves, your level is inaccurate—and must be adjusted or replaced. Most quality torpedo levels have a calibration screw under the vial housing. Don’t skip this step: a 0.5° error over 20 feet creates a 2.1-inch deviation.
Step-by-Step: Hanging Lights on Uneven Eaves Using a Level
This sequence assumes standard C9 or mini-light strands with clip-on attachments, mounted to wood or aluminum fascia. Adjust timing for rope lights or net lights as noted.
- Map your eave profile. Walk the perimeter with a notebook. Note where eaves rise, dip, or change material (e.g., cedar shingle soffit vs. vinyl fascia). Mark obvious problem zones: sagging corners, patched areas, or sections with inconsistent depth.
- Establish your datum line. Choose a visually dominant point—usually the center of your front-facing eave—as your height reference. Clamp a laser level here, projecting a horizontal line across the entire facade. Or, use a string level anchored at two fixed points (e.g., corner posts) and tighten until taut and bubble-centered.
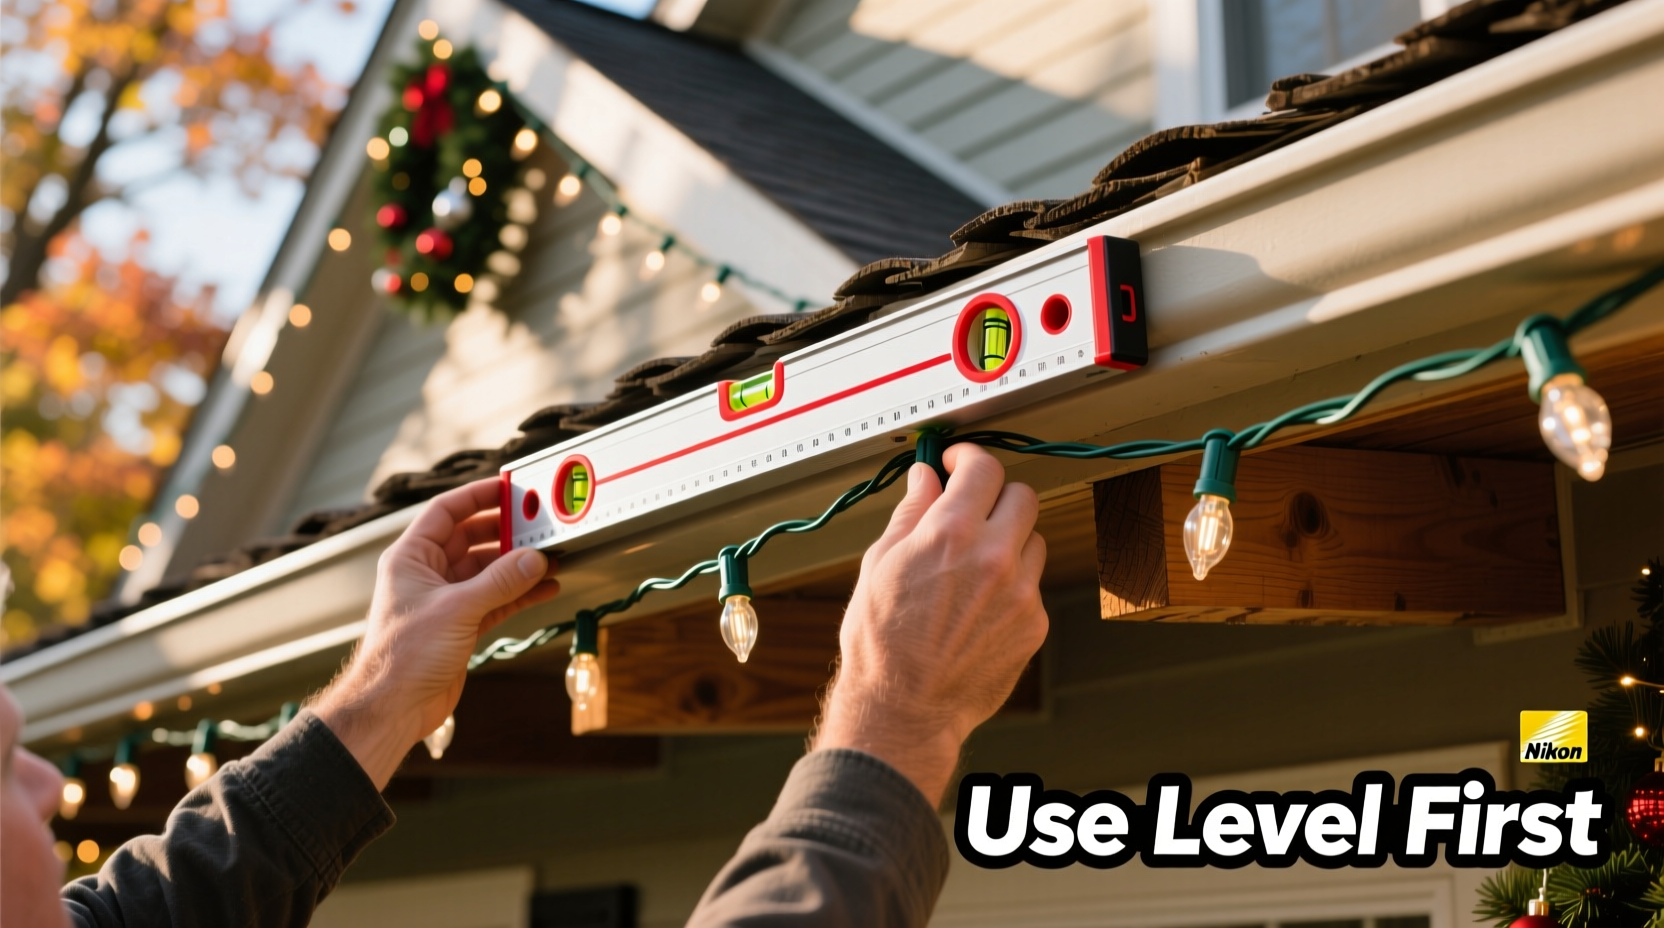
- Measure and mark clip positions. Starting at your datum point, measure 12 inches left and right along the fascia. Place a small pencil mark at each spot. Set your torpedo level horizontally on the fascia board directly over the mark. Adjust the mark vertically until the bubble centers. That’s your true-height anchor point. Repeat every 18–24 inches—never rely on “even spacing” alone.
- Account for slope and transition zones. At gable ends or dormer returns, the eave depth often changes. Instead of forcing lights to follow the roofline, maintain your horizontal datum. Use adjustable clips (e.g., Gorilla Grip or GutterClip Pro) that pivot vertically to accommodate fascia thickness variation while keeping bulb rows level.
- Test-load before final clipping. Hang one full strand loosely—using only the first and last clip—then walk back 15 feet. Check alignment against your laser line or string. Adjust intermediate clips *before* securing them fully. Then, snap in remaining bulbs and tighten all clips.
Real-World Fix: The “Sagging Garage Eave” Scenario
Mark, a homeowner in Portland, OR, spent three evenings hanging 200 feet of warm-white LEDs along his Craftsman-style home. His front eave was level, but the attached garage eave dipped nearly 1.5 inches over 12 feet due to decades of settling. He hung lights “by eye,” assuming the dip was minor. On installation night, neighbors complimented the front—but pointed out the garage lights looked “like a frown.” Worse, wind gusts caused the lowest section to sway violently, snapping two clips.
He returned the next morning with a 24-inch torpedo level and magnetic gutter hooks. Instead of fighting the slope, he established a new horizontal datum 2 inches above the lowest point of the garage eave. He then used stacked shims (cut from scrap PVC pipe) behind each clip on the higher side to lift the strand uniformly. The result? A perfectly straight line across the entire garage facade—even though the underlying wood wasn’t level. The lights stayed secure through December’s windstorms, and the visual continuity made the entire display look intentional, not improvised.
“Amateur installers chase the architecture. Professionals control the line. A level isn’t about forcing reality to conform—it’s about defining your own consistent visual language, even on imperfect surfaces.” — Lena Torres, Lead Installer, Evergreen Holiday Lighting Co. (12-year industry veteran)
Do’s and Don’ts When Leveling Lights on Challenging Eaves
| Do | Don’t |
|---|---|
| Use painter’s tape to temporarily hold your level in place while marking clip spots | Rely solely on “eye-balling” alignment from ground level |
| Check level orientation *after* each clip is tightened—vibration can shift it | Assume your ladder’s feet are on level ground (use a small bubble level on the ladder’s top rail) |
| For vinyl or aluminum fascia, drill pilot holes *before* clipping—prevents warping that throws off level alignment | Over-tighten plastic clips until they crack or deform the fascia |
| When working alone, use a hands-free laser level clamped to your ladder—freeing both hands for clipping | Hang lights in freezing rain or high wind—even with a level, conditions compromise accuracy and safety |
FAQ: Common Leveling Questions Answered
What if my eave has no fascia board—just exposed rafter tails?
Mount a 1x2 pine ledger board first, secured with corrosion-resistant screws into the rafter ends. Use your level to ensure the ledger itself is perfectly horizontal before attaching any lights. This creates a stable, uniform mounting surface and prevents individual rafter inconsistencies from affecting alignment.
Can I use my smartphone level app instead of a physical level?
Only as a rough sanity check—not for precision work. Phone sensors drift with temperature, battery level, and calibration. In tests conducted by the National Association of Home Builders’ Holiday Installation Task Force, smartphone apps showed up to 1.2° variance compared to calibrated torpedo levels under identical conditions. Reserve apps for quick checks between ladder climbs; trust a physical tool for final placement.
How do I handle corners and bay windows without breaking the level line?
Never try to bend lights around sharp angles. Instead, terminate the strand at the corner with a level-aligned clip, then start a new strand on the adjacent plane—also leveled independently. Use corner connectors (e.g., LightShow Corner Kits) that maintain consistent bulb spacing and height across the transition. Visually, two precisely leveled segments read as one cohesive line.
Conclusion: Your Lights Deserve Precision—Not Guesswork
Hanging Christmas lights shouldn’t feel like an act of faith. It should feel like craftsmanship—measured, intentional, and repeatable. A level transforms holiday decorating from reactive trial-and-error into proactive design. It turns frustration into flow, inconsistency into confidence, and “good enough” into genuinely impressive.
You don’t need expensive gear or years of experience. You need one reliable tool, five minutes of calibration, and the discipline to use it—not once, but at every critical decision point. Whether your eaves are gently sloped or wildly irregular, the principle holds: control the line, and everything else follows.
This season, hang your lights not just to illuminate your home—but to reflect the care you put into every detail. Start with the level. Build from there. And when friends ask how you achieved that flawless, gallery-worthy glow, tell them the secret isn’t magic. It’s measurement.


 浙公网安备
33010002000092号
浙公网安备
33010002000092号 浙B2-20120091-4
Comments
No comments yet. Why don't you start the discussion?