
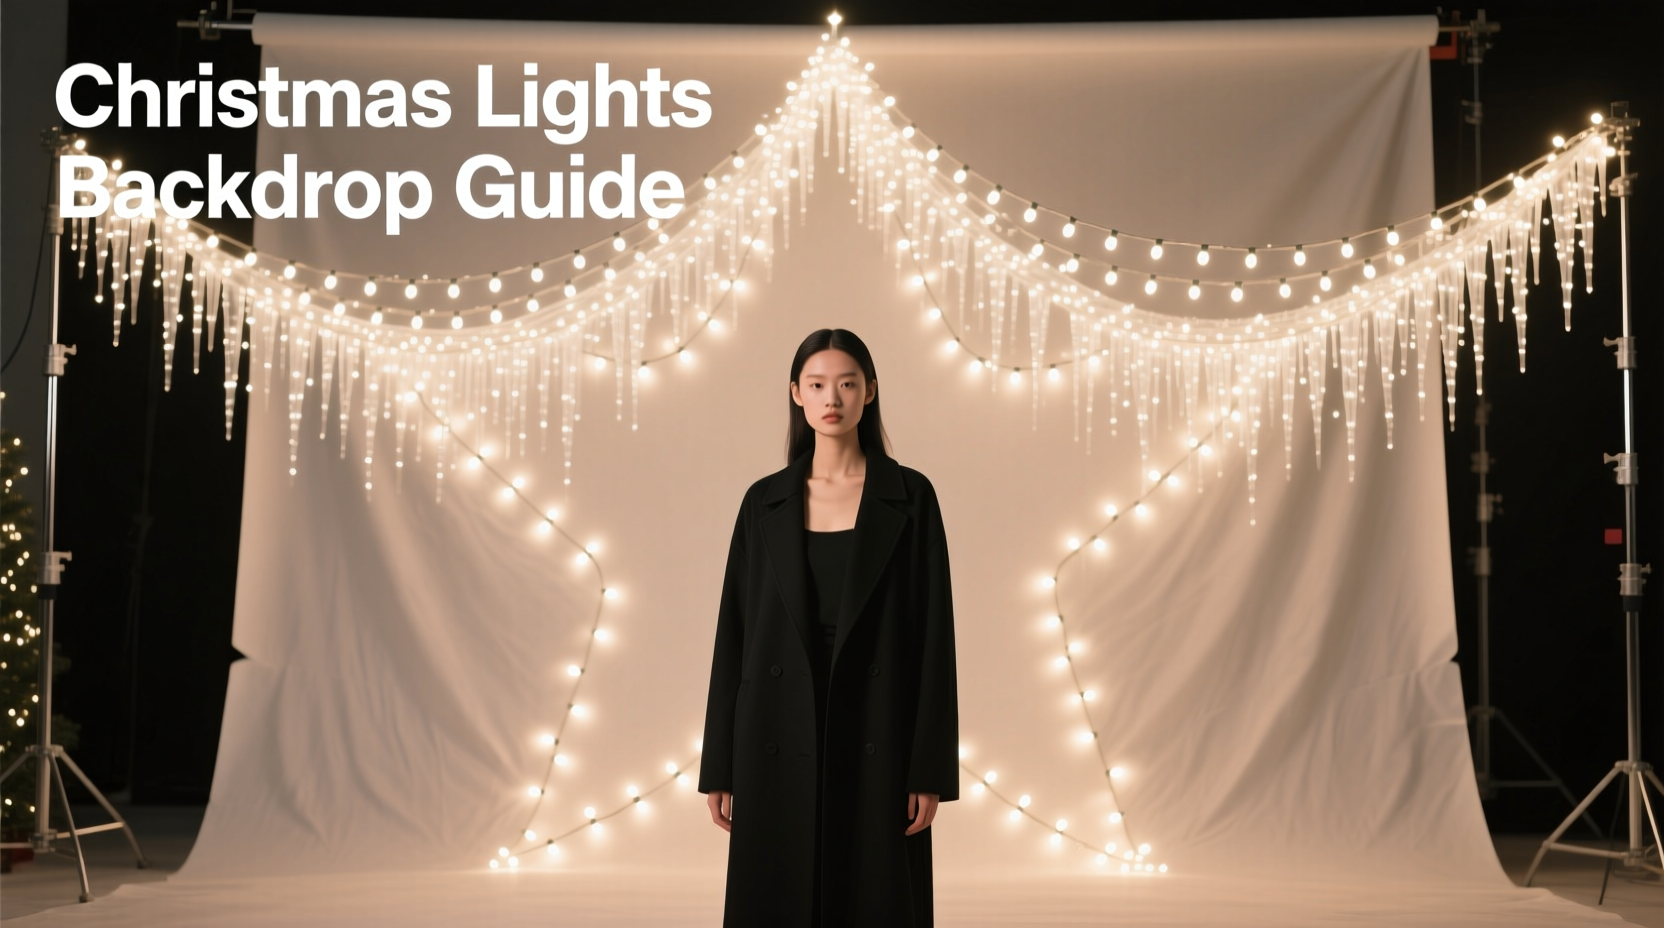
Photographers constantly seek affordable, creative lighting solutions that deliver professional results. One often-overlooked resource is the humble string of Christmas lights. When used strategically, they can produce dreamy, twinkling backdrops ideal for portraits, product shots, and seasonal campaigns. However, their inconsistent color temperature—especially in mixed sets—can sabotage image quality. Achieving a cohesive look requires more than just plugging in a strand; it demands planning, technical awareness, and consistency.
The key challenge lies in the nature of most decorative lights: many are not designed for photographic precision. Off-the-shelf strings may combine warm white, cool white, or even colored bulbs, leading to uneven hues across your backdrop. Without control over color temperature, post-processing becomes tedious, and skin tones or product colors may appear unnatural. The solution? Treat Christmas lights like any other studio light—calibrate them, group them by specification, and integrate them into a controlled setup.
Understanding Color Temperature in Lighting
Color temperature, measured in Kelvin (K), defines the warmth or coolness of light. Lower values (2700K–3500K) appear warm or yellowish, typical of incandescent bulbs and candlelight. Higher values (5000K–6500K) resemble daylight and appear cooler or bluish. For photography, matching color temperatures across all light sources ensures neutral whites and accurate color rendition.
When using Christmas lights as a backdrop, mismatched temperatures result in distracting patches—some areas glowing orange, others pale blue. This inconsistency undermines visual harmony, especially in close-up portraits or commercial photography where color fidelity is critical.
LED Christmas lights dominate the market today, offering energy efficiency and longer life. But not all LEDs are created equal. Many budget strands mix different batches, resulting in slight variations even within the same “warm white” label. Premium LED strings, however, are binned during manufacturing—sorted by precise color output—to ensure uniformity. These are ideal for photography.
“Lighting consistency starts before you press the shutter. If your background emits conflicting color temperatures, no amount of white balance correction can fully fix it.” — Lena Torres, Commercial Photographer & Lighting Instructor
Choosing the Right Lights for Uniform Output
Not every Christmas light works for photography. Selecting the right type is the first step toward a reliable backdrop.
Opt for single-color, high-CRI LED strings. CRI (Color Rendering Index) measures how accurately a light source reveals true colors. Choose LEDs with a CRI of 90 or higher. While most decorative lights don’t advertise CRI, specialty photography or film-grade LED fairy lights do—and are worth the investment for repeated use.
Stick to one color temperature. Decide whether you want a warm (2700K–3000K), neutral (4000K), or daylight-balanced (5500K) backdrop. Purchase multiple identical strands from the same product line and batch. Avoid multi-color or RGB sets unless you’re using only one color mode consistently and have verified its stability.
Recommended Light Types
| Type | Color Temp Range | Best For | Avoid If |
|---|---|---|---|
| Warm White LED Mini Lights | 2700K–3000K | Cozy portraits, holiday themes | Shooting under daylight-balanced key lights |
| Daylight White LED String | 5000K–5500K | Product photography, clean backgrounds | Seeking a warm ambiance |
| Dimmable Film-Grade Fairy Lights | Adjustable 3000K–6000K | Professional setups, mixed lighting | Budget is extremely limited |
| Incandescent Mini Bulbs | ~2700K | Vintage aesthetic, soft glow | Heat sensitivity or long shoots (they get hot) |
Step-by-Step Setup for a Consistent Backdrop
Creating a seamless, evenly lit backdrop with Christmas lights involves more than draping strings haphazardly. Follow this sequence to ensure both aesthetic appeal and technical accuracy.
- Plan the layout: Determine the size and shape of your backdrop. A grid pattern (horizontal and vertical rows) provides even coverage. Use a frame made of PVC pipe, wood, or wire mesh to mount the lights uniformly.
- Test and sort lights: Turn on all strands and compare them side by side. Discard or set aside any that appear visibly warmer, cooler, or tinted green/pink. Group only matched sets together.
- Wire in parallel: Connect strands so they receive equal voltage. Daisychaining too many can cause dimming at the end. Use a power splitter or distribution box if using multiple strings.
- Mount with spacing: Space bulbs 4–6 inches apart for a dense, continuous effect. Closer spacing reduces visible gaps between points of light.
- Diffuse if needed: For softer glow and reduced glare, place a sheer white fabric or diffusion panel 12–18 inches behind the model but in front of the lights. This blurs individual points into a luminous field.
- Set camera white balance manually: Use a gray card under the ambient light (including the backdrop) to set a custom white balance in-camera. Avoid Auto White Balance, which may shift between shots.
- Shoot in RAW: This preserves maximum color data, allowing fine-tuning in post without degrading image quality.
Mini Case Study: Holiday Product Shoot for a Skincare Brand
A boutique skincare brand needed a festive yet elegant backdrop for their winter product launch. Budget constraints ruled out renting a full lighting kit. Instead, the photographer used 12 strands of 2700K warm white LED fairy lights mounted on a 6x4-foot wooden grid.
All strands were purchased from the same online order to ensure batch consistency. Before installation, each was tested on a dark table; two were discarded due to a slight green cast. The remaining ten were wired through a surge-protected splitter to maintain brightness.
A white muslin cloth was hung 15 inches in front of the light grid to diffuse the points into a soft glow. The model was lit with a 3200K tungsten key light, matching the backdrop’s warmth. Custom white balance was set using a gray card placed at model position.
The result: rich, golden bokeh in the background with perfectly neutral skin tones. Post-production required only minor exposure tweaks. The client praised the “luxurious, handcrafted” feel achieved affordably.
Common Pitfalls and How to Avoid Them
Even with careful planning, issues can arise. Awareness of common mistakes helps prevent wasted time and subpar images.
- Mixing bulb types: Never combine LED and incandescent strings—even if labeled the same color temp. Incandescents emit a continuous spectrum; LEDs can have spikes, affecting color rendering.
- Ignoring ambient light: Overhead room lights or windows can introduce conflicting color casts. Shoot in a darkened room to isolate your setup.
- Using dimmers not designed for LEDs: Some household dimmers cause flickering or color shifting in LED strings. Use trailing-edge dimmers or dedicated LED controllers.
- Overlooking power load: Plugging too many strands into one outlet can trip breakers or reduce brightness. Calculate total wattage and distribute across circuits.
Checklist: Preparing Your Christmas Light Backdrop
- ☐ Choose LED strings with consistent color temperature (e.g., all 3000K)
- ☐ Verify high CRI (90+) if possible
- ☐ Test all strands for visual color match
- ☐ Build or acquire a mounting frame
- ☐ Wire strands with proper voltage distribution
- ☐ Mount bulbs evenly spaced (4–6 inches apart)
- ☐ Darken the shooting environment
- ☐ Set manual white balance using a gray card
- ☐ Use diffusion material if point-source glare is too harsh
- ☐ Shoot in RAW format for maximum flexibility
Frequently Asked Questions
Can I mix different brands of warm white lights?
It’s not recommended. Even if both are labeled “2700K,” manufacturing variances can lead to subtle differences in hue. Stick to one brand and model for best results. If mixing is unavoidable, test extensively under shooting conditions.
Why do my Christmas light photos look orange in post?
This usually means your camera’s white balance is set incorrectly. If you shot in JPEG with Auto WB, the camera may have prioritized the subject and ignored the warm backdrop. Always set a custom white balance using a gray card under the actual lighting. Shooting in RAW allows correction, but prevention is better.
Are battery-powered lights suitable for photo backdrops?
Only if they offer consistent output. Many battery-powered strings dim as power depletes, altering both brightness and color temperature. Use AC-powered sets for reliability. If batteries are necessary, monitor output closely and replace them frequently during long sessions.
Conclusion: Elevate Your Photography with Intentional Lighting
Christmas lights are more than seasonal decor—they’re versatile tools for creative photographers. When approached with technical care, they can transform simple backdrops into captivating scenes. The secret lies in consistency: uniform color temperature, matched hardware, and deliberate setup.
Don’t settle for random sparkle. Treat each string like a studio strobe—test it, calibrate it, and integrate it thoughtfully. With the right preparation, you’ll achieve images that feel magical without sacrificing professionalism.


 浙公网安备
33010002000092号
浙公网安备
33010002000092号 浙B2-20120091-4
Comments
No comments yet. Why don't you start the discussion?