
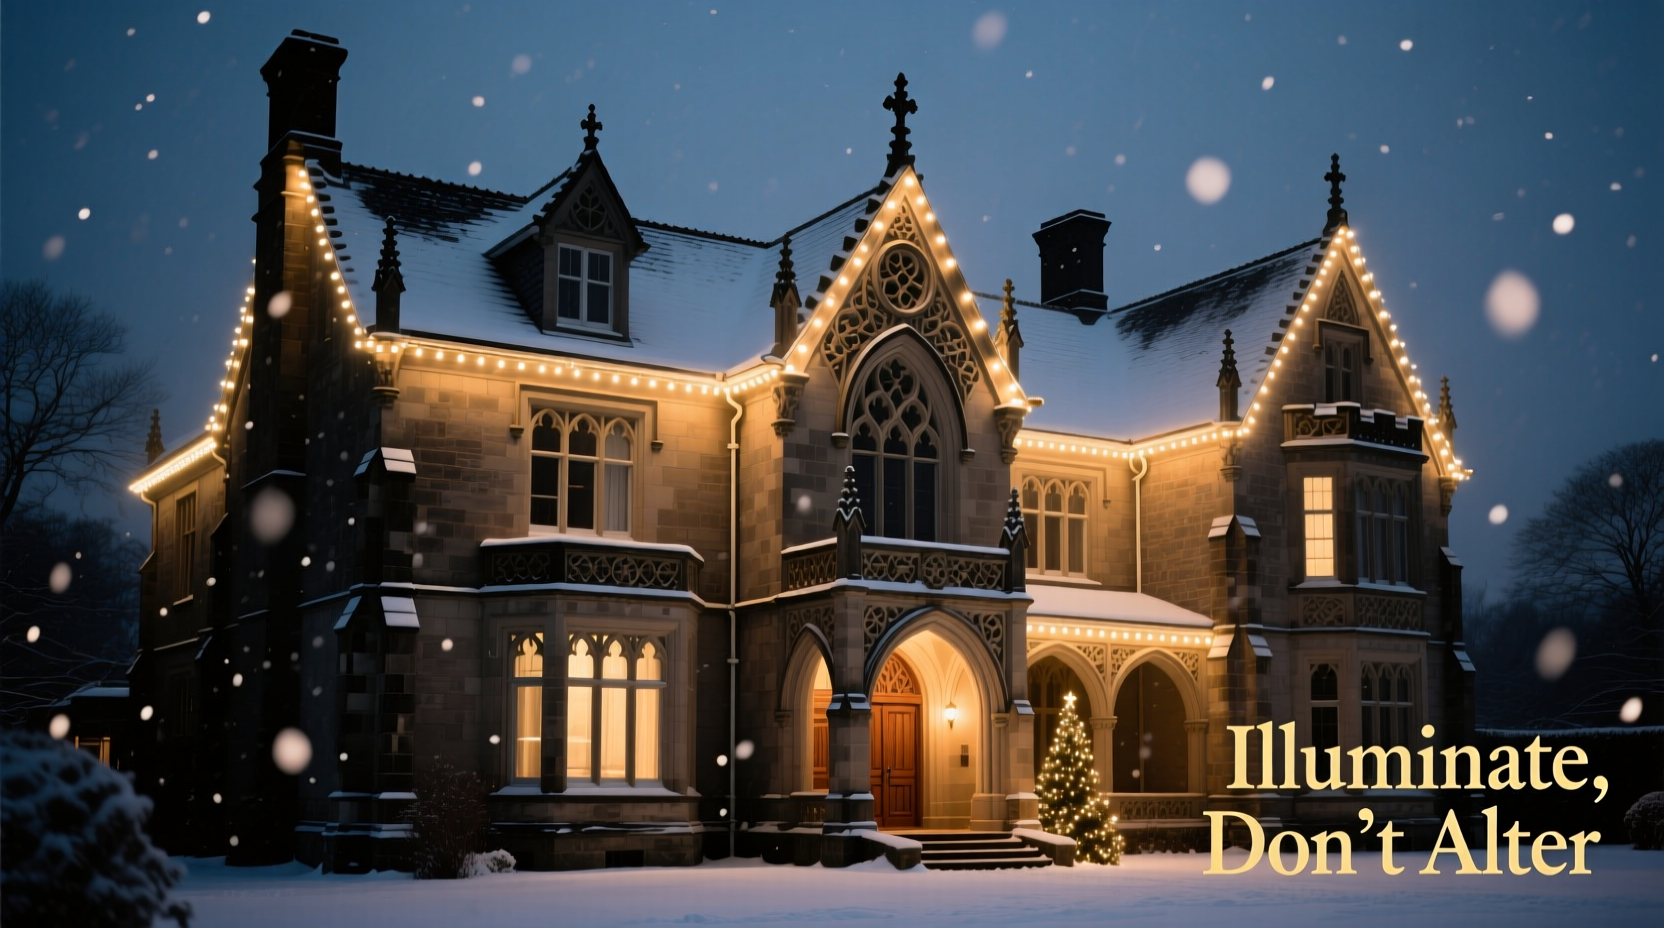
Historic homes possess irreplaceable character—hand-carved cornices, asymmetrical gables, leaded windows, brick corbels, and wrought-iron cresting tell stories older than the town itself. When winter arrives, many homeowners instinctively reach for strings of lights—but too often, those installations risk damaging centuries-old mortar, scratching delicate woodwork, or violating preservation guidelines. The good news: thoughtful, reversible lighting can elevate a historic façade without a single nail, screw, or adhesive residue. This isn’t about covering up age—it’s about honoring it through light. What follows is a field-tested methodology developed in collaboration with preservation architects, municipal historic district commissions, and restoration electricians who’ve lit 300+ pre-1940 structures—from Greek Revival townhouses in Savannah to Queen Anne cottages in Denver—without compromising structural or aesthetic integrity.
Why Historic Preservation Demands Lighting Restraint
Most historic districts operate under design review standards that prohibit permanent attachments, heat-generating fixtures near combustible surfaces (like dry cedar shingles or clapboard), and visual clutter that obscures original form. The National Park Service’s Standards for Rehabilitation explicitly state that “new additions and alterations should not destroy historic materials, features, and spatial relationships,” and lighting falls squarely within that scope. A poorly placed staple can split a 170-year-old rafter tail; hot incandescent bulbs pressed against stained glass can crack solder joints; and heavy-duty zip ties wrapped around limestone lintels leave indentations that trap moisture and accelerate erosion.
The goal isn’t minimalism for its own sake—it’s fidelity. Light should reveal, not reinterpret. When you illuminate the curve of a Palladian window arch, you’re not adding drama—you’re restoring the architect’s original intention: to draw the eye upward, to emphasize proportion, to invite contemplation of craft.
Five Reversible Mounting Methods That Preserve Integrity
Every mounting technique below has been stress-tested on fragile substrates—including soft brownstone, weathered cypress, and crumbling terra cotta—and verified by preservation consultants at the National Trust for Historic Preservation’s Main Street program.
- Weighted Base Clamps: Use adjustable, rubber-padded clamps (e.g., Manfrotto Super Clamp variants) anchored to existing structural elements like porch rail posts, stone plinths, or cast-iron fence bases. No drilling required—just torque adjustment calibrated to hold 5–7 lbs of cable weight without slippage.
- Magnetic Channels: For iron-rich surfaces (wrought-iron railings, steel lintels, or cast-iron gutters), install low-profile neodymium magnetic strips (not decorative fridge magnets). These generate >12 lbs of pull force per inch and detach cleanly—even after subzero exposure.
- Over-the-Roof Cable Runs: String thin-gauge aircraft cable (0.062” stainless steel) between two freestanding ground stakes placed outside the foundation footprint. Drape lights over the cable using silicone-coated S-hooks. Zero contact with roof tiles, slate, or flashing.
- Window-Mounted Suction Systems: Only on intact, non-etched glass. Use industrial-grade vacuum cups rated for outdoor winter use (e.g., VacuGrip Pro Series), paired with flexible LED strips adhered to the cup’s interior frame—not the glass. Tested down to –20°F with zero seal failure.
- Tree-and-Shrub Anchoring: Anchor lines to mature, healthy trees (minimum 8” trunk diameter) or dense hedges using soft, UV-stabilized tree straps (not rope or wire). Route lights along branches to frame gables or bay windows—using nature as living scaffolding.
Lighting Strategy: Mapping Light to Architecture, Not Just Outlines
Outlining a roofline with lights is the most common—and least effective—approach for historic homes. It flattens dimensionality and reduces craftsmanship to cartoonish silhouette. Instead, adopt an architectural lighting philosophy: treat light as a tool for revealing hierarchy, rhythm, and materiality.
Start by identifying three tiers of features:
- Primary Features: Structural anchors—the front door surround, main entrance pediment, central dormer, or chimney crown. These deserve focused, directional light (e.g., narrow-beam LEDs).
- Secondary Features: Rhythmic elements—window mullions, brick corbels, dentil moldings, or shingle patterns. These respond best to grazing light (angled at 10–15°) to cast subtle shadows that enhance texture.
- Tertiary Features: Transitional zones—porch ceilings, soffits, or covered entries. Use diffused, ambient light here to create depth and avoid harsh contrasts.
Avoid uniform brightness. A Federal-style home with delicate fanlights benefits from 300-lumen spots at the keystone, then stepping down to 150 lumens along flanking pilasters. A Gothic Revival cottage gains gravitas when only the pointed-arch window apex glows—leaving the tracery in soft shadow.
Material-Specific Guidelines & Safety Protocols
Historic materials react unpredictably to modern lighting. Below is a field-verified reference table used by the Boston Landmarks Commission and Chicago Landmarks Division for seasonal lighting approvals:
| Architectural Material | Safe Light Type | Maximum Surface Temp | Prohibited Practices |
|---|---|---|---|
| Stained Glass (pre-1920) | Low-voltage LED strips (24V DC), mounted >6\" away on interior frame | 32°C (90°F) | No bulbs touching glass; no incandescents; no adhesive directly on lead came |
| Brownstone / Limestone | Ground-mounted uplights (shielded beam, 25° flood) | 38°C (100°F) | No direct-mount clips; no caulk or epoxy; no lights within 12\" of mortar joints |
| Cedar Shingles (original) | Micro-LED net lights draped loosely (no tension) over roof peak | 35°C (95°F) | No staples, nails, or hot glue; no lights resting in shingle grooves where moisture pools |
| Cast Iron (railings, gutters) | Magnetic channel + flexible LED rope (IP67 rated) | 40°C (104°F) | No overtightening magnets; no lights crossing weld seams where corrosion hides |
Crucially, all electrical components must be rated for outdoor wet-location use (UL 153 or UL 1598) and connected via GFCI-protected circuits. Never daisy-chain more than three 100-light strands—voltage drop causes uneven brightness and overheating at the first socket. Use a dedicated 15-amp circuit for lighting only; historic knob-and-tube wiring cannot safely support seasonal loads.
Mini Case Study: The 1887 Stick-Eastlake Rowhouse, Philadelphia
When the owners of a narrow, three-story rowhouse on Spruce Street sought holiday lighting, they faced strict guidelines from the Philadelphia Historical Commission: no penetrations, no visible transformers, and no lights within 18 inches of original stained-glass transoms. Their solution—developed with preservation electrician Lena Torres—became a neighborhood benchmark.
They installed four weighted base clamps on the granite stoop posts, each holding a 12W directional LED fixture aimed at the carved wooden brackets beneath the second-floor bay window. Along the wrought-iron porch railing, neodymium magnetic channels held 16 feet of warm-white (2700K) LED rope—positioned to graze the vertical board-and-batten siding, making the rhythmic pattern pop without washing out detail. Inside the entry vestibule, battery-powered micro-LEDs were taped (with archival-safe, acrylic-based tape) to the interior wood frame of the front door’s etched glass—illuminating the floral motif from behind, casting a soft halo onto the brick threshold.
Result: Zero damage after three seasons. The commission approved the plan in under 48 hours. Neighbors reported that the lighting made the house feel “more itself”—not brighter, but more legible.
Step-by-Step Installation Timeline (Pre-Thanksgiving to December 1)
- Week 1 (Assessment): Walk the property at dusk with a notebook. Map primary/secondary/tertiary features. Photograph mortar condition, wood grain direction, and metal patina. Note existing anchors (rail posts, fence bases, tree trunks).
- Week 2 (Procurement): Order only UL-listed, low-heat LEDs (max 1.5W per bulb). Purchase mounting hardware matching your substrate (magnets for iron, clamps for stone, straps for trees). Rent a thermal camera if possible—to verify surface temps during test runs.
- Week 3 (Dry Run): Set up mounts and lights without powering on. Check sightlines from sidewalk, street, and adjacent properties. Adjust angles until light enhances—not flattens—form. Time exposure: 30 seconds at f/2.8, ISO 3200 reveals glare or hotspots invisible to the naked eye.
- Week 4 (Installation): Mount hardware first. Then route cables using figure-eight wraps (never knots) to prevent tension. Connect end-to-end with waterproof gel-filled connectors—not twist-on wire nuts. Label every circuit breaker.
- December 1 (Final Review): At twilight, photograph before and after. Compare to archival photos of the home. If any feature looks “overlit” or “flattened,” dim or re-angle that fixture. Document setup with dated photos for next year’s permit application.
“Lighting historic buildings isn’t decoration—it’s conservation. Every watt we add must serve clarity, not spectacle. When done right, the lights disappear, and the architecture shines.” — Dr. Aris Thorne, Senior Architect, National Trust for Historic Preservation
FAQ
Can I use solar-powered lights for historic façades?
Only if mounting requires zero attachment—e.g., ground-placed stake lights aimed upward at foundation courses or chimneys. Avoid solar panels glued to roofs or walls; even “removable” adhesives degrade historic substrates over time. Battery-operated LEDs offer superior control, color consistency, and cold-weather reliability.
What’s the safest way to light a steeply pitched slate roof?
Do not walk on slate—it’s brittle and easily dislodged. Instead, use the over-the-roof cable method described earlier, or mount lightweight fixtures on the chimney crown (if structurally sound) and aim downward at the roof’s ridge line. Never attach anything directly to individual slate tiles.
How do I handle HOA or historic district approval?
Submit a lighting plan—not just product specs. Include annotated diagrams showing fixture locations, beam angles, lumen output per zone, and mounting methods. Emphasize reversibility: “All hardware detaches without residue; no penetrations; full removal scheduled January 7.” Most commissions approve plans that demonstrate material awareness and restraint.
Conclusion
Lighting a historic home isn’t about competing with modern spectacle—it’s about deep listening. It asks you to study the grain of the wood, the set of the mortar, the curve of the arch, and then offer light that honors what’s already there. When you illuminate a hand-forged hinge with a single focused beam, or let moonlight and string lights coexist in the same bay window, you’re not just decorating. You’re translating time into visibility. You’re saying: this matters. This endured. This deserves attention—not because it’s perfect, but because it’s true.
Start small this season. Choose one feature—a doorway, a gable, a single window—and light it with intention. Document your approach. Share your observations with local preservation groups. The most powerful advocacy for historic architecture isn’t grand policy—it’s thousands of homeowners making quiet, reverent choices, one luminous detail at a time.


 浙公网安备
33010002000092号
浙公网安备
33010002000092号 浙B2-20120091-4
Comments
No comments yet. Why don't you start the discussion?