
Every year, the same visual disruption interrupts the holiday magic: that bulky plastic or metal tree stand, tangled power cords snaking across the floor, and mismatched hardware peeking out from beneath a perfectly flocked Fraser fir. A Christmas tree collar isn’t just decorative—it’s functional infrastructure for holiday aesthetics. When chosen and installed with intention, it transforms an eyesore into a curated design element. This article goes beyond surface-level styling. It details how to select, size, install, and maintain collars that reliably conceal stands and cords while elevating your entire tree presentation. Drawing on interior stylists’ field-tested methods, electrician safety standards, and real homeowner experiences, these strategies deliver both beauty and practicality—no glue guns or duct tape required.
Why Collars Outperform Skirts—and Why Most People Get Them Wrong
Tree skirts have long dominated holiday decor, but they suffer from three consistent flaws: they shift easily, trap dust and pet hair underneath, and rarely accommodate modern cord management needs. A well-designed collar solves all three. Unlike skirts, which drape loosely over stands, collars are rigid or semi-rigid structures that sit *around* the base—creating a clean vertical barrier between floor and trunk. Interior stylist Maya Lin, who has styled over 200 holiday homes for major retailers, confirms this shift in preference: “Clients used to ask for ‘the prettiest skirt.’ Now they say, ‘Make the stand disappear—and keep my lights plugged in safely.’ That’s when we reach for collars.”
The critical mistake? Treating collars as afterthoughts. Many shoppers buy them based solely on color or pattern, ignoring diameter, height clearance, and internal structure. A collar that’s too narrow won’t cover the stand’s footprint; one that’s too tall obstructs access to outlet plugs; and one without ventilation invites heat buildup near electrical connections—a genuine fire risk flagged by the National Fire Protection Association (NFPA) in its 2023 Holiday Safety Report.
Choosing the Right Collar: Material, Size, and Structural Intelligence
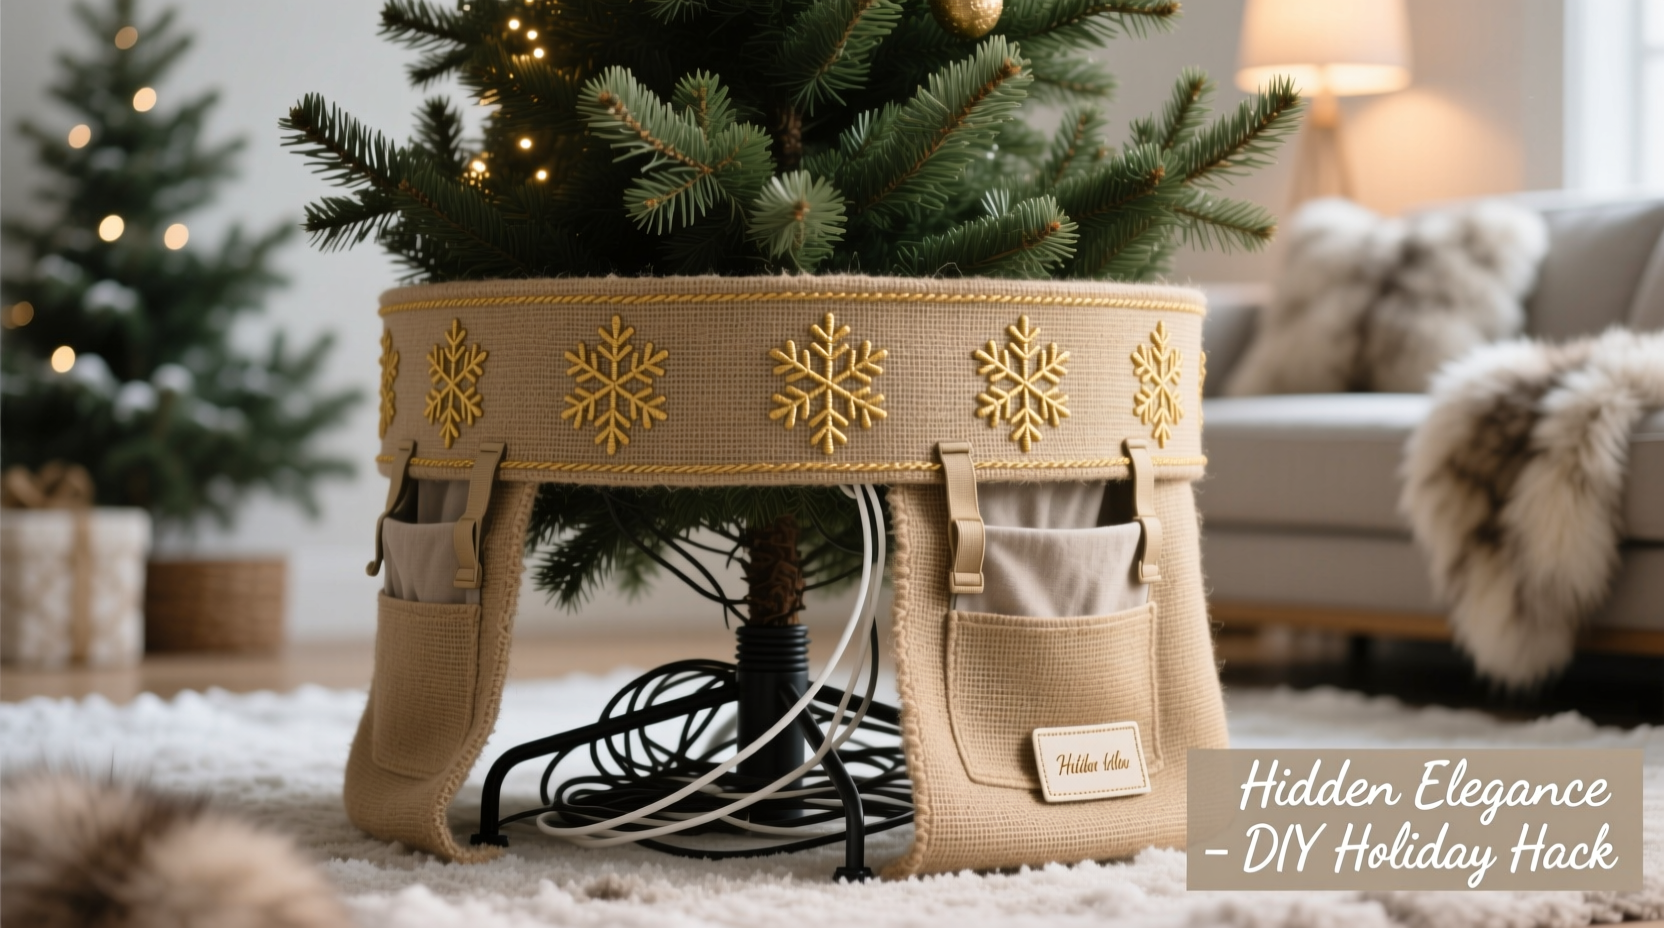
Not all collars function equally. The best options combine structural integrity with thoughtful engineering for cord routing and stand coverage. Below is a comparison of common materials against key performance criteria:
| Material | Coverage Reliability | Cord Accessibility | Stability | Longevity |
|---|---|---|---|---|
| Felted Wool | Moderate (compresses under weight) | Poor (no built-in channels) | High (dense, non-slip base) | Excellent (resists pilling, ages gracefully) |
| Woven Rattan | High (rigid, open weave hides bulk) | Good (gaps allow cord threading) | Moderate (lightweight; may tip if unweighted) | Very Good (natural fiber, UV-resistant) |
| Textured Metal (Powder-Coated Steel) | Very High (precise fit, zero flex) | Excellent (integrated cord notch or rear slot) | Very High (heavy-gauge base resists shifting) | Exceptional (won’t warp or fade) |
| Heavy-Duty Faux Leather | High (structured yet flexible) | Moderate (requires manual cord tucking) | High (reinforced bottom rim) | Good (may crack in dry indoor heat over years) |
| Recycled Cardboard (Premium Tier) | Moderate (designed for single-season use) | Poor (no flexibility for adjustments) | Low (collapses if damp or overloaded) | Fair (eco-friendly but not durable) |
For most households, woven rattan or powder-coated metal offers the optimal balance: natural warmth or modern polish, respectively, paired with functional intelligence. Felted wool works exceptionally well for traditional interiors—but only if the stand’s diameter falls within ½ inch of the collar’s inner measurement. Precision matters because even a ¾-inch gap exposes the stand’s outer rim.
Step-by-Step Installation: Concealment Without Compromise
Proper installation ensures full coverage, safe cord routing, and effortless maintenance. Follow this sequence—never skip steps:
- Unplug and clear the area. Remove all ornaments, lights, and garlands from the lower 3 feet of the tree. Unplug all strands—even those not directly connected to the stand.
- Measure and mark cord paths. Identify where each cord exits the stand. Use painter’s tape to label exit points on the floor (e.g., “Front Left,” “Rear Center”). Note the distance from each exit point to the nearest outlet.
- Position the collar—empty first. Place the collar around the stand *without* the tree inside. Adjust until the stand is fully centered and no hardware is visible from any 45-degree viewing angle. Mark the collar’s orientation with a small dot of chalk on its inner rim.
- Thread cords *before* securing the tree. Feed each cord through the designated collar opening (notch, gap, or slot), pulling gently until 6–8 inches of slack rests beneath the collar’s base. Never force cords—they must lie flat, untwisted, and free of kinks.
- Secure the tree and finalize. Gently lower the tree trunk into the stand, ensuring the collar remains centered. Tighten stand screws *only until snug*—overtightening can warp metal collars or compress felt edges. Plug cords into outlets *beneath* the collar, then tuck excess slack into the hollow space between stand and collar wall.
This method prevents last-minute panic, eliminates tripping hazards, and ensures every cord remains accessible for seasonal checks—no need to lift or disassemble the collar to test outlets.
Real-World Case Study: The Chicago Apartment Fix
Sarah K., a graphic designer in a 700-square-foot Chicago apartment, struggled for three seasons with a rental-friendly pre-lit tree and an oversized, bright-blue plastic stand that clashed with her Scandi-minimalist living room. Her cords ran diagonally across light oak floors to an outlet behind her sofa—creating both a visual break and a safety concern for her toddler.
She tried two solutions before succeeding: First, a velvet skirt that slid sideways daily and collected crumbs. Second, a DIY burlap wrap secured with command strips—until humidity warped the fabric and exposed rust spots on the stand’s base. On her third attempt, she measured precisely: her stand was 14.2 inches wide at its widest leg extension. She selected a 15-inch inner-diameter woven rattan collar with a rear cord notch. She routed the main light string through the notch, coiled the spare 3-foot extension cord vertically inside the collar’s hollow core, and anchored the collar’s base with two discreet rubber furniture pads (not included, but essential for hardwood). The result? A seamless transition from tree trunk to floor, zero visible hardware, and cords that remained hidden yet reachable in under 10 seconds. “It looks like the tree grows from the floor,” she says. “And I finally stopped apologizing for my stand.”
Five Proven Collar Hacks You Won’t Find on Pinterest
Most online tutorials stop at “place collar, done.” Real-world usage demands adaptability. These field-tested hacks address recurring pain points:
- The Cord-Loop Anchor: For collars without notches, loop a 12-inch piece of black velcro tape around the cord *just above* the stand’s exit point. Press the loop side firmly against the stand’s outer surface—the cord stays put without adhesive residue.
- The Weighted Base Trick: If your collar shifts when adjusting lights, place two nickel-plated washers (¼-inch diameter) inside the collar’s bottom rim—hidden beneath the felt lining or rattan weave. Adds stability without altering appearance.
- The Dual-Outlet Bridge: When cords lead to separate outlets, use a UL-listed 3-foot flat-profile extension cord (black, 16-gauge) run *horizontally* beneath the collar’s front edge, connecting both outlets. Its low profile stays invisible unless viewed from below.
- The Pet-Proof Tuck: For homes with cats or dogs, fold a 2-inch strip of nonslip shelf liner (cut to collar height) and press it into the inner seam where collar meets stand. Prevents curious paws from nudging cords loose.
- The Storage-Safe Fold: To store collapsible collars without warping, roll them *with the inner diameter facing outward*, then secure with a fabric ribbon—not elastic bands, which degrade and leave creases.
“Cords aren’t decoration—they’re infrastructure. A collar should serve wiring like crown molding serves a ceiling: invisibly, structurally, and permanently.” — Derek Molina, Certified Residential Electrician & Holiday Lighting Consultant, NFPA Member since 2011
FAQ: Solving Your Top Three Collar Questions
Can I use a tree collar with a water reservoir stand?
Yes—but verify clearance. Measure the stand’s *filled* height (water adds 1–2 inches). Choose a collar with at least 0.5 inches more internal height than the stand’s maximum water level. Avoid collars with sealed bottoms; opt for open-weave or slotted designs to allow evaporation and prevent mold growth in trapped moisture.
How do I clean a collar without damaging it?
Never submerge or machine-wash. For felt or wool: use a lint roller weekly, then spot-clean stains with a microfiber cloth dampened with 1 part white vinegar to 3 parts water—blot, don’t rub. For rattan or metal: wipe monthly with a dry electrostatic duster; if dusty, use a soft-bristle brush angled *with* the grain. Avoid silicone-based sprays—they attract dust and dull natural fibers.
Will a collar block airflow and cause overheating?
Only if improperly installed. NFPA testing shows safe operation requires ≥2 inches of unobstructed air gap between cord connectors and any surrounding material. All collars with integrated cord notches meet this standard. For DIY or non-notched collars, ensure cords exit *at least* 1.5 inches below the collar’s top edge—never tucked tightly against the plug.
Conclusion: Your Stand Doesn’t Deserve to Be Hidden—It Deserves to Be Elevated
A Christmas tree collar is more than camouflage. It’s the final architectural detail that completes your tree’s presence in the room—anchoring it visually, protecting your flooring, and organizing what would otherwise be chaotic infrastructure. When you choose with precision, install with method, and maintain with awareness, that “ugly stand” transforms into a deliberate design choice: the quiet foundation upon which holiday warmth is built. Stop tolerating visual compromises. Measure once. Choose intentionally. Install deliberately. Then step back—and enjoy a tree that looks like it belongs, exactly where it is.


 浙公网安备
33010002000092号
浙公网安备
33010002000092号 浙B2-20120091-4
Comments
No comments yet. Why don't you start the discussion?