
Decorating for the holidays brings warmth and joy, especially during the winter season. But if you're renting, the excitement of hanging Christmas lights often comes with hesitation—will it damage the walls? Will the landlord charge a fee? These concerns are valid, and many renters avoid festive displays altogether. The good news: there’s a simple, damage-free solution. Command hooks offer a reliable way to hang Christmas lights on rental properties without nails, screws, or permanent fixtures. When used correctly, they provide strong support, are easy to remove, and leave no residue behind.
This guide walks through everything you need to know about using Command hooks for Christmas lights in rental homes, apartments, and condos. From selecting the right type of hook to proper installation and seasonal maintenance, this article ensures your holiday display is both dazzling and renter-friendly.
Why Command Hooks Are Ideal for Renters
Rental agreements typically prohibit modifications that alter the structure or finish of a property. Traditional methods of hanging Christmas lights—nails, staples, or adhesive tapes not designed for outdoor use—can lead to paint chipping, holes, or sticky residue. Landlords may deduct repair costs from security deposits, making such decorations a financial risk.
Command hooks, developed by 3M, are engineered specifically to stick securely yet remove cleanly. They use a revolutionary adhesive technology that bonds to various surfaces—including painted drywall, wood, tile, and metal—without causing damage when removed properly. This makes them ideal for temporary holiday installations.
Moreover, Command offers multiple product lines tailored to different weight loads and environments. Whether you’re decorating indoors or outdoors, light strings weighing several pounds can be supported safely as long as the correct hook type and number are used.
“Renters don’t have to sacrifice festive spirit for fear of penalties. With the right tools like Command hooks, holiday lighting can be both beautiful and reversible.” — Sarah Lin, Interior Designer & Renter Advocate
Selecting the Right Command Hook for Your Lights
Not all Command hooks are created equal. Using the wrong type can result in sagging wires, fallen strands, or accidental damage during removal. To ensure success, match the hook to your specific lighting setup and surface type.
Consider these factors when choosing:
- Weight of the lights: Measure the total weight of each string. LED lights are lighter than incandescent; longer strands weigh more.
- Indoor vs. outdoor use: Outdoor hooks are weather-resistant and UV-protected.
- Surface material: Smooth, clean surfaces work best. Textured or freshly painted walls (less than 28 days old) may not hold well.
- Spacing needs: More hooks mean better weight distribution and less strain on individual adhesives.
Recommended Command Hook Types
| Hook Type | Max Weight | Best For | Indoor/Outdoor |
|---|---|---|---|
| Large Clear Hooks | 4 lbs per pair | Heavy-duty indoor garlands or thick light cords | Indoor only |
| Medium Picture Hanging Hooks – White | 3 lbs per pair | Standard LED string lights indoors | Indoor |
| Outdoor Large Hooks | 7.5 lbs per pair | Exterior eaves, railings, siding | Outdoor |
| Utility Hooks – Small | 1 lb per pair | Light curtain-style LEDs or indoor accents | Indoor |
| Moving Strips (for flat mounting) | Up to 12 oz per strip | Backing strips for flush-mounted lights on trim | Indoor/Outdoor |
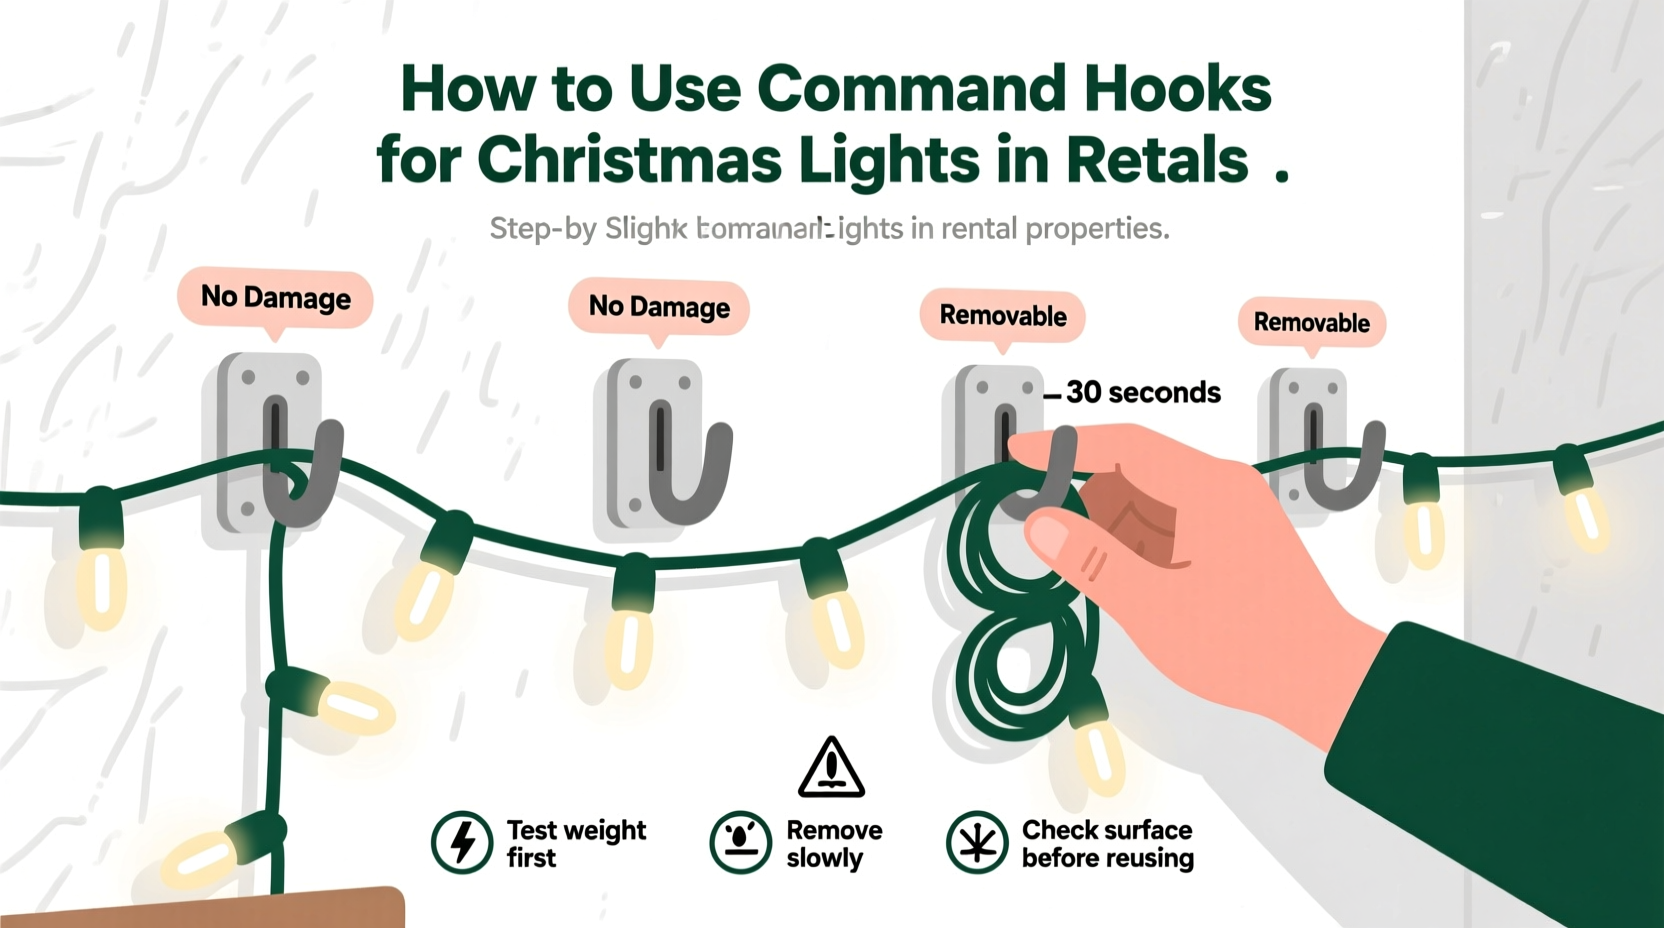
Step-by-Step Guide: Installing Christmas Lights with Command Hooks
Proper installation is critical to ensure safety, stability, and clean removal later. Follow this timeline-based process for best results.
- Plan Your Layout (Day 1)
Walk around your space and sketch where lights will go—windows, door frames, balconies, stair railings. Note distances and turns. Use a measuring tape to calculate total length needed. - Test Light Functionality (Day 2)
Plug in each strand to confirm all bulbs work. Replace faulty sections now before hanging. - Clean Surfaces Thoroughly (Day of Installation)
Wipe areas with rubbing alcohol on a lint-free cloth. Let dry completely. Dust, grease, or moisture prevents proper adhesion. - Apply Hooks According to Spacing Guidelines (Ongoing)
Space hooks every 12–18 inches along straight runs. At corners or bends, place one on each side. Press firmly for 30 seconds per hook. - Hanging the Lights (Same Day)
Gently drape lights over hooks. Avoid pulling or tugging. Let gravity settle the cord into place. - Final Inspection & Adjustment (After Hanging)
Check for gaps, sags, or loose ends. Add extra hooks if needed. Ensure plugs are accessible and cords aren’t stretched.
When to Install for Best Results
Aim to install your lights at least three days before guests arrive or events begin. This allows time for troubleshooting and gives the adhesive full strength—Command products reach maximum bond after 24–48 hours.
Avoiding Common Mistakes
Even experienced decorators make errors when using adhesive hooks. Here are frequent missteps and how to prevent them.
- Skipping surface cleaning: Oils from hands or airborne grime weaken the bond. Always wipe with alcohol before applying.
- Overloading a single hook: Distribute weight across multiple points. Never exceed the listed weight limit.
- Peeling off too quickly: Removing hooks improperly can lift paint. Pull straight down slowly along the tab until the adhesive releases.
- Using indoor hooks outside: Humidity, rain, and temperature swings degrade non-outdoor-rated adhesives.
- Ignoring manufacturer instructions: Each product has unique application steps. Read the package carefully.
Do’s and Don’ts Summary
| Action | Do | Don't |
|---|---|---|
| Surface Prep | Clean with isopropyl alcohol | Apply to dusty or greasy walls |
| Application | Press firmly for 30 seconds | Just stick and walk away |
| Weight Load | Use multiple hooks for heavy strands | Drape 50 feet of lights on two hooks |
| Removal | Pull tab downward slowly | Yank sideways or upward |
| Environment | Use outdoor-rated hooks outside | Assume all hooks are weatherproof |
Real Example: A Successful Apartment Balcony Display
Jamie, a tenant in a Chicago high-rise apartment, wanted to decorate her ninth-floor balcony for Christmas but was nervous about violating her lease. Her building prohibited any drilling or fasteners on exterior surfaces. After researching options, she decided to try Command Outdoor Large Hooks.
She measured her railing perimeter (28 feet), purchased four packs of outdoor hooks (rated for 7.5 lbs each), and chose warm-white LED net lights weighing approximately 2.8 lbs total. She cleaned the metal railing with alcohol wipes, applied a hook every 14 inches, and gently draped the netting over them. She left the lights up for six weeks, through snow and wind gusts up to 30 mph.
After the holidays, she slowly pulled each tab downward. Every hook released cleanly, leaving no marks. Her landlord inspected the unit and confirmed no damage. Jamie saved $150 in potential deposit deductions—and received compliments from neighbors who asked how she did it.
Essential Checklist Before You Begin
- Review your rental agreement for decoration clauses
- Measure total length of light strings
- Weigh each strand or check packaging specifications
- Determine whether installation is indoor or outdoor
- Choose appropriate Command hook type based on weight and environment
- Clean all mounting surfaces with rubbing alcohol
- Allow 24–48 hours for adhesive to cure before final adjustments
- Label cords or take photos so removal is easy and organized
- Store original packaging in case replacements are needed
- Plan removal date and method to avoid last-minute stress
Frequently Asked Questions
Can I reuse Command hooks after removing them?
No, Command hooks are designed for single-use only. Once removed, the adhesive strip loses its effectiveness. However, replacement strips are available for some models, allowing you to reuse the plastic hook body.
Will Command hooks work on stucco or brick walls?
They are not recommended for rough, porous surfaces like stucco, brick, or stone. The adhesive cannot form a continuous seal. For these materials, consider removable tension rods, magnetic clips (on metal surfaces), or freestanding light frames instead.
How do I remove Command hooks without damaging the wall?
Hold the base of the hook steady and pull the removal tab straight down slowly and steadily. Do not jerk or twist. If resistance increases, pause and continue gently. The adhesive should stretch and release cleanly. Any residual glue can be removed with fingers or a soft cloth.
Final Thoughts: Celebrate Freely, Remove Responsibly
Holiday decorating shouldn’t come at the cost of your security deposit or peace of mind. With Command hooks, renters can enjoy the same festive ambiance as homeowners—without permanent changes or hidden risks. The key lies in preparation, product selection, and mindful installation.
By following the guidelines outlined here—from choosing weather-appropriate hooks to spacing them correctly and removing them with care—you protect both your home and your tenancy. You also set an example for responsible, creative living within rental boundaries.
The holidays are about connection, warmth, and shared moments. Let your lights reflect that spirit—not anxiety over what happens when you move out. With the right approach, you can shine brightly, season after season, wherever you call home.


 浙公网安备
33010002000092号
浙公网安备
33010002000092号 浙B2-20120091-4
Comments
No comments yet. Why don't you start the discussion?