
Hanging Christmas lights on a brick exterior often feels like a dilemma: you want the festive glow, but not at the cost of permanent holes or damaged masonry. Traditional methods like nails or screws can crack bricks or leave lasting marks, especially in older homes. Fortunately, Command™ hooks offer a reliable, no-drill solution that’s both removable and residue-free when used correctly. With the right technique and preparation, you can achieve a professional-looking light display without compromising your home’s integrity.
This guide walks through every step—from selecting the right hook to spacing lights evenly—so you can decorate with confidence. Whether you're a first-time holiday decorator or looking for a gentler alternative to drilling, this method is practical, cost-effective, and seasonally sustainable.
Why Avoid Drilling Into Brick?
Brick is durable, but it’s not immune to damage. Hammering nails or drilling into mortar or brick can lead to cracks, spalling (surface flaking), or water infiltration over time. Repointing mortar or patching holes adds expense and effort, especially if you rent or plan to sell your home. Even small fasteners disrupt the aesthetic of clean brickwork.
Additionally, seasonal decor doesn’t require permanent fixtures. Why commit to year-round hardware for something displayed just a few weeks? Command hooks provide temporary hold with strong adhesion, designed specifically for smooth and semi-rough surfaces—including properly prepared brick.
“Using adhesive solutions like Command hooks on brick has become a go-to for homeowners who value both aesthetics and preservation.” — Derek Langston, Home Exterior Consultant
Selecting the Right Command Hooks for Brick
Not all Command hooks are created equal. Brick is porous and textured, which challenges standard adhesives. To succeed, choose products engineered for heavier loads and rougher surfaces.
Look for:
- Weather-resistant models: Labeled as outdoor-safe or UV-resistant.
- Weight-rated capacity: Each hook should support at least 2–4 pounds, depending on light strand density.
- Specialty adhesive backing: Some Command Outdoor products use industrial-strength adhesives suitable for stucco, vinyl, and painted brick.
- Size and shape: J-hook or utility hooks offer better grip for light strands than flat loops.
Recommended Command Hook Types
| Hook Model | Weight Capacity | Best For |
|---|---|---|
| Command Outdoor Large J-Hook | 4 lbs per hook | Heavy-duty LED strands, garlands |
| Command Medium Refillable Hooks | 2 lbs per hook | Standard incandescent or lightweight LED strings |
| Command Adhesive Strips (Double-Lock) | Up to 5 lbs (when layered) | Reinforcing existing hooks or DIY anchor points |
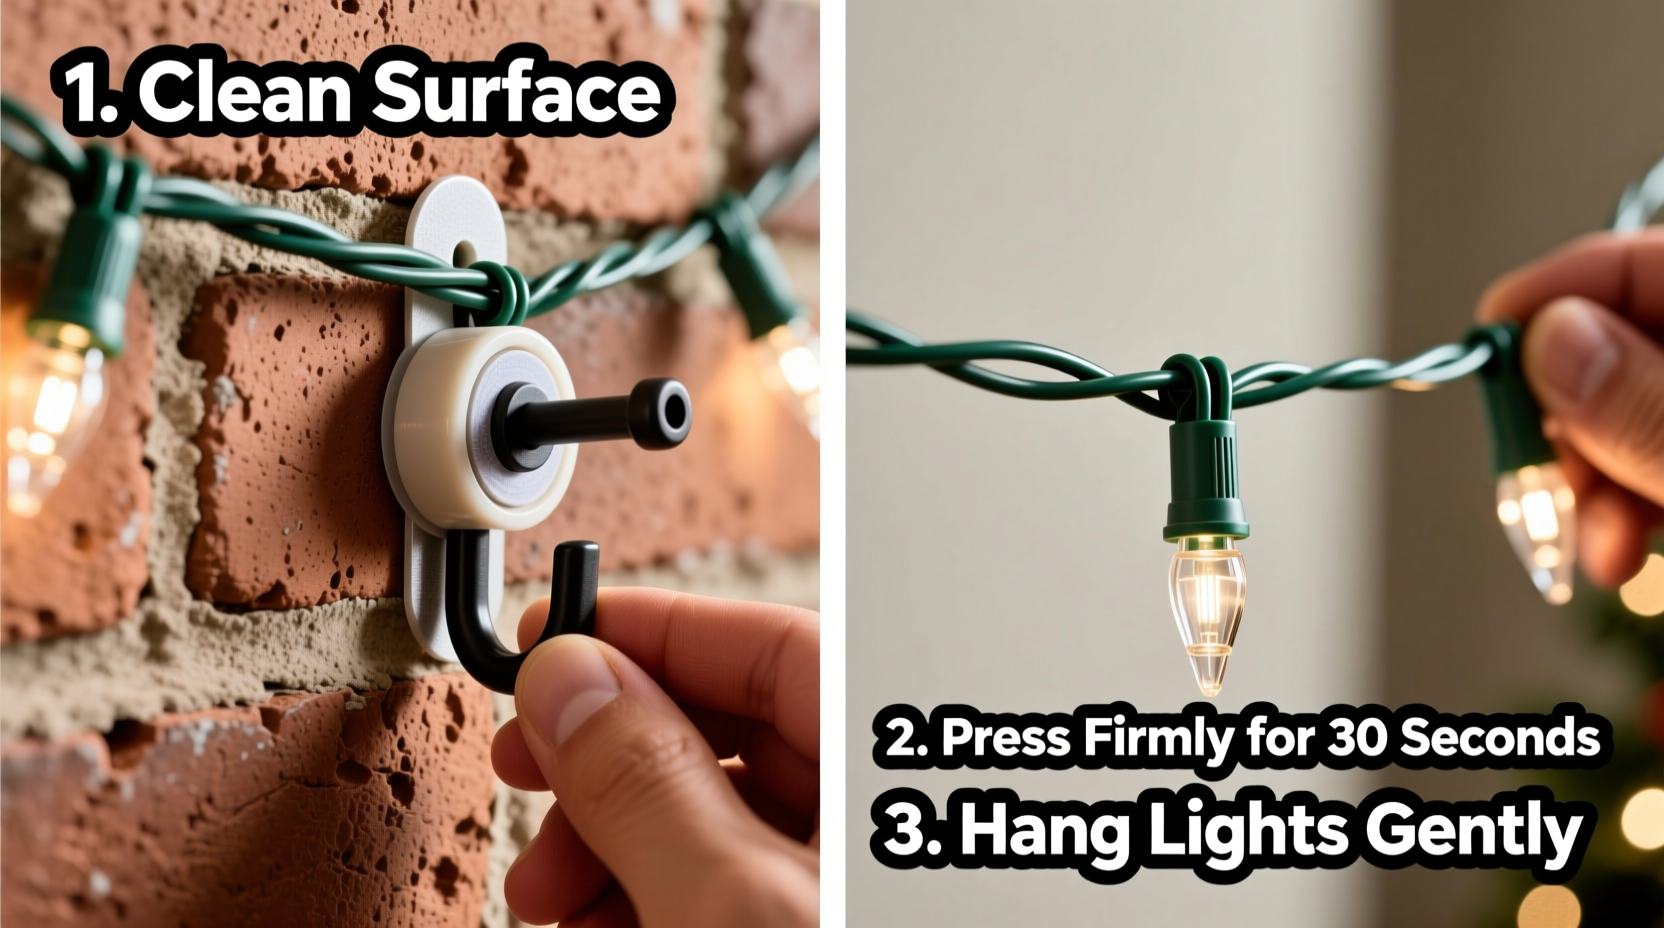
Step-by-Step Guide: Hanging Lights on Brick Without Drilling
Success hinges on surface prep, correct placement, and patience during installation. Follow this timeline for best results.
- Plan Your Light Layout (15–20 minutes)
Sketch a rough outline of where lights will go—along eaves, around windows, or down columns. Measure total linear feet needed and calculate how many light strands and hooks you’ll require. A general rule: place hooks every 12–18 inches for even support. - Clean the Brick Surface (30 minutes)
Use a soft brush and mild detergent mixed with water to scrub the areas where hooks will adhere. Remove dirt, algae, and chalky residue. Rinse with clean water and let dry completely—ideally 24 hours in direct sun. Moisture or grime drastically reduces adhesive strength. - Prepare the Hooks (10 minutes)
Remove the protective liner from the adhesive strip only when ready to apply. Handle the sticky side minimally to avoid oils from skin weakening the bond. - Apply Hooks with Firm Pressure (5 seconds per hook)
Press each hook firmly onto the brick for at least 30 seconds. Use the palm of your hand or a small block of wood to distribute pressure evenly. This activates the adhesive and ensures full contact with the uneven surface. - Wait 48 Hours Before Hanging Lights
This is critical. The adhesive needs two full days to reach maximum bond strength, especially in cooler temperatures. Do not rush this step—even if the package says “ready in one hour,” brick demands longer curing. - Hang the Lights Gradually
Start at one end and drape the light strand over each hook. Avoid pulling taut; allow slight slack between supports to prevent strain. If using multiple strands, stagger connections so weight isn’t concentrated in one spot. - Inspect and Adjust
Step back and view from different angles. Adjust spacing or reposition hooks if needed—but only before the 48-hour mark. After that, moving them risks tearing the adhesive pad.
Tips for Maximum Hold and Safety
Brick varies in texture and porosity. These strategies improve success across different surfaces:
- Painted brick adheres better than bare brick. If your exterior is painted, ensure the paint is intact and not peeling—hooks stick best to stable, sealed surfaces.
- Avoid frost or damp conditions when applying hooks. Ideal temps are between 50°F and 90°F (10°C–32°C).
- Use overlapping strips for extra-heavy decorations. Layer a second Command strip beneath a hook for added security.
- Angle hooks downward slightly so light strands don’t slip off in wind or rain.
- Don’t overload hooks. Stick to rated weight limits—even if the hook seems secure, cold weather can weaken adhesives over time.
Real Example: Decorating a Two-Story Colonial
Sarah Thompson, a homeowner in Richmond, Virginia, wanted to frame her front porch and second-floor windows with warm white LED lights for the holidays. Her house has original 1920s brick, and she was advised against drilling by her historic preservation board.
She purchased 24 Command Outdoor Large J-Hooks, spacing them every 15 inches along the brick facade and under the eaves. After cleaning the surface with a vinegar-water mix and allowing two days of cure time, she hung six connected strands totaling 180 feet.
The display lasted five weeks through snow, wind, and freeze-thaw cycles. When she removed the hooks in January, she followed the manufacturer’s instructions—pulling the tab straight down slowly—and found zero residue or damage. “I was skeptical at first,” she said, “but they held up better than I expected. Now I do this every year.”
Do’s and Don’ts When Using Command Hooks on Brick
| Do’s | Don’ts |
|---|---|
| Do clean and dry brick thoroughly before application | Don’t apply to wet, dusty, or crumbling surfaces |
| Do wait 48 hours before loading the hook | Don’t hang lights immediately after placing the hook |
| Do use outdoor-rated Command products | Don’t substitute indoor hooks for exterior use |
| Do remove hooks slowly using the tab | Don’t yank hooks sideways or upward |
| Do store leftover hooks in a cool, dry place | Don’t expose adhesive strips to heat or humidity before use |
Frequently Asked Questions
Can Command hooks really hold up in winter weather?
Yes—when using outdoor-rated models. These are designed to withstand temperatures as low as -20°F and resist moisture, UV rays, and wind. However, prolonged exposure to ice buildup or heavy snow sliding off roofs may stress the bond. Inspect periodically during extreme conditions.
Will removing the hooks damage the brick?
No, not if done correctly. Pull the tab at a steady, downward angle. The adhesive is formulated to stretch and release cleanly. On older or highly porous brick, a faint mark may appear temporarily but usually fades with rain or light cleaning.
What if a hook fails mid-season?
If a hook detaches, check the surface for debris or moisture at the time of initial application. Re-clean the area, apply a new outdoor-rated hook, and allow another 48 hours before re-hanging lights. Consider doubling up with an additional hook nearby for redundancy.
Checklist: Hang Christmas Lights on Brick Safely
- Measure and map out light layout
- Buy outdoor-rated Command hooks (J-hooks recommended)
- Clean brick surface with mild soap and water
- Allow brick to dry completely (24+ hours)
- Apply hooks with firm, sustained pressure
- Wait 48 hours before hanging lights
- Install lights with slight slack between hooks
- Inspect weekly during display period
- Remove hooks slowly by pulling the tab straight down
- Store unused hooks in original packaging for next year
Conclusion: Enjoy Festive Lights Without the Damage
Hanging Christmas lights on brick doesn’t require compromising your home’s exterior. With proper planning and the right Command hooks, you can create a dazzling display that’s safe, reversible, and respectful of your property’s structure. The key lies in preparation—clean surfaces, correct product selection, and patience during the curing phase.
Thousands of homeowners have made the switch from drilling to adhesive solutions, finding that modern technology delivers both convenience and reliability. This holiday season, skip the drill and embrace a smarter way to shine.


 浙公网安备
33010002000092号
浙公网安备
33010002000092号 浙B2-20120091-4
Comments
No comments yet. Why don't you start the discussion?