
Holiday decorating brings joy, but it often comes with a hidden cost: damaged walls. For homeowners and renters alike, hanging Christmas lights without chipping paint or leaving behind stubborn marks is a top concern. Traditional nails and tape can compromise wall finishes, especially on freshly painted surfaces. Fortunately, Command™ hooks offer a reliable, damage-free alternative—if used correctly. With the right technique, you can create a festive display that’s both beautiful and safe for your walls.
The key lies in understanding how these adhesive hooks work, selecting the appropriate type, and following a precise installation process. When done properly, Command hooks support lightweight string lights securely while removing cleanly when the season ends. This guide walks through every step—from preparation to takedown—ensuring your holiday décor shines without sacrificing your wall’s integrity.
Understanding Command Hooks and Painted Walls
Command hooks rely on a special foam-based adhesive that bonds to smooth, clean surfaces. Unlike tapes or putties, they’re engineered to hold firmly during use yet detach cleanly when removed by following the correct removal method. However, their performance depends heavily on surface compatibility and environmental conditions.
Painted walls, particularly those with latex or acrylic finishes, are generally compatible with Command products—as long as the paint is fully cured. Fresh paint needs time to harden; applying hooks too soon increases the risk of peeling. Most manufacturers recommend waiting at least 7–10 days after painting before attaching any adhesive products. Glossy or semi-gloss finishes tend to work better than flat paints, which have a porous texture that may reduce adhesion strength.
“Adhesive technology has advanced significantly, but success still hinges on proper surface prep and timing. Never rush decorative installations on new paint.” — Sarah Linwood, Interior Finish Specialist
Additionally, temperature and humidity affect bonding. The ideal application environment is between 65°F and 85°F (18°C–29°C) with low moisture. Installing hooks in cold garages or damp basements reduces effectiveness, even if the wall appears dry.
Choosing the Right Command Hook for Christmas Lights
Not all Command hooks are created equal. Selecting the wrong size or style can lead to sagging wires, fallen strands, or accidental paint lifting. Christmas lights vary in weight depending on length, bulb type (LED vs. incandescent), and wire thickness. Most string lights weigh between 0.25 and 1 pound per 25 feet, placing them in the “light to medium” load category.
For standard LED string lights (the most common and lightweight option), small or medium clear plastic hooks are sufficient. These typically support up to 1 pound and blend into trim or corners. For heavier incandescent sets or longer runs with multiple strands, opt for larger utility hooks rated for 3–4 pounds. J-hook styles provide better grip for thicker cords.
| Hook Type | Weight Capacity | Best For | Avoid On |
|---|---|---|---|
| Small Clear Hooks | Up to 1 lb | LED mini lights, indoor trim | Exterior walls, humid areas |
| Medium Picture Hooks | Up to 3 lbs | Denser light strings, longer runs | Textured or cracked paint |
| Utility Hooks (Large) | Up to 7.5 lbs | Multiple strand clusters, icicle lights | Freshly painted walls (under 7 days) |
| Outdoor Strips | Up to 4 lbs | Protected eaves, covered porches | Direct rain exposure |
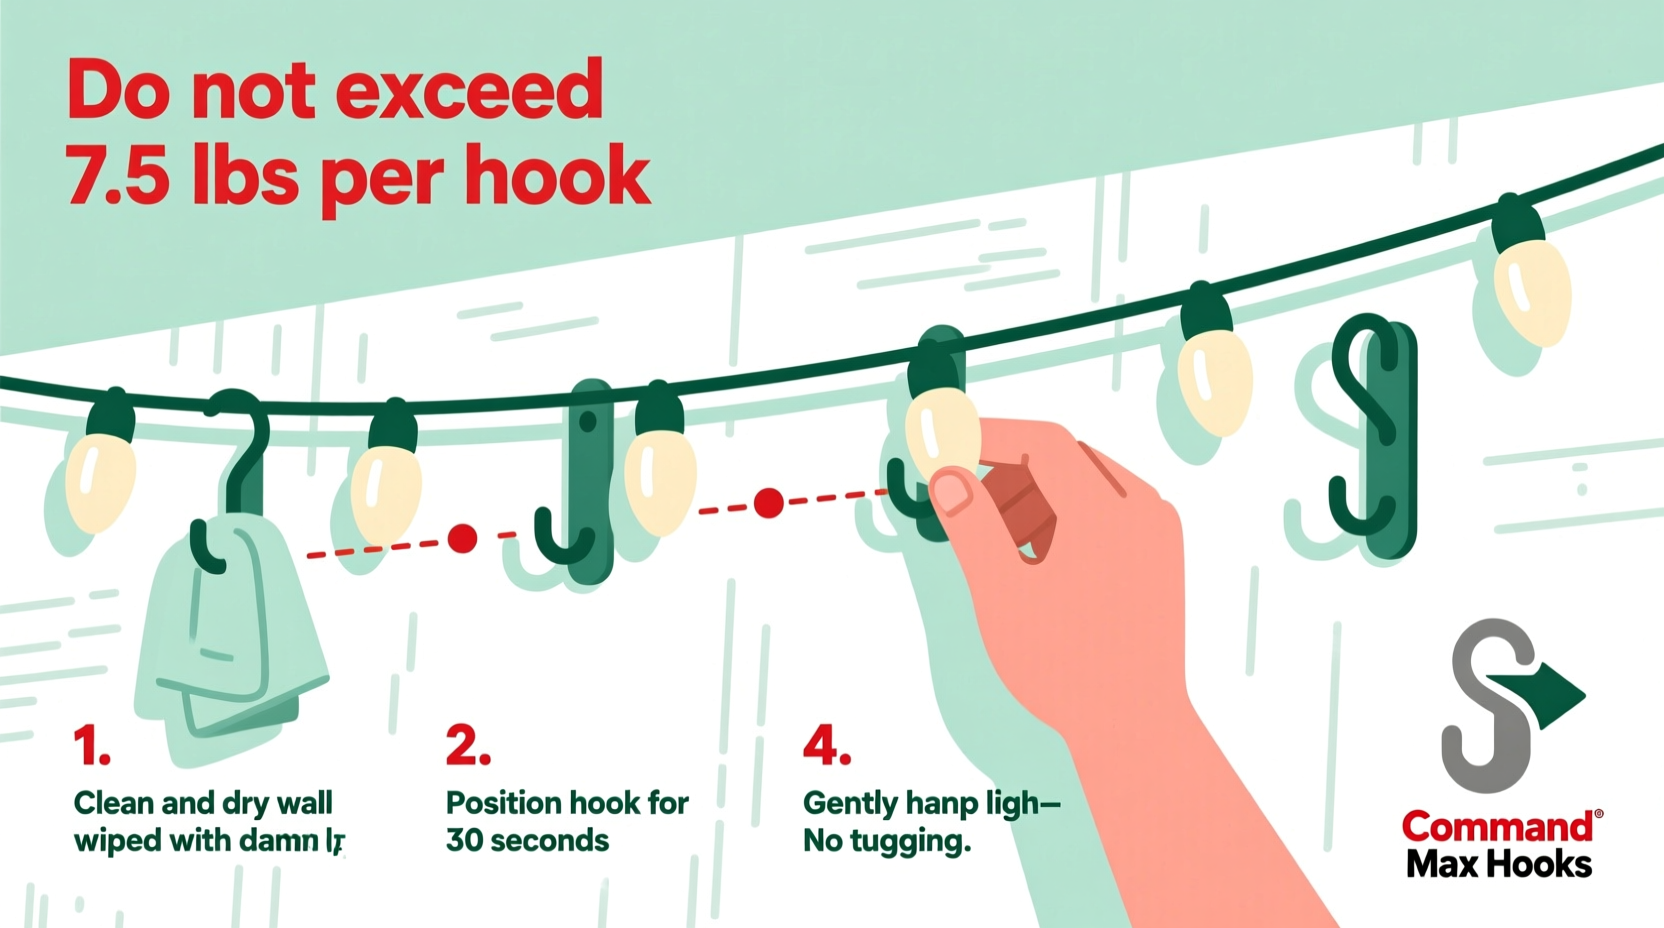
Step-by-Step: Installing Command Hooks for Christmas Lights
Proper installation ensures maximum holding power and clean removal. Follow this sequence carefully to avoid compromising your painted walls.
- Plan your layout. Lay out the lights on the ground first to determine spacing. Mark approximate hook positions with a soft pencil dot—no more than 18–24 inches apart for consistent support.
- Clean the wall surface. Use isopropyl alcohol (70% or higher) and a lint-free cloth to wipe each attachment point. Let dry completely. Do not use household cleaners, which leave residues that weaken adhesion.
- Wait for optimal conditions. Install hooks during daytime hours when room temperature is stable and humidity is below 60%. Avoid early mornings when condensation may be present.
- Peel and press. Remove the backing from the hook’s adhesive pad. Align precisely over your mark and press the hook firmly against the wall with your palm for 30 seconds. Apply even pressure—don’t rub or slide.
- Wait before loading. Allow the adhesive to bond for at least one hour before hanging lights. For best results, wait 24 hours, especially in cooler rooms.
- Hang lights gently. Drape the cord over the hook without tugging. Avoid twisting or pinching the wire, which could strain the hook’s base.
For vertical drops—such as stair railings or window frames—use paired hooks: one at the top edge and another partway down to prevent swaying. On crown molding or doorframes, position hooks so the weight pulls parallel to the wall, reducing outward stress.
Avoiding Common Mistakes
Even experienced decorators make errors that compromise wall safety. Awareness prevents costly oversights.
- Skipping surface cleaning. Dust, oils, and invisible residues block adhesion. Always clean with alcohol before applying.
- Using expired hooks. Adhesive degrades over time. Check packaging for expiration dates—typically two years from manufacture.
- Overloading a single hook. Distribute weight evenly. If a section sags, add an extra hook instead of relying on adjacent ones.
- Removing incorrectly. Yanking hooks off creates paint tears. Always stretch the removal strip slowly downward until the bond releases.
- Ignoring paint age. Applying hooks within 48 hours of painting dramatically increases failure risk. Wait at least a week.
Real-World Example: A Renters’ Holiday Solution
Julia, a tenant in a historic Boston brownstone, wanted to decorate her living room for Christmas but feared damaging the recently repainted off-white walls. Her lease prohibited nails or permanent fixtures. After researching options, she chose medium-sized clear Command hooks for her 25-foot LED string lights.
She waited 12 days after painting to ensure full cure, cleaned each spot with alcohol, and installed six hooks along the ceiling line. She allowed 36 hours of bonding time before draping the lights. Throughout December, the display remained secure—even during a weekend party with open windows and fluctuating temperatures.
When it came time to remove them in January, Julia followed the manufacturer’s instructions: she pulled the removal strip straight down at a slow, steady pace. Every hook released cleanly, leaving no marks. Her landlord later complimented the apartment’s condition, unaware it had hosted a full holiday setup.
“Renters shouldn’t have to choose between celebration and responsibility. Smart tools make seasonal joy possible without long-term consequences.” — Marcus Tran, Property Management Consultant
End-of-Season Removal: Preserving Your Walls
The true test of a damage-free system isn't just installation—it's removal. Many people succeed at hanging lights only to ruin their effort in the final step by tearing hooks off abruptly.
To remove Command hooks safely:
- Unplug and take down all lights first.
- Grasp the removal strip at the bottom of the hook.
- Pull straight down toward the floor in a slow, continuous motion. Do not jerk or angle sideways.
- If resistance increases, pause and apply gentle heat with a hairdryer (low setting, 30 seconds) to soften the adhesive.
- Once detached, inspect the wall. Any residual adhesive can be removed by rubbing gently with the same alcohol wipe used during installation.
Never use blades, scrapers, or solvents. These may scratch or discolor paint. If a small amount of paint lifts despite careful removal, touch-up paint from your original supply can usually conceal the spot.
FAQ: Common Questions About Command Hooks and Holiday Lights
Can I reuse Command hooks after taking them down?
No. Once removed, the adhesive pad loses its bonding ability and structural integrity. Reusing them risks immediate failure. Always use fresh hooks for each season.
What should I do if a hook falls off mid-season?
First, check the cause. Was the wall dirty? Was the paint too fresh? Clean the area thoroughly, allow it to dry, and reapply a new hook of equal or greater strength. Consider upgrading to a larger size if weight was the issue.
Are there alternatives to Command hooks for painted walls?
Yes, but with trade-offs. Plastic clip strips (non-adhesive) require drilling. Over-door hooks only work on certain edges. Magnetic hooks need metal backing. For true no-damage hanging, Command remains the top choice when used correctly.
Checklist: Safe Christmas Light Hanging with Command Hooks
- Confirm paint is at least 7 days old
- Select hook type based on light weight
- Plan hook placement (every 18–24 inches)
- Gather supplies: Command hooks, alcohol wipes, lint-free cloth, pencil
- Ensure room temperature is between 65°F–85°F
- Clean each spot with alcohol and let dry
- Peel backing and press hook firmly for 30 seconds
- Wait at least 1 hour (ideally 24) before loading
- Gently drape lights—do not tug or twist
- Remove lights first
- Pull removal strip straight down slowly
- Clean any residue with alcohol
- Store leftover hooks in original packaging for future use
Conclusion: Celebrate Safely and Stress-Free
Hanging Christmas lights doesn’t have to mean trading festive cheer for wall damage. With Command hooks and the right approach, you can achieve a professional-quality display that respects your home’s finish. The process demands patience—especially in preparation and removal—but the payoff is lasting beauty both during and after the holidays.
Whether you're sprucing up a rental, protecting a newly renovated space, or simply avoiding February repair projects, this method delivers peace of mind. By choosing the correct hook, preparing your surface, and following proven steps, you safeguard your walls while spreading seasonal warmth.


 浙公网安备
33010002000092号
浙公网安备
33010002000092号 浙B2-20120091-4
Comments
No comments yet. Why don't you start the discussion?