
Decorating for the holidays should bring joy—not damage to your walls or a weekend spent patching holes. Yet many homeowners hesitate to string up Christmas lights because they fear permanent marks, especially when dealing with heavier strands like commercial-grade LED sets or vintage incandescent strings. The good news: you don’t need to drill a single hole. With the right type of Command hooks and proper installation techniques, you can securely hang even heavy Christmas lights on a variety of surfaces—brick, stucco, wood, vinyl siding, and painted drywall—without compromising your home’s finish.
The key lies in understanding weight distribution, surface compatibility, and the correct use of adhesive technology. Modern Command products have evolved beyond lightweight picture hangers. Heavy-duty versions now support up to 7.5 pounds per hook, making them viable for seasonal lighting displays when used strategically. This guide walks through every step—from selecting the right hook to spacing patterns and removal—with real-world advice that ensures both safety and sparkle.
Choosing the Right Command Hook for Heavy Lights
Not all Command hooks are created equal. Using a small, standard hook meant for towels on a dense strand of 300-bulb lights will end in disappointment—and possibly a tangled mess on your porch. The first step is matching the hook’s load capacity to your light set’s weight.
Start by checking the packaging or manufacturer specs for your Christmas lights. Most pre-lit garlands and long outdoor strands weigh between 2 and 6 pounds. Some commercial or vintage-style sets can exceed 7 pounds, especially when factoring in moisture from rain or snow. Always add a 20% safety margin when estimating weight.
Command offers several heavy-duty options:
- Command Large Clear Outdoor Hooks – Supports up to 7.5 lbs; UV-resistant and weatherproof.
- Command Jumbo Quartz Hooks – Same weight rating, but with a wider base for better adhesion on textured surfaces.
- Command Adhesive Strips (Double-sided, Extra Strong) – Can be paired with non-adhesive clips for custom mounting.
For best results, choose outdoor-rated hooks. These are designed to withstand temperature fluctuations, humidity, and sunlight exposure—all critical during winter months.
Surface Preparation and Proper Installation
Even the strongest adhesive fails if applied incorrectly. Over 80% of Command hook failures stem from poor surface prep, not product defects. Whether you're working on smooth stucco or painted trim, follow these steps to ensure maximum bond strength.
- Clean the area thoroughly – Use isopropyl alcohol and a lint-free cloth to remove dust, grease, or wax. Avoid household cleaners with moisturizers or silicone, which leave invisible residues.
- Dry completely – Moisture interferes with adhesion. Wait at least 30 minutes after cleaning before applying the hook.
- Apply firm, consistent pressure – Press the hook onto the surface for 30 seconds. Don’t just stick it and walk away. Use the heel of your hand to ensure full contact, especially along the edges.
- Wait 1 hour before loading – Command’s adhesive needs time to cure. Applying weight too soon reduces holding power by up to 50%.
Temperature matters. Install hooks when ambient temperatures are between 50°F and 100°F (10°C–38°C). Cold surfaces inhibit bonding, while excessive heat can cause premature softening.
“Adhesive performance isn’t just about strength—it’s about surface energy. Smooth, non-porous materials like glass, metal, and finished wood offer the best grip.” — Dr. Alan Reyes, Materials Scientist, Adhesive Research Group at MIT
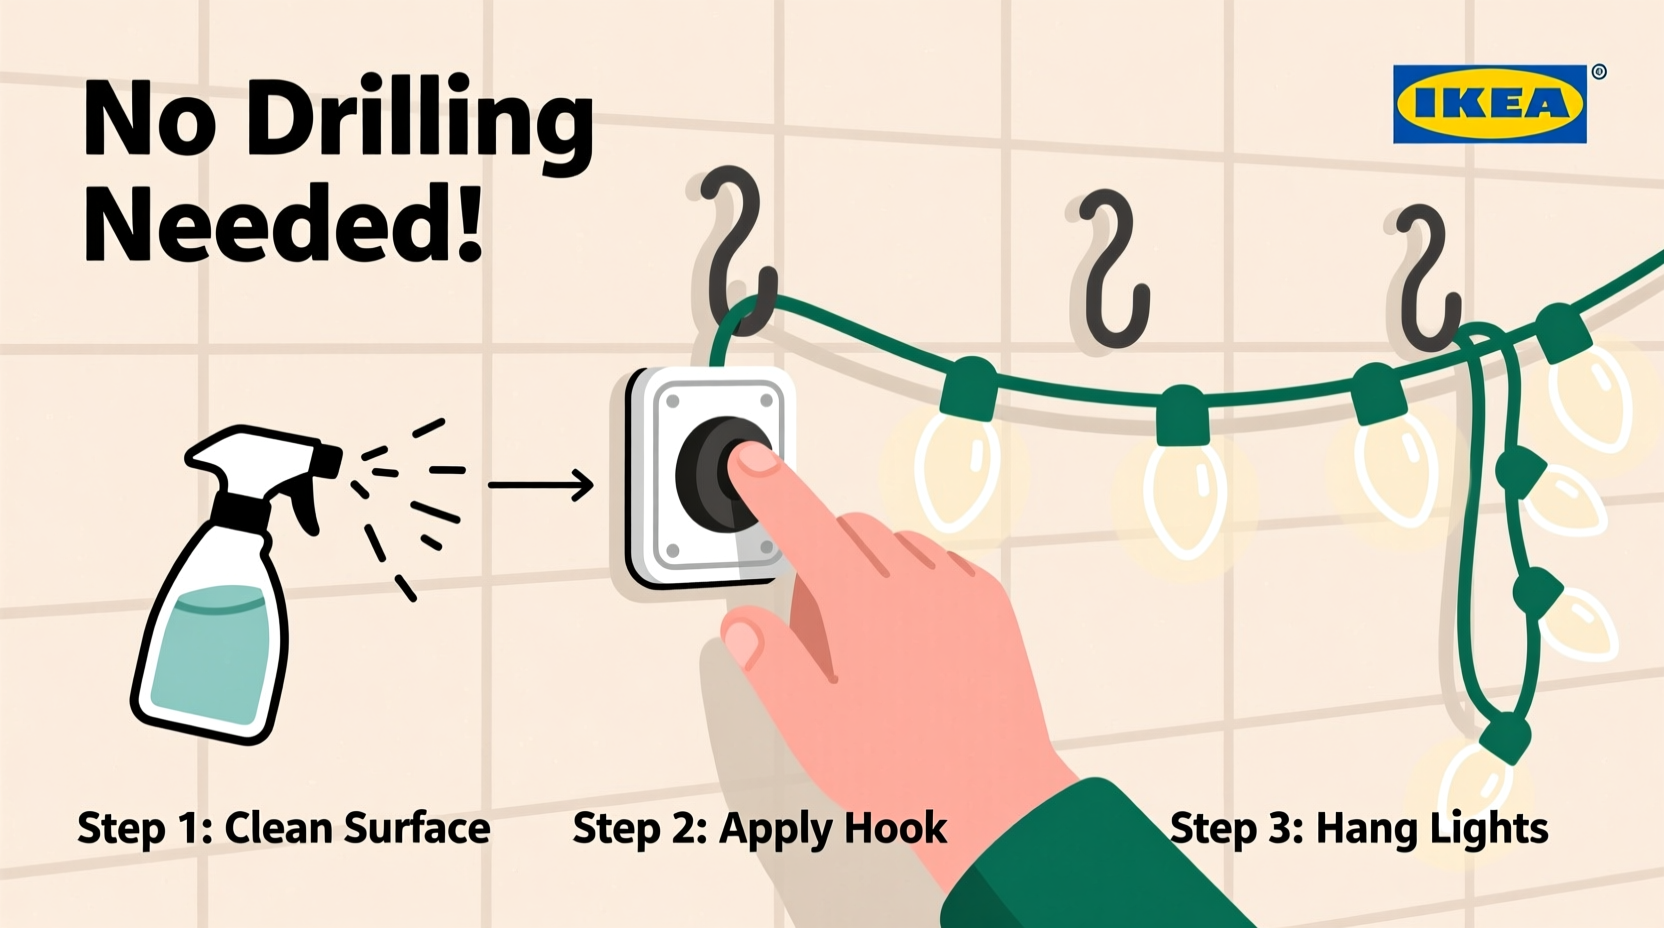
Step-by-Step Guide: Hanging Heavy Lights Without Drilling
Follow this proven method to install heavy Christmas lights safely and securely using Command hooks.
- Measure and mark placement – Lay out your lights on the ground first. Determine spacing based on hook strength and light density. For heavy strands, place hooks every 18–24 inches.
- Select hook type and quantity – Use large outdoor Command hooks rated for 7.5 lbs each. If your strand weighs 6 lbs, two hooks provide ample support with redundancy.
- Prepare the surface – Clean each attachment point with rubbing alcohol. Let dry completely.
- Attach the hooks – Remove the backing and press firmly for 30 seconds. Repeat for all locations.
- Wait one hour – Allow the adhesive to bond fully before proceeding.
- Hang the lights gradually – Start at one end and gently drape the strand over each hook. Avoid jerking or pulling, which can stress individual anchors.
- Check tension and alignment – Ensure the lights hang evenly without sagging. Adjust hook positions if needed before finalizing.
- Test stability – Gently tug downward on the center of the strand to simulate wind or snow load. No movement should occur.
Do’s and Don’ts: Maximizing Success and Avoiding Failure
To help you avoid common pitfalls, here’s a quick-reference table summarizing best practices.
| Do | Don’t |
|---|---|
| Use outdoor-rated Command hooks with UV protection | Use indoor-only hooks outside—they degrade quickly |
| Clean surfaces with isopropyl alcohol | Wipe with Windex or dish soap, which leave residue |
| Space hooks every 18–24 inches for heavy loads | Place hooks too far apart, creating sagging and strain |
| Wait at least one hour before hanging lights | Hang immediately after application |
| Remove hooks slowly by pulling straight down along the strip direction | Yank sideways or upward, risking paint lift |
One often-overlooked factor is thermal expansion. As temperatures drop at night, materials contract. This slight movement can weaken marginal bonds over time. To counteract this, avoid installing near heat sources like exhaust vents or recessed lighting that create microclimate shifts.
Real Example: A Brooklyn Brownstone Porch Makeover
Sarah M., a renter in Brooklyn, wanted to decorate her historic brownstone’s front porch for Christmas but faced strict no-drilling rules from her landlord. She planned to hang three strands of 25-foot commercial LED lights totaling nearly 18 pounds across the railing, columns, and eaves.
Instead of nails or zip ties, she opted for Command Large Clear Outdoor Hooks. She cleaned each attachment point with alcohol wipes, spaced hooks every 20 inches along the wooden railing, and allowed a full curing period. For added confidence, she used double hooks at corner turns where tension was highest.
The display stayed secure through two snowstorms and winds exceeding 25 mph. After the holidays, she removed the hooks by pulling the tabs straight down. The paint remained intact, and the superland approved her February renewal without any condition notes.
“I was skeptical at first,” Sarah said. “But seeing those lights stay put through a nor’easter? That was the real test. And cleanup took less than five minutes.”
Frequently Asked Questions
Can Command hooks hold icicle lights on gutters?
Yes, but only if you use heavy-duty outdoor hooks and install them on clean, smooth sections of gutter. Avoid placing them on rusted or peeling areas. Space hooks every 12–18 inches for icicle strands, which concentrate weight at the bottom.
Will removing Command hooks damage painted siding?
When removed correctly—by pulling the tab straight down along the adhesive strip—Command hooks typically leave no residue and do not pull off paint. However, older, brittle paint may chip regardless of method. Test one hook in an inconspicuous area first.
What if my surface is rough or textured, like stucco?
Rough surfaces reduce contact area, weakening adhesion. In such cases, use Command Jumbo Hooks with deeper adhesive backing, or consider pairing adhesive strips with plastic clips screwed into removable anchors (for renters who can patch minor holes later). Alternatively, mount a thin wooden batten to the wall using multiple Command strips, then attach lights to the board with traditional clips.
Checklist: Hang Heavy Christmas Lights Without Drilling
Before you start, go through this essential checklist to ensure success:
- ☐ Weigh your Christmas light strands to determine total load
- ☐ Select heavy-duty Command Outdoor Hooks rated for 7.5 lbs each
- ☐ Clean all mounting surfaces with isopropyl alcohol
- ☐ Allow surfaces to dry completely before application
- ☐ Apply hooks with firm, sustained pressure (30 seconds per hook)
- ☐ Wait at least 1 hour before hanging any lights
- ☐ Space hooks every 18–24 inches for uniform support
- ☐ Test stability with gentle downward pressure
- ☐ Plan for removal: note the location of pull tabs
- ☐ Store hooks and instructions for reuse next season (if undamaged)
Conclusion: Festive Décor Without the Commitment
Hanging heavy Christmas lights without drilling is not only possible—it’s practical, safe, and increasingly popular among homeowners and renters alike. By leveraging modern adhesive technology and following a disciplined approach to installation, you can achieve a professional-quality lighting display that lasts the entire season without leaving a trace.
The holiday season is about celebration, not renovation. You shouldn’t have to sacrifice charm for the sake of preserving drywall or siding. With Command hooks, you gain flexibility, peace of mind, and the freedom to change your décor year after year without penalty.


 浙公网安备
33010002000092号
浙公网安备
33010002000092号 浙B2-20120091-4
Comments
No comments yet. Why don't you start the discussion?