
Living in a rental often means sacrificing design freedom. One of the most common frustrations? Wanting to install ambient lighting but being forbidden from drilling holes. Whether it’s fairy lights above your bed, string lights along a balcony railing, or pendant-style LEDs in your living area, traditional installation methods aren’t an option. But there’s a better way: command hooks.
These adhesive-backed hanging solutions are engineered to support weight temporarily while removing cleanly—no residue, no damage. When used correctly, they offer renters a reliable, reversible method to hang decorative and functional lighting. This guide dives into the practical techniques, material considerations, and strategic placements that make command hooks a go-to solution for renters seeking style without sacrifice.
Why Command Hooks Are Ideal for Renters
Renters face unique challenges when personalizing their space. Lease agreements typically prohibit permanent modifications, making even small holes a potential deposit deduction. Command hooks bypass this issue entirely. Developed by 3M, they use a proprietary adhesive that bonds securely to paint, tile, wood, and other smooth surfaces, yet releases cleanly with a simple pull of the removal tab.
Their versatility makes them perfect for temporary lighting setups. Unlike nails or screws, they don’t compromise walls. Unlike tape or suction cups, they’re designed for sustained weight-bearing. With load ratings ranging from 1 pound (small hooks) to 7.5 pounds (large jumbo hooks), they can support everything from lightweight LED strands to heavier rope lights.
“Command hooks have revolutionized how renters approach decor. They offer a balance between stability and reversibility that wasn’t possible before.” — Dana Reyes, Interior Designer & Renter Advocate
Selecting the Right Hook and Light Combination
Not all command hooks are created equal—and neither are light strings. Matching the right hook to your lighting type is critical for safety and longevity.
Start by checking the weight of your lights. Most string lights weigh between 0.5 and 3 pounds, depending on length and bulb type. Fairy lights made of thin copper wire are extremely lightweight, while thicker PVC-coated rope lights with larger bulbs add more heft. Always round up when estimating weight.
Next, choose the appropriate hook size:
- Small Clear Hooks: Up to 1 lb – ideal for micro LED strands or lightweight battery-operated twinkle lights.
- Medium White Hooks: Up to 4 lbs – suitable for standard 16–33 ft string lights with plastic casings.
- Jumbo Hooks: Up to 7.5 lbs – best for heavy-duty rope lights, curtain lights, or multi-strand installations.
For added security, especially with longer runs, use multiple hooks spaced evenly rather than relying on one or two. This distributes weight and reduces stress on individual adhesives.
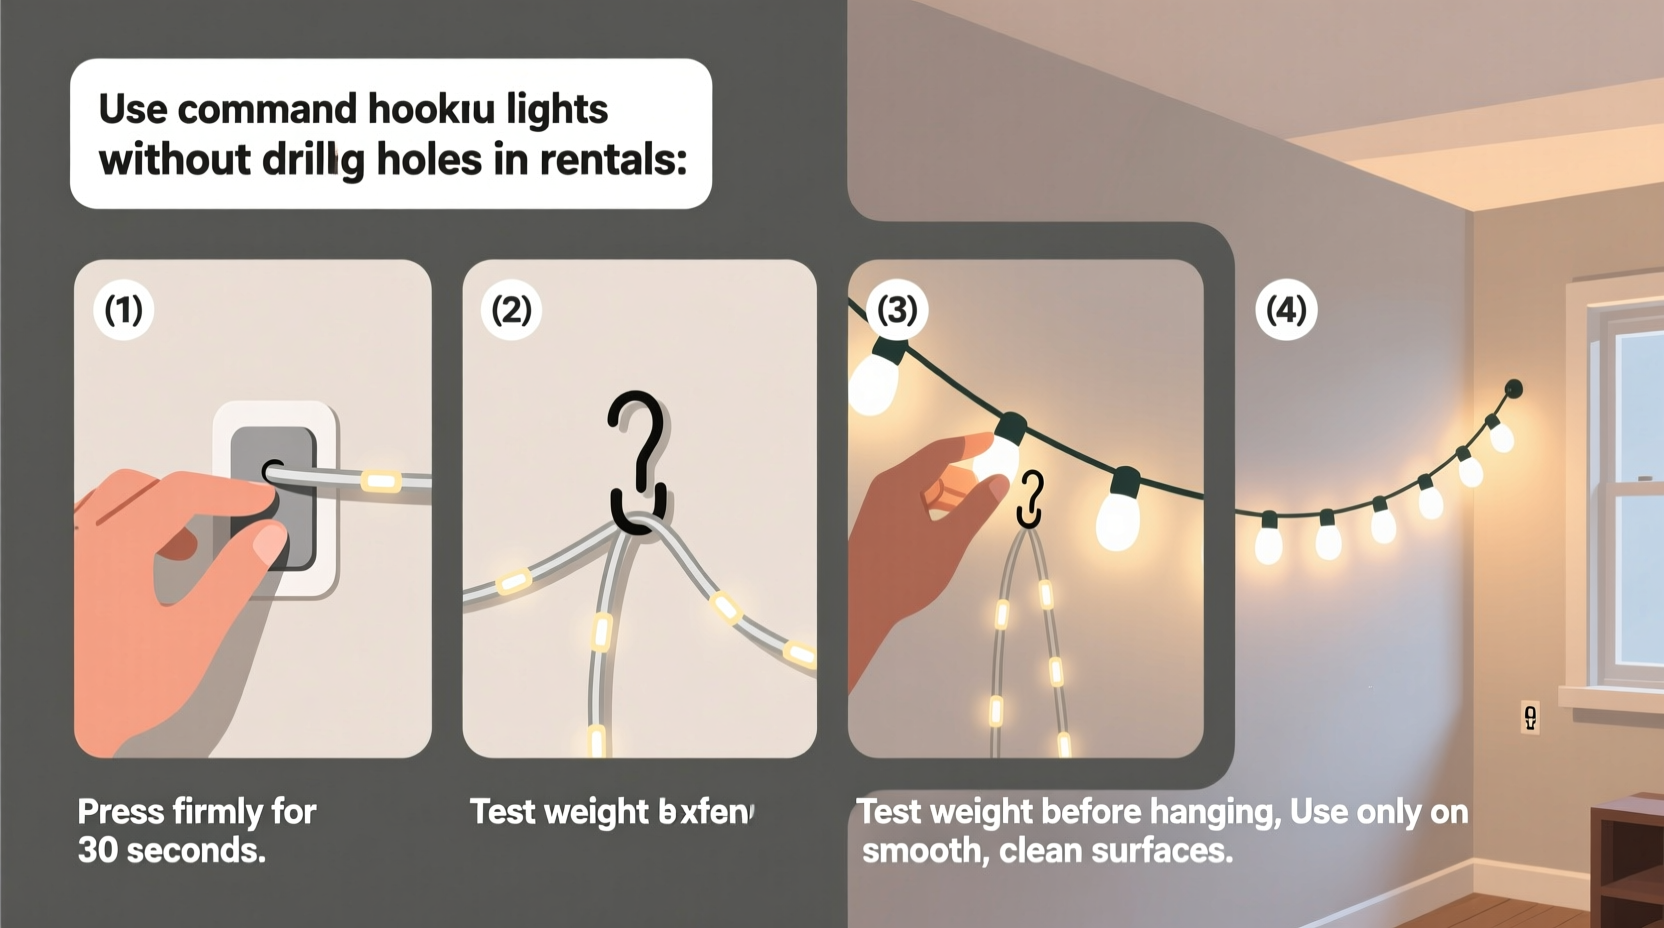
Step-by-Step Guide to Installing Lights with Command Hooks
Proper installation ensures your lights stay up and your walls stay intact. Follow these steps carefully:
- Clean the Surface: Use rubbing alcohol and a lint-free cloth to wipe the area where the hook will adhere. Dust, oil, or residue weakens the bond.
- Plan Your Layout: Lay out your lights on the floor first to determine spacing and coverage. Mark approximate hook positions with a pencil.
- Peel and Press: Remove the backing from the hook and press it firmly against the surface for 30 seconds. Apply even pressure with your palm—don’t just stick and walk away.
- Wait Before Hanging: Allow the adhesive to set for at least one hour before attaching any lights. For best results, wait 24 hours, especially in cooler or humid environments.
- Hang the Lights: Clip the light strand onto the hook. Avoid yanking or tugging during setup. For continuous runs, interlock multiple strands using compatible connectors.
- Test and Adjust: Turn on the lights to ensure full coverage. Gently adjust positioning if needed, but avoid pulling down on the strand.
This process may seem meticulous, but it significantly increases hold strength and reduces the risk of premature detachment.
Do’s and Don’ts: Maximizing Hook Performance
Even high-quality products fail when misused. The table below outlines key practices to follow and avoid.
| Do’s | Don’ts |
|---|---|
| Use on clean, smooth, non-textured surfaces like painted drywall, glass, or tile. | Apply to freshly painted walls (wait at least 7 days). |
| Press firmly for 30 seconds after application. | Install in areas with constant moisture (e.g., inside showers). |
| Distribute weight using multiple hooks for long light strands. | Hang near heat sources like radiators or stoves. |
| Remove by slowly stretching the tab downward—never yank sideways. | Exceed the listed weight limit, even slightly. |
Real-World Example: Apartment Balcony Makeover
Sophia, a graphic designer renting a downtown studio, wanted to transform her concrete balcony into a relaxing evening retreat. She purchased 100 feet of warm-white LED string lights to drape along the railings and overhead beams. Her building prohibited any exterior modifications.
She selected medium-sized white command hooks rated for 4 pounds each. After cleaning the metal railing and adjacent stucco wall with alcohol wipes, she applied a hook every 16 inches along the top edge. For the overhead beam—where tension was higher—she doubled up with two hooks per support point.
She waited 24 hours before draping the lights. Once installed, the setup created a café-like ambiance perfect for reading or hosting friends. After six months, including exposure to light rain and wind, all hooks remained secure. When she moved out, she removed each hook using the stretch-release method. No marks, no deductions.
Sophia’s success came down to surface prep, proper spacing, and respecting weight limits—proving that thoughtful execution beats brute force.
Alternative Uses and Creative Lighting Ideas
Command hooks aren’t limited to basic string lights. With some creativity, they enable sophisticated lighting designs:
- Canopy Ceilings: Create a starry effect by crisscrossing multiple strands across the ceiling using a grid of small hooks.
- Wall Accents: Outline mirrors, headboards, or artwork with mini lights clipped onto low-profile hooks.
- Shelf Lighting: Hang tiny puck or strip lights underneath floating shelves to highlight decor.
- Room Dividers: Suspend vertical strands from ceiling hooks to subtly separate spaces in open layouts.
- Seasonal Displays: Install holiday lights on windows or doors without risking paint damage.
Battery-powered or plug-in USB lights work best in rentals where outlet access is limited. For cord management, use clear command clips to route excess wiring neatly along baseboards or behind furniture.
Troubleshooting Common Issues
Even with careful planning, problems can arise. Here’s how to handle them:
Hooks Start Peeling at the Edges: This usually indicates poor surface contact or excess humidity. Reapply with thorough cleaning and increased pressure. Consider switching to outdoor-rated command strips if moisture is unavoidable.
Lights Sag Between Hooks: Add additional hooks midway. Long spans naturally stretch under their own weight.
Adhesive Leaves Residue: Rare with genuine 3M products, but if it happens, gently rub the area with the provided remover or a dab of mineral oil. Never scrape.
Hook Fails Suddenly: Check if the surface was textured, dirty, or exposed to temperature extremes. Overloading is the most common cause—always verify total light weight.
Frequently Asked Questions
Can I use command hooks on textured walls?
Standard command hooks require smooth, flat surfaces to create a proper seal. On lightly textured walls, they may not adhere well and could detach prematurely. For such surfaces, consider using command strips with broader contact areas or opt for tension-based alternatives like removable track systems.
Will command hooks damage my walls when removed?
When applied and removed correctly—using the stretch-tab technique—command hooks should leave zero damage. The adhesive is formulated to release cleanly from most painted, sealed, and finished surfaces. However, older paint or very porous materials may occasionally flake, so test in a discreet area first.
Are there outdoor-rated command hooks for patio lights?
Yes. 3M offers Outdoor Large Hooks specifically designed to withstand sun, rain, and temperature changes. These are ideal for balconies, porches, or rental patios. They support up to 5 pounds and remain UV-resistant for up to three years.
Checklist: Hanging Lights with Command Hooks – Quick Reference
- Measure and weigh your light strands.
- Choose the correct hook size based on weight.
- Clean the mounting surface with rubbing alcohol.
- Mark hook placement with a pencil.
- Peel backing and press hook firmly for 30 seconds.
- Wait at least 1 hour (ideally 24) before hanging lights.
- Clip lights securely onto hooks—avoid overloading.
- Inspect weekly for signs of loosening.
- Remove by stretching the tab straight down.
- Dispose of used hooks properly—do not reuse.
Final Thoughts: Lighting Freedom Without the Consequences
Renting doesn’t have to mean compromising on comfort or aesthetics. With command hooks, you can enjoy warm, inviting lighting exactly where you want it—without violating your lease or endangering your security deposit. The key lies in preparation, precision, and respect for product limits.
Whether you’re creating a cozy bedroom corner, brightening a dim hallway, or turning a bland balcony into an evening oasis, this method empowers you to personalize your space responsibly. Thousands of renters have already discovered this simple yet transformative technique.


 浙公网安备
33010002000092号
浙公网安备
33010002000092号 浙B2-20120091-4
Comments
No comments yet. Why don't you start the discussion?