
Hanging Christmas lights can instantly elevate the festive spirit of your home, but traditional mounting methods often come with a hidden cost: damaged paint, cracked siding, or stubborn nail holes that linger long after the holidays end. Fortunately, there’s a smarter, safer alternative—Command hooks. These adhesive-backed hooks offer a damage-free way to display dazzling light displays while preserving the integrity of your home’s surfaces. When used correctly, they support substantial weight, remove cleanly, and leave zero residue. This guide walks you through everything you need to know about using Command hooks for Christmas lights—without compromising your walls, trim, or peace of mind.
Why Command Hooks Are Ideal for Holiday Lighting
Unlike nails, staples, or zip ties, Command hooks are engineered specifically for temporary installations on delicate surfaces. Originally developed by 3M, these hooks rely on advanced adhesive technology that bonds securely yet releases cleanly when removed. The foam-based adhesive strip stretches upon removal, breaking its own bond without pulling off paint or damaging materials like vinyl, stucco, or wood trim.
This makes them ideal for renters, homeowners with freshly painted exteriors, or anyone who values convenience and cleanliness. They’re also versatile—available in multiple sizes and load ratings—and reusable if undamaged during removal. Most importantly, they eliminate the risk of moisture infiltration around nail holes, which over time can lead to rot, mold, or structural deterioration.
“With proper selection and placement, Command hooks can handle full strands of LED lights without failing—even in cold winter conditions.” — Derek Langston, Residential Lighting Specialist
Choosing the Right Command Hook for Your Lights
Not all Command hooks are created equal. Using the wrong type can result in sagging wires, fallen strands, or accidental surface damage. To ensure success, match the hook to both the weight of your lights and the mounting surface.
| Hook Type | Weight Capacity | Best For | Avoid On |
|---|---|---|---|
| Small Clear Hooks | Up to 1 lb (0.45 kg) | Indoor trim, window frames, glass edges | Wet surfaces, rough brick |
| Medium Outdoor Hooks | Up to 3 lbs (1.36 kg) | Siding, soffits, smooth stucco | Unsealed wood, dusty walls |
| Jumbo Outdoor Hooks | Up to 7.5 lbs (3.4 kg) | Gutters, fascia boards, heavy light strands | Peeling paint, porous stone |
| Metal Wire Hooks | Up to 5 lbs (2.27 kg) | Vertical runs, railings, metal surfaces | High-gloss finishes |
For most standard LED Christmas light strings (which typically weigh between 0.5 and 1.2 pounds per 100 bulbs), medium outdoor hooks are sufficient. If you're stringing multiple connected lines or using incandescent sets, opt for jumbo or dual-hook configurations. Always check packaging labels for “Outdoor” or “Weather Resistant” designations—these contain UV-stabilized adhesives that won’t degrade under sun exposure or freeze-thaw cycles.
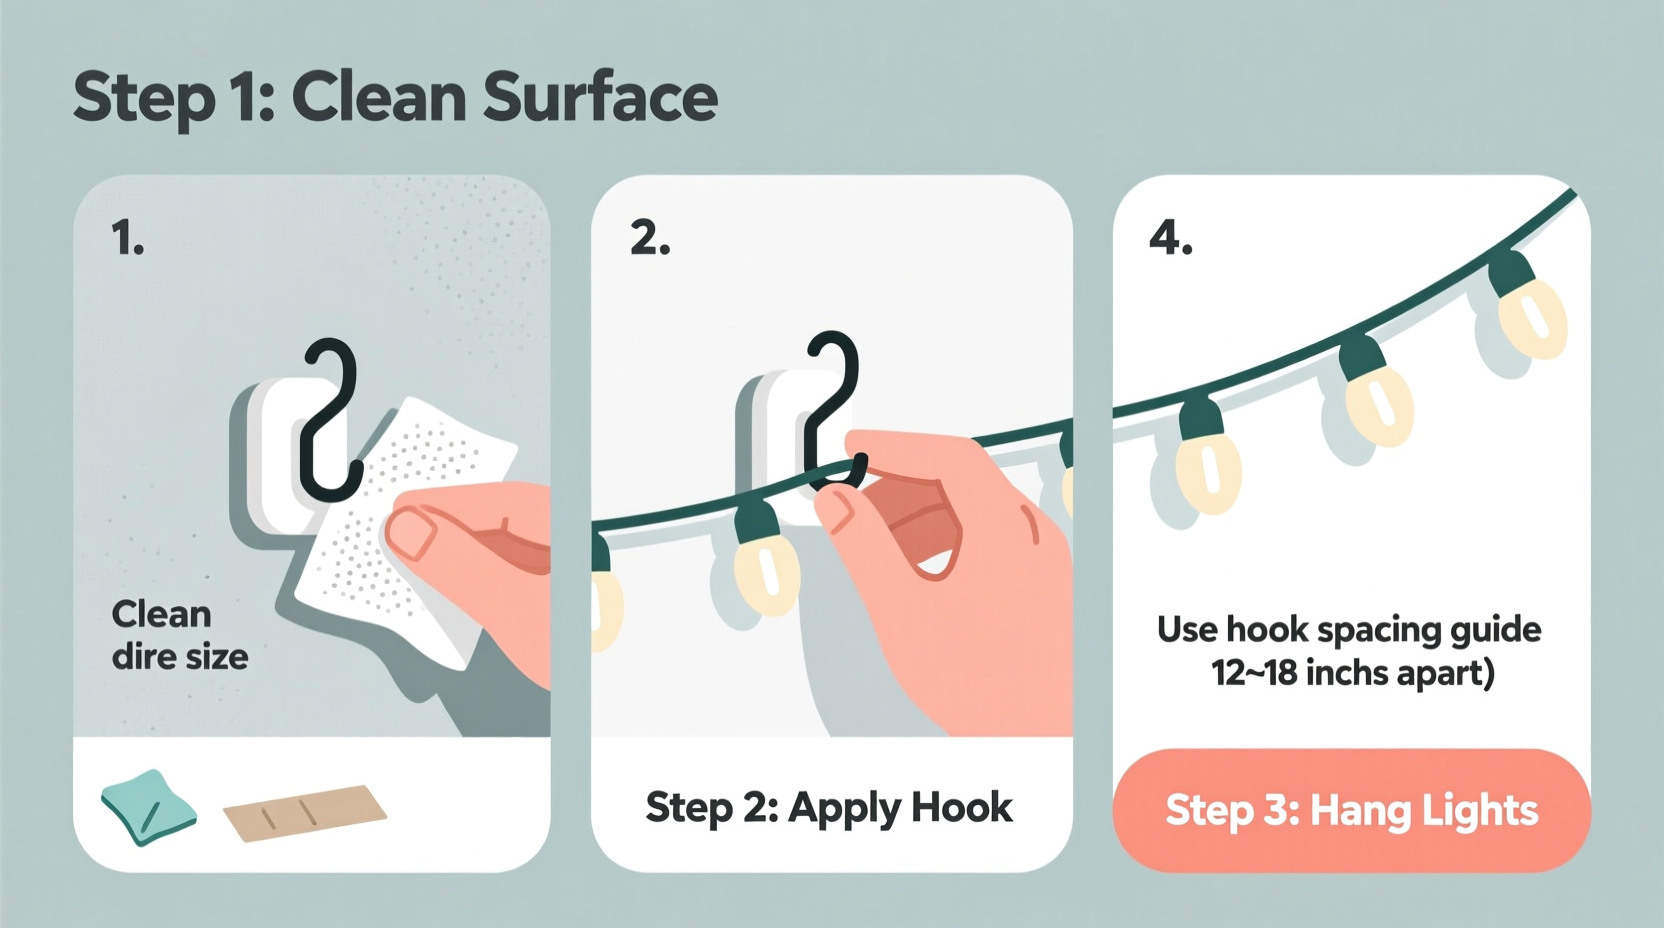
Step-by-Step Guide to Installing Christmas Lights with Command Hooks
Proper installation is key to ensuring your lights stay secure and your surfaces remain unharmed. Follow this timeline-tested method for flawless results.
- Plan Your Layout (Day 1)
Walk around your house and sketch where lights will go—roofline, windows, doors, trees. Measure total linear feet needed and calculate how many hooks you’ll require (one every 12–18 inches for horizontal runs). - Clean All Mounting Surfaces (Day 2)
Use isopropyl alcohol and a lint-free cloth to wipe each attachment point. Dirt, grease, or moisture prevents proper adhesion. Let dry completely before applying hooks. - Apply Hooks at Correct Intervals (Day 2)
Peel the backing from the hook and press firmly onto the surface for 30 seconds. Use a level or string line to keep alignment consistent. For vertical drops (e.g., from eaves to bushes), place two hooks stacked slightly apart to cradle wire loops. - Wait 24 Hours Before Hanging Lights
This allows the adhesive to reach maximum bond strength. Skipping this step is the most common cause of early failure. - String Lights Gently Over Hooks (Day 3)
Drape each strand loosely over the curved portion of the hook. Avoid tugging or stretching wires, which can dislodge the base. For tight corners, use corner-specific hooks or double up spacing. - Test and Adjust (Same Day)
Plug in lights to confirm coverage and brightness. Re-position any sagging sections by adding supplemental hooks. Secure loose ends with additional clips if needed.
Once installed, inspect your setup weekly, especially after storms. Snow accumulation or ice expansion can stress connections, so gently brush off buildup and verify hook stability.
Avoid These Common Mistakes
Even experienced decorators make errors that compromise safety or surface protection. Steering clear of these pitfalls ensures a smooth, damage-free experience.
- Skipping surface prep: Applying hooks to dirty or damp walls drastically reduces hold time.
- Overloading hooks: Exceeding weight limits leads to detachment and potential fire hazards from dangling wires.
- Using indoor hooks outdoors: Indoor variants lack weather resistance and fail within days when exposed to rain or frost.
- Removing hooks too quickly: Yanking them off instead of slowly stretching the tab can peel paint. Always follow the stretch-release technique.
- Ignoring temperature limits: Adhesives perform best when applied above 50°F (10°C). Cold application weakens initial bonding.
Real-World Example: A Renter’s Holiday Transformation
Sarah Kim, a tenant in a historic Denver townhome, wanted to decorate her unit’s exterior for Christmas but feared violating her lease agreement. Her landlord prohibited any permanent alterations, including drilling or nailing. After researching non-damaging solutions, she opted for medium outdoor Command hooks.
She began by cleaning the stucco façade and window trims with rubbing alcohol. Over two days, she applied 42 hooks along rooflines, porch columns, and planter boxes. She used energy-efficient LED mini-lights totaling 350 bulbs across six strands. After waiting 24 hours, she hung the lights and tested them at dusk. The effect was striking—warm white accents highlighted architectural details without a single puncture.
In January, Sarah removed the lights and stretched each hook tab downward as instructed. Every adhesive strip released cleanly. She submitted photos to her landlord, who praised her thoughtful approach. “It looked professional, festive, and most importantly, my walls were untouched,” the landlord later wrote in a review.
Removal and Surface Care: Ending the Season Right
The true test of a damage-free system comes during removal. Done incorrectly, even Command hooks can leave marks. But when followed properly, the process leaves surfaces pristine.
- Unplug and carefully coil lights for storage.
- Grasp the hook’s hanging loop and locate the removal tab beneath the foam strip.
- Slowly pull the tab straight down, stretching the adhesive until it detaches. This should take 10–15 seconds per hook.
- Inspect the wall. Any residual adhesive can be removed by pinching it gently with fingers or using a small amount of rubbing alcohol on a cloth.
- Store leftover hooks in their original backing for future use.
Never use tools like scrapers or solvents unless absolutely necessary. Most residues yield easily to hand pressure due to the designed “clean release” formula. If paint does lift, it likely indicates pre-existing weakness—such as flaking primer or improper curing—not a flaw in the product.
“The number one reason people report damage isn’t the hook—it’s applying it to compromised surfaces.” — Lisa Tran, Home Preservation Consultant
Frequently Asked Questions
Can I reuse Command hooks after taking them down?
No, the adhesive strip is designed for single use. Once stretched, it loses bonding capability. However, 3M sells replacement strips for certain models, allowing you to re-skin compatible hooks.
Will Command hooks work on brick or stone?
Only on smooth, sealed masonry. Rough, porous, or uneven surfaces prevent full contact, reducing adhesion. For brick, consider magnetic or gutter-mounted alternatives instead.
How long can I leave Command hooks up?
They’re rated for up to 12 months outdoors. Leaving them longer increases the risk of edge lifting due to weather exposure. Remove within six weeks after the holidays to stay safe.
Final Checklist Before You Begin
- Choose weather-rated Command hooks based on light weight
- Measure total run length and calculate hook quantity (+10% buffer)
- Clean all mounting areas with isopropyl alcohol
- Check daytime temperatures—apply only above 50°F (10°C)
- Allow 24-hour cure time before hanging lights
- Inspect monthly for loosening or wear
- Remove promptly after season using stretch-release method
Conclusion: Festive Beauty Without the Cost
Mounting Christmas lights shouldn’t mean sacrificing your home’s finish or violating rental agreements. With Command hooks, you gain the freedom to create stunning displays while keeping walls, siding, and relationships with landlords intact. The process is simple, reversible, and backed by science—adhesive engineering that prioritizes both strength and gentleness. Whether you’re outlining a cozy cottage window or framing a multi-story entryway, this method delivers professional results without the permanence.


 浙公网安备
33010002000092号
浙公网安备
33010002000092号 浙B2-20120091-4
Comments
No comments yet. Why don't you start the discussion?