
Sheer curtains are more than window dressings—they’re light-modulating canvases. When paired with carefully selected and installed LED strips, they transform ordinary daylight filtering into intentional, sculptural ambient lighting. Unlike overhead fixtures or floor lamps, this technique delivers wall-warmed, glare-free illumination that feels architectural rather than applied. It’s not about brightness; it’s about luminous texture—gentle gradients, subtle halos, and layered depth that shift with time of day and room activity. Done well, it eliminates harsh shadows, reduces visual clutter, and adds warmth without visual weight. But success hinges on precise component choices, thoughtful installation, and an understanding of how light behaves when filtered through fine fabric. This guide distills field-tested practices from residential lighting designers, interior architects, and professional installers who regularly integrate this technique into high-end living rooms, bedrooms, and home offices.
Why Sheer + LED Works—And Why Most Attempts Fall Short
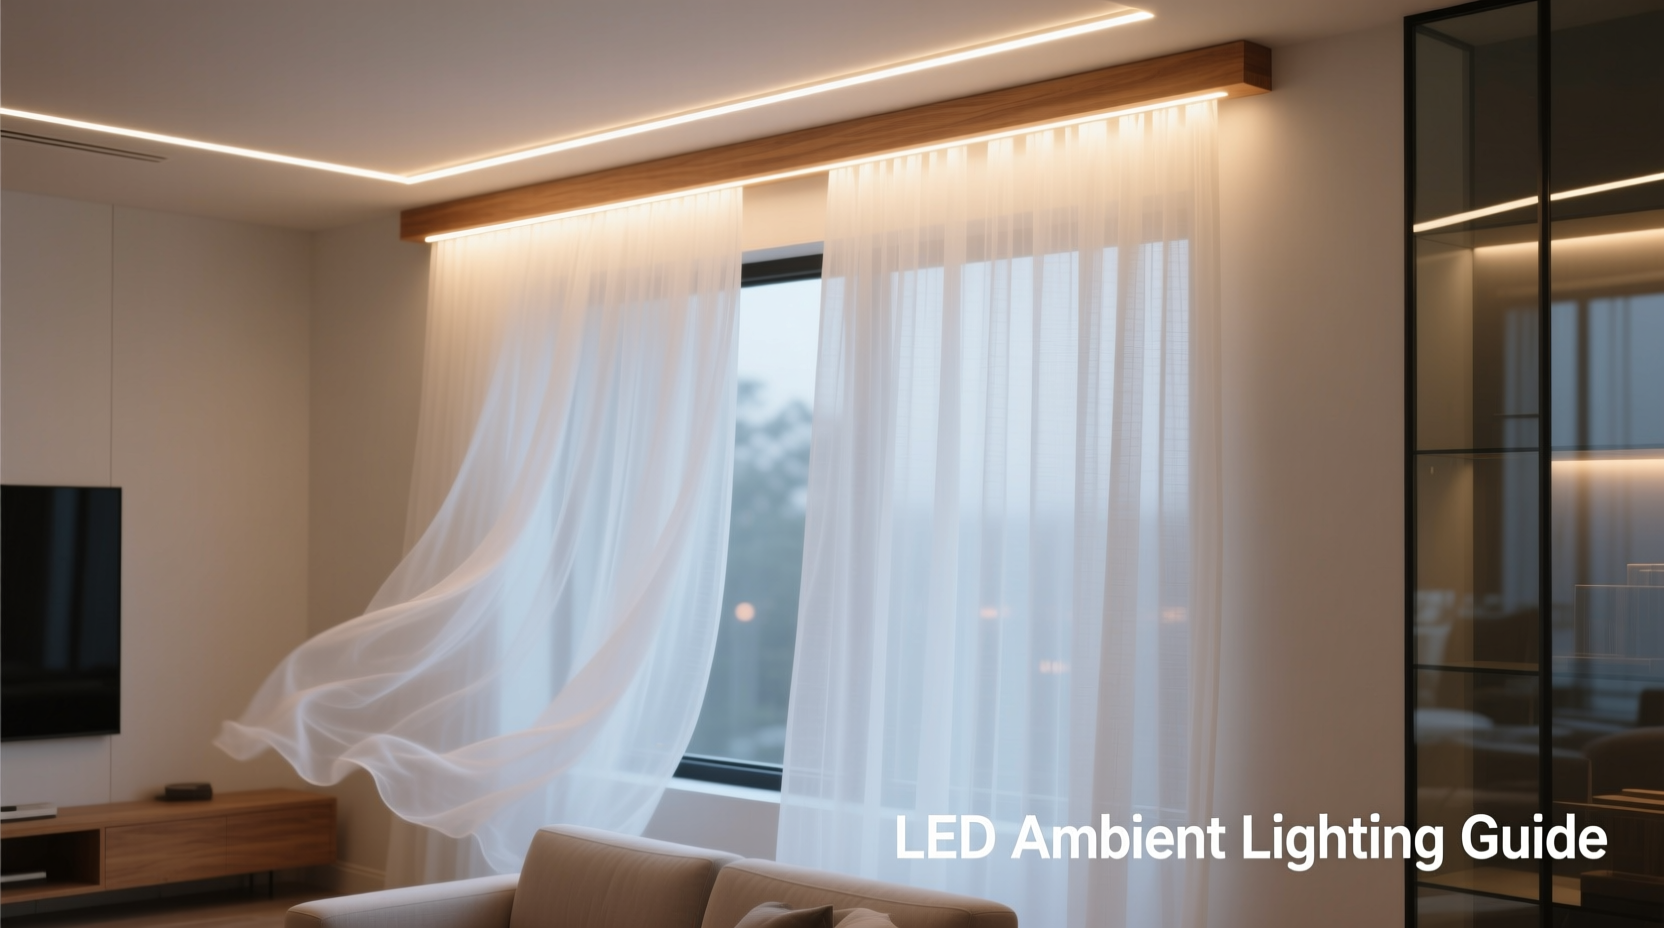
The magic lies in the physics of diffusion: sheer fabrics like voile, linen gauze, or polyester organza scatter point-source light across thousands of micro-fibers. This scattering converts the discrete, linear glow of an LED strip into a continuous, edgeless band of light. The result is a soft, ethereal wash—not a visible line of LEDs, but a luminous veil suspended in air. Yet most DIY attempts fail because they treat the curtain as passive background rather than an active optical element. Common missteps include using high-lumen-density strips behind heavy sheers (causing hotspots), mounting strips too close to the curtain (creating visible dot patterns), or selecting non-dimmable controllers that prevent fine-tuning of mood. Interior lighting consultant Lena Torres explains:
“The curtain isn’t just a cover—it’s the final lens. If your LED strip emits 40° beam angles and your sheer has a 35% open weave, you’ll get striations. You need either lower-intensity LEDs with wider native dispersion, or strategic spacing to let the fabric do its work.” — Lena Torres, Lighting Designer & Founder, Lumina Studio
Essential Component Selection: What to Buy—and What to Avoid
Not all LED strips perform equally behind sheer fabric. Prioritize optical performance over raw lumen output. Below is a comparison of key attributes:
| Feature | Recommended Choice | Avoid | Why It Matters |
|---|---|---|---|
| Luminance Density | 6–9W/m (e.g., 300–600 LEDs/m at 12V) | >12W/m or >1200 LEDs/m | Lower density prevents “beading”—visible individual LEDs—even at close viewing distances. |
| Color Temperature | 2700K–3000K (warm white) or tunable white (2200K–6500K) | 4000K+ cool white without dimming control | Warm tones mimic natural sunset light and reduce eye strain in evening settings; tunable white allows seasonal adjustment. |
| Diffusion Method | Integrated frosted silicone coating (IP65-rated) + optional external diffuser channel | Bare PCB strips or non-coated flexible strips | Frosted coating scatters light before it hits the curtain—critical for eliminating pixelation. |
| Controller Type | 0–10V or PWM dimmer with smooth 0.1%–100% range | On/off switches or basic triac dimmers | True dimming preserves color fidelity and enables seamless transitions between task and ambient modes. |
| Power Supply | Constant-voltage (12V or 24V), overspec’d by 20% (e.g., 60W supply for 48W load) | Underpowered or unregulated adapters | Prevents voltage drop, flicker, and premature LED degradation—especially critical for long runs (>5m). |
Installation: A Step-by-Step Sequence for Flawless Results
Mounting location and method directly impact diffusion quality. Follow this verified sequence:
- Measure and Plan Layout: Determine strip length based on curtain rod width—not window frame. Add 10 cm extra per side for gentle curve allowance. Mark vertical mounting zones every 30 cm along the top track or cornice box.
- Prepare Mounting Surface: Clean dust and grease from the underside of the cornice or top rail. Use painter’s tape to temporarily position strips—observe light spread before permanent adhesion.
- Mount Strips with Precision Spacing: For 12V strips, maintain ≥10 cm gap between strip ends and corners to avoid thermal buildup. Apply strips centered under the cornice lip—not flush against the wall—so light projects forward onto the curtain plane, not backward into the ceiling void.
- Route Wires Discreetly: Run low-voltage wires behind cornice trim or inside hollow curtain rods. Never staple wires to drywall near heat sources. Use right-angle connectors to minimize bulk at corners.
- Secure Curtain Hardware First: Install curtain rod *before* finalizing strip placement. Ensure the sheer hangs taut and plumb—wrinkles or sagging cause uneven diffusion. Rods should be mounted 5–8 cm above window frame for optimal light coverage.
- Test Before Finalizing: Power on at 10% brightness in full darkness. Observe from multiple angles: standing, seated, and across the room. Adjust strip position if hotspots appear near rod brackets or corners.
Optimizing Diffusion: Fabric, Distance, and Layering Techniques
Distance between LED strip and sheer is the single most controllable variable for softness. The inverse square law applies: doubling distance reduces intensity by 75%, but increases uniformity exponentially. Use this calibrated approach:
- Minimum Effective Distance: 8 cm from strip to back of sheer. Less than this invites visible LED structure—even with frosted coating.
- Ideal Range: 12–18 cm. Achieves full diffusion while retaining enough intensity for ambient effect (≈5–15 lux at seating level).
- Advanced Layering: For ultra-soft results, add a secondary diffusion layer: mount a 3 mm white acrylic sheet (matte-finished) 5 cm behind the sheer, then position the strip 5 cm behind the acrylic. This triple-layer system (LED → acrylic → sheer) eliminates all structure, yielding pure luminous volume.
Sheer fabric choice matters more than many realize. Not all “sheer” textiles diffuse equally. Linen gauze offers organic, irregular diffusion ideal for living rooms. Polyester organza provides sharper, crisper edges—better for defined architectural accents. Cotton voile strikes a balance: consistent, neutral, and forgiving of minor installation variances. Always test fabric samples with your chosen strip at planned mounting distance before full purchase.
Real-World Application: A Bedroom Transformation Case Study
In a north-facing Toronto bedroom (12' x 14'), homeowner Maya sought ambient light that supported circadian rhythm without competing with task lighting. Her existing ivory linen sheer had moderate openness (45%) but revealed LED dots when lit from 6 cm away. Working with a local lighting technician, she implemented the following solution:
- Replaced original 1200-LED/m strip with a 600-LED/m, 24V frosted strip (3000K, CRI >95).
- Mounted the strip 15 cm below the ceiling-mounted cornice, projecting light onto the sheer’s backplane.
- Added a custom 10 cm-deep recessed cornice box lined with matte white paint to contain spill and enhance contrast.
- Installed a smart dimmer allowing preset scenes: “Sunrise” (2200K, 5% brightness at 5:30 AM), “Evening Wind Down” (2700K, 25%), and “Midnight Glow” (2200K, 2%).
Result: A seamless, wall-warmed band of light that begins at the ceiling line and fades softly downward—no visible hardware, no glare on the bed, and zero blue-light intrusion during sleep hours. Energy use averages 1.8W per hour, less than a nightlight. Crucially, the light adapts: brighter in winter mornings, softer in summer evenings, always harmonizing with natural light levels.
FAQ: Practical Questions Answered
Can I use battery-powered LED strips for this application?
Only for temporary setups or very short runs (<2m). Battery packs lack stable voltage regulation, causing color shift and rapid dimming over time. Lithium-ion batteries also pose fire risk when enclosed in cornice boxes. Hardwired 12V/24V supplies with UL-listed transformers are the only safe, reliable choice for permanent installations.
Will the heat from LED strips damage my sheer curtains?
Properly spec’d low-density strips (≤9W/m) operating at ≤50% brightness generate surface temperatures under 35°C—well below the ignition point of cotton (255°C) or polyester (480°C). However, avoid mounting strips directly against synthetic sheers in enclosed, unventilated cornices. Always maintain ≥8 cm air gap and verify airflow behind mounting surfaces.
How do I clean or replace the LED strip later without removing the curtain?
Design for serviceability: use removable double-sided tape (3M VHB 4910) instead of permanent adhesive, and route wires through accessible access panels in the cornice. For new builds, install a 5 cm service cavity behind the cornice lining—this allows full strip replacement without disturbing drapery hardware or fabric.
Conclusion: Light as Atmosphere, Not Just Illumination
Using LED strips behind sheer curtains isn’t about adding another light source—it’s about redefining how light occupies space. It shifts focus from objects to ambiance, from function to feeling. When executed with attention to optical physics, material compatibility, and human-centered control, it delivers something rare in residential lighting: quiet sophistication. No switches to fumble for, no glare to squint against, no visual noise to compete with art or architecture. Just light that breathes with the room. Start small: retrofit one window in your living room. Choose a warm, dimmable strip. Measure twice. Test at 10% brightness before committing. Notice how the quality of shadow changes, how conversation deepens in the softened glow, how the room feels both larger and more intimate. That’s not decoration—that’s intention made visible. Your space deserves lighting that doesn’t announce itself, but quietly transforms everything it touches.


 浙公网安备
33010002000092号
浙公网安备
33010002000092号 浙B2-20120091-4
Comments
No comments yet. Why don't you start the discussion?