
Outdoor Christmas lighting has evolved far beyond simple plug-and-play strings. Today’s displays combine artistry, energy awareness, and interactive technology—motion sensors being among the most effective tools for adding surprise, efficiency, and neighbor-friendly charm. When used correctly, motion-activated lights draw attention at just the right moment: a child’s gasp as reindeer blink to life upon approach, a porch wreath glowing softly as guests step onto the walkway, or synchronized light sequences triggered only when someone passes beneath the eaves. But improper implementation leads to flickering chaos, false triggers, wasted electricity, or—worse—electrical hazards in wet, freezing conditions. This guide distills field-tested practices from professional display designers, certified electricians, and municipal lighting inspectors into actionable, code-compliant strategies. No theory. No marketing fluff. Just what works—and why it works—when motion meets merry.
Understanding Motion Sensor Types & Outdoor Suitability
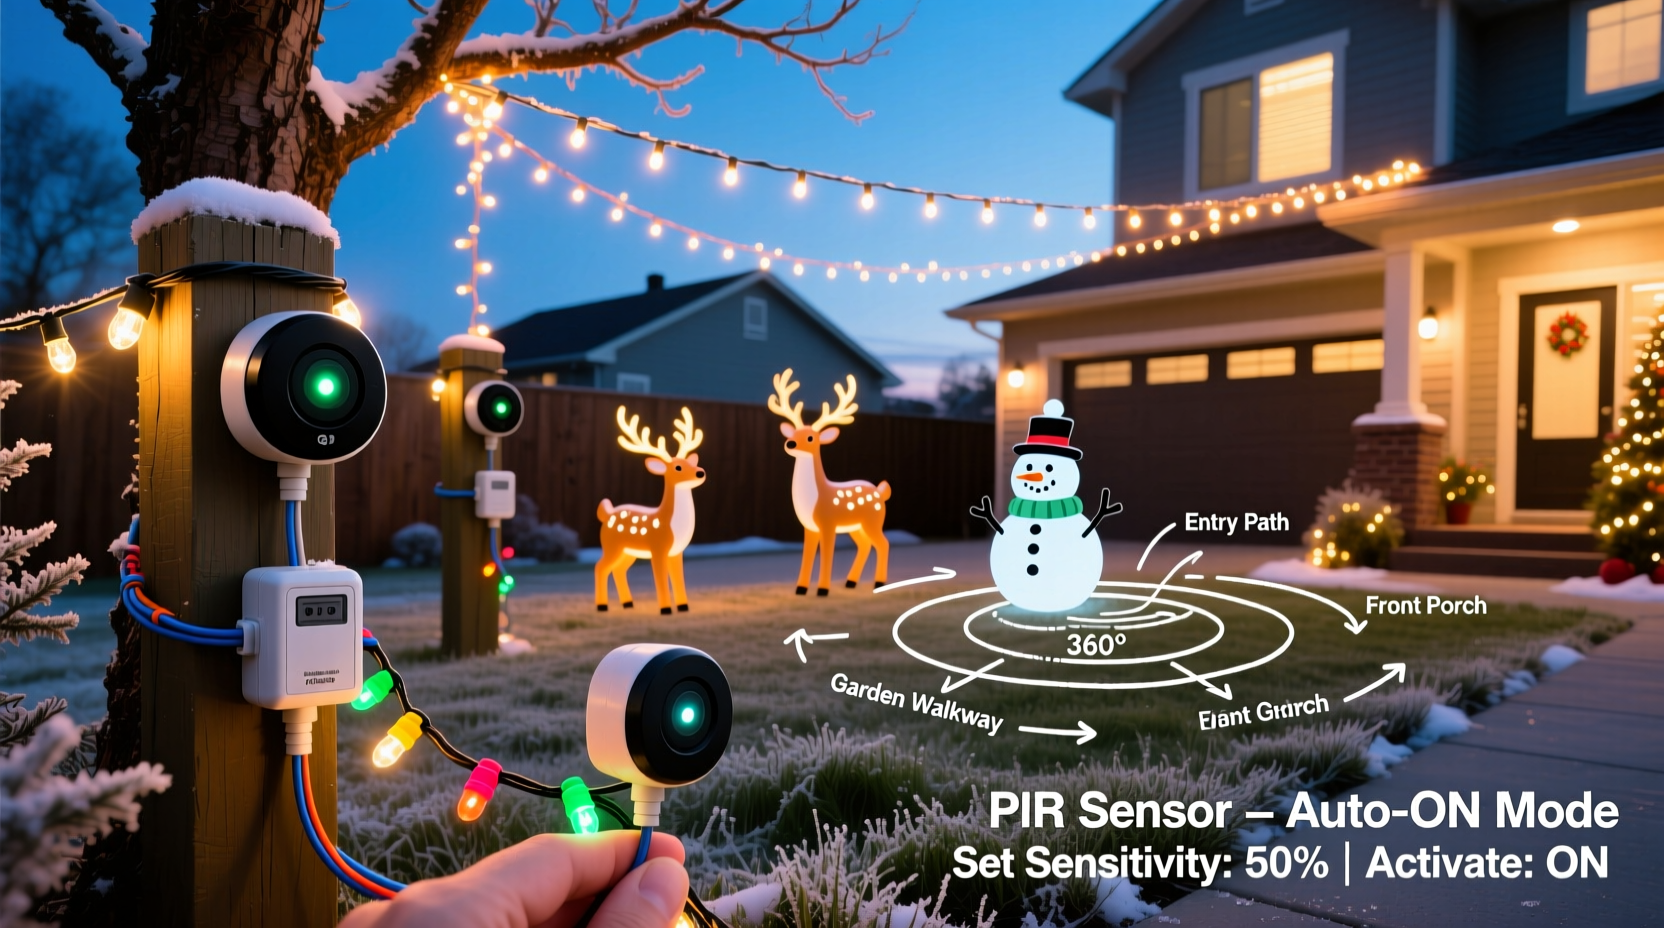
Not all motion sensors are built for December. Indoor PIR (Passive Infrared) units fail outdoors due to temperature swings, wind-blown debris, and snow accumulation. For exterior use, you need purpose-built hardware designed for cold, moisture, and variable ambient infrared noise.
The two viable sensor categories for outdoor Christmas lighting are:
- Weatherproof PIR + Microwave Dual-Technology Sensors: Combine infrared heat detection with microwave Doppler sensing. They ignore small animals, blowing leaves, or distant traffic while reliably detecting human-scale movement within 15–30 feet. Ideal for porches, driveways, and entryways.
- Hardwired Photocell + PIR Combo Units: Integrate dusk-to-dawn operation with motion activation. Lights remain off until darkness falls and motion is detected—eliminating daytime false triggers and maximizing energy savings.
Avoid battery-powered “smart” motion sensors marketed for indoor holiday decor. Their limited range, inconsistent cold-weather performance below 20°F (−7°C), and inability to handle high-wattage loads make them unsuitable for permanent outdoor installations.
Electrical Compatibility & Load Management
Motion sensors act as switches—not power sources. Their capacity is defined by maximum load (in watts or amps). Exceeding this limit causes premature failure, tripped breakers, or overheating. Most residential-grade outdoor motion sensors support 600–1,200W resistive loads (e.g., incandescent bulbs) but only 300–600W for LED stringers due to inrush current spikes during startup.
Here’s how to calculate your actual load:
- Identify total wattage of all lights connected to the sensor’s output circuit. (Check packaging: e.g., 100 mini LEDs = 4.8W; 50 C9 bulbs = 250W).
- Add 20% headroom for voltage drop over long extension runs or cold-temperature resistance increases.
- Confirm the sensor’s rated load matches or exceeds that figure at the lowest expected operating temperature (consult datasheet derating curves).
| Sensor Type | Max Load (LED) | Max Load (Incandescent) | Typical Outdoor Range |
|---|---|---|---|
| Standard Weatherproof PIR | 400W | 1,000W | 15–20 ft, 180° arc |
| Dual-Tech (PIR + Microwave) | 600W | 1,200W | 25–30 ft, adjustable sensitivity |
| Smart Relay Module (e.g., Shelly 1PM) | 1,600W | 1,600W | Controlled remotely; requires neutral wire & hub |
| Heavy-Duty Industrial Sensor | 2,400W | 2,400W | Up to 40 ft; commercial-grade sealing |
Important: Never daisy-chain multiple high-wattage light strings through a single sensor unless explicitly rated for the combined load. Use a contactor or relay for displays exceeding 1,200W. A licensed electrician should verify panel capacity before connecting more than 1,500W per circuit.
Step-by-Step Installation: From Mounting to Timing Calibration
Proper installation prevents nuisance triggers, inconsistent response, and weather-related failures. Follow this sequence precisely:
- Choose the mounting location: Mount 7–9 feet above ground, angled slightly downward. Avoid direct line-of-sight to passing cars, HVAC exhaust vents, or heat-radiating surfaces like brick chimneys or dark shingles.
- Verify wiring compatibility: Confirm your sensor supports your home’s electrical system (120V AC, grounded, with neutral if required). Older homes without grounding require GFCI-protected circuits and non-ground-dependent sensors.
- Turn OFF power at the breaker: Use a non-contact voltage tester to confirm zero potential before touching any wires.
- Wire the sensor: Connect LINE (hot incoming), LOAD (to lights), NEUTRAL (if required), and GROUND (bare copper). Use waterproof wire nuts (e.g., Wing-Nut W-60) and silicone sealant inside the junction box.
- Mount securely: Use stainless steel screws and anchors rated for masonry or wood. Ensure the sensor’s lens faces unobstructed coverage zone.
- Calibrate sensitivity & duration: Set sensitivity to “Medium” initially. Adjust time delay between 30 seconds (pathway accent) and 5 minutes (front yard display). Test with slow, deliberate walking—not jogging—to avoid missing detection.
After calibration, observe operation for 48 hours across varying conditions: early evening (dusk transition), midnight (full dark), and pre-dawn (cold, dew-heavy air). Fine-tune only after confirming consistent behavior.
Real-World Case Study: The Maple Street Porch Project
In Portland, Oregon, homeowner Lena R. installed 1,800 LED lights across her Craftsman-style porch—including animated icicle strands, a fiber-optic tree, and a projection-mapped wreath. Her initial setup used a $22 indoor motion sensor mounted under the eave. Within three days, lights triggered randomly every 90 seconds—caused by falling pine needles, gusts shaking hanging ornaments, and reflected infrared from frost forming on the windowpane.
She replaced it with a dual-tech sensor (Leviton DOS05-1LW) rated for 600W LED, mounted on a south-facing bracket angled away from the gutter and window. She added a 15-minute timer override (so lights stay on for guests) and set sensitivity to “Low-Medium.” Crucially, she separated the high-draw icicle strands (320W) onto their own sensor and kept low-power accent lights (110W) on a second unit—reducing inrush stress. Result: 98% reliable triggering, zero false alarms over five weeks, and a 42% reduction in display runtime versus all-night operation.
“Motion sensors aren’t about cutting corners—they’re about intentionality. Every trigger should feel like a curated moment, not a startled reflex. That means respecting physics, load limits, and environmental variables—not just plugging in and hoping.” — Carlos Mendez, Lighting Designer & NEC Article 410 Consultant
Do’s and Don’ts for Reliable, Safe Operation
Even experienced installers overlook subtle pitfalls. These distilled best practices come from incident reports filed with the Electrical Safety Foundation International (ESFI) and field notes from holiday lighting contractors:
| Do | Don’t |
|---|---|
| Use GFCI-protected outlets or breakers for all outdoor circuits—even if the sensor has built-in GFCI. | Install sensors where snow drifts will bury the lens or where icicles may form directly in front. |
| Test sensors monthly during the season—especially after storms or rapid temperature drops. | Ignore manufacturer-specified minimum operating temperatures (e.g., -22°F / -30°C). Below that, PIR sensitivity degrades significantly. |
| Group lights by function: pathway lights (short duration), entry lights (medium), and show pieces (longer duration or manual override). | Use extension cords as permanent wiring. All connections must be in weatherproof enclosures rated for wet locations. |
| Label all circuits clearly at the breaker panel: “Front Porch Motion,” “Driveway Sensor,” etc. | Assume smart-home integration is plug-and-play. Many “Works With Alexa” sensors lack outdoor certifications or proper load handling. |
FAQ: Troubleshooting Common Issues
Why do my lights flicker or turn off immediately after triggering?
This almost always indicates an overloaded sensor or incompatible LED driver. Many inexpensive LED strings have poor power factor correction, causing brief voltage dips that reset cheap sensors. Solution: Replace the sensor with a dual-tech model rated for LED loads, or add a 1000µF/25V electrolytic capacitor across the LOAD terminals (consult an electrician first). Also verify no other high-draw appliances (garage door opener, furnace) share the same circuit.
Can I use one motion sensor to control multiple lighting zones with different behaviors?
Yes—but not directly. Use the motion sensor to trigger a programmable relay module (e.g., Shelly Pro 1PM or Zooz ZEN17) that can activate separate circuits with independent timers, delays, or even dimming profiles. This avoids complex multi-pole sensors and gives precise control: e.g., porch lights brighten instantly, while garden lights fade up over 3 seconds.
How do I prevent pets or wildlife from triggering my display?
Raise the sensor mounting height to 8+ feet and narrow the detection angle using included masking tape or an adjustable bracket. Dual-tech sensors inherently reject small-mass movement—so upgrade if you’re using basic PIR. Also, avoid aiming near bird feeders, compost bins, or fence lines where squirrels travel. Some models (like the Bosch ISN-P2) offer “pet-immunity” modes that ignore heat signatures under 40 lbs.
Conclusion: Light with Purpose, Not Just Presence
Motion sensors transform outdoor Christmas lighting from static decoration into responsive storytelling. They conserve energy, reduce light pollution, extend bulb life, and create genuine moments of delight—when implemented with technical rigor and environmental awareness. Success isn’t measured in how many lights you can trigger, but in how meaningfully each activation connects: the warmth of welcome, the hush before wonder, the shared smile when light answers presence. Start small—automate one entryway. Measure your load. Respect the weather rating. Calibrate deliberately. Then expand with confidence. Your neighbors won’t just notice the lights—they’ll remember how they made them feel.


 浙公网安备
33010002000092号
浙公网安备
33010002000092号 浙B2-20120091-4
Comments
No comments yet. Why don't you start the discussion?